Friday, November 3, 2023

Happy Holidays Shaker Card

The current theme for Christmas Card Throwdown's challenge is shaker cards. I decided to challenge myself further & make a shaker card using 4 stamps from Hero Arts' "North Pole Express" set & their coordinating dies to make one window. I'm happy to report I succeeded! :)


I did a test run for the image stamping & die cutting on scrap cardstock to make sure my idea would work before going to my "good" paper. This also gave me a template to help me line up my images on my card panels. I cut 2 pieces of Strathmore Smooth Bristol paper to 5-1/2x4-1/4". I positioned the first in my MISTI stamp positioning tool, & lined up my test run guide with that to place the first stamp. I stamped that in Versafine Onyx Black ink, and without moving my stamp, repeated on the second piece of bristol paper. I did this for each of the other stamps to create my train. Stamping both panels at the same time ensured that my images on the background would line up with the window on the front panel.

I cut a piece of patterned paper from my stash to the same size as my bristol panels, & used low-tack painter's tape to attach it temporarily to the back of one of my bristol panels. I lined up one of the coordinating dies over the stamped image on the bristol, & die cut it through both the bristol & patterned paper panels. I did this process for each of the other images, and then removed the tape attaching the two panels. I adhered the patterned paper panel to the front of the bristol panel, making sure the die cut openings lined up. I adhered a piece of acetate to the back of this panel, & added 2 layers of foam tape to create the well for my clear seed beads. I added the beads into the well, and adhered a second piece of acetate to the back to seal my shaker. This is a tip I got from Nina-Marie Trapani, which both helps shaker bits move more freely & makes it easier to line up the shaker over an image panel.

On my other bristol panel, I used my Zig Clean Color Real Brush markers to color the images. I adhered my shaker panel over that, making sure to line up the window opening with the images. I used liquid glue to stick the "inner" pieces of patterned paper from the die cuts to the shaker window. I stamped my greeting, also from "North Pole Express," in Lawn Fawn's Guava ink onto a scrap of white cardstock & cut that into a banner. Finally, I adhered my banner in place & added my card front to a white A2-size card base. I am so happy with how this card came out, & as a bonus, I have 4 more of these images that I can color & add to another card!

I'm also entering this card in the following challenges:

Friday, October 27, 2023

Merry Christmas Mouse


This week's challenge at Christmas Card Throwdown is "Christmas Cup." I have had this panel with the "Sweet Cocoa" digital image from Sweet 'n Sassy Stamps on my desk for at least a year or 2, waiting for me to color it & make a card around it. This challenge inspired me finally to do just that!


To create the original focal panel, I opened the image in Photoshop & resized it to fit a panel as per an old Operation Write Home sketch. I typed the Merry Christmas words along the rim of the cup, making sure to delete the text where Cocoa's paws covered it, just to increase the realism. Then I printed it onto a piece of Canson XL Mixed Media paper. And, as I said, it has sat on my desk ever since.

I used my Prismacolor pencils to color the image, & then matted it with red cardstock. I adhered 2 scraps of patterned paper from my stash to a panel of the same red cardstock, & adhered my focal panel. I glued 3 buttons to my card front, let the glue dry (well, mostly - I did get impatient!), & then pierced holes through the buttons into my background and stitched through the buttons with white crochet twine. I had to squirt a little more glue under the buttons, just to anchor them further. (I did let that dry thoroughly!) Finally, I added my card front to a white A2 card base.

I'm also entering my card in the following challenges:

Saturday, October 14, 2023

Merry Christmas Wreath


I am so happy & excited to be the guest designer for Christmas Card Throwdown! The challenge this week is to use red & brown on your card. So get out those inks, stamps, dies, & papers and get making!


This color scheme made me think of a rustic look. Which led me to kraft cardstock. I wanted to try stamping a wreath with Distress Oxide inks, using Gina K Designs "Holiday Wreath Builder" set & her Wreath Builder template. I die cut a 4" square of kraft, & stamped the flowers, berries, & berry branches with different red inks. I also brought in Vintage Photo ink for the pinecones. I had to stamp the red elements 2-3 times each, but I was just glad that it worked out. Then I had to decide what to do with my panel!

I didn't want just to slap the square on a card, add a greeting, & call it done. So I die cut the wreath out with circle dies. I didn't like the doughnut look of it, so I figured I'd try fussy cutting. I took a cue from Kristina Werner, & penciled an cutting line around the inside & outside of my wreath first. If you make an errant pencil line, it's easy to erase. An errant cut with scissors is impossible to fix. I fussy cut the inside first, which wasn't easy! But I took my time, & it worked. The outside perimeter was much easier. After I finished cutting, I erased any pencil lines that still showed.

I stamped my background panel with Altenew's "Wood Pallet Background" (discontinued) & Gina K Charcoal Brown ink. Then I blended over that with Walnut Stain Distress ink. I wanted a bit more shading around the edges, so I brought in a bit of Black Soot Distress ink.

For the greeting, I stamped the Merry Christmas from Hero Arts' "Color Layering Gingerbread House" set (discontinued) onto a scrap of kraft cardstock with Lumberjack Plaid Distress Oxide ink. I added clear embossing powder over that, & melted it with my heat tool so I could do a bit of emboss resist. I cut the greeting out with a Spellbinders "Grommet Tags" die (discontinued). I put the die cut back in the die, & inked through the opening with Brushed Corduroy Distress ink, just to provide a bit of contrast.

I adhered my wreath to my background with foam tape, & glued the greeting label down flat. After I matted my panel with red cardstock that I'd adhered to a white A2-size card base, I added Bright Gold Nuvo Crystal drops to the label to look like decorative nail heads. I went over the berries on the wreath with Rhubarb Crumble Nuvo Crystal drops for a bit of added shine & interest. And that finished off this card! I am happy with how the card came out in the end. Now it's your turn to make a red & brown Christmas card (or more than 1!) and enter it in this week's challenge. Have fun!

Sunday, September 17, 2023

Happy Bird-day


This is my second card for Lawn Fawnatics' current color challenge. I was able to use leftover leaf die cuts from my first card I made for this challenge, which were actually the inspiration for the design of this card.

I used the center panel from my die cut frame for my first card for the background on this one. I ink blended a sky with Salvaged Patina Distress ink. I also die cut a scrap of yellow cardstock with the same "Small Stitched Rectangle" die that I'd used for the background, so it would be the same width & carry the stitching detail on down. I cut the top edge of that piece with one of the "Stitched Hillside Borders" dies.

I stamped the images, from Lawn Fawn's "Special Delivery" & "Special Delivery Box Add-on," onto Strathmore Vellum Bristol paper. I used my Prismacolor pencils to color them, then cut them with the coordinating dies. I ink blended over the top of the strings die cut with Salvaged Patina, so it would blend into the sky. After I glued the strings to the box, I used a black marker to draw the ribbon & box lines across the strings die cut, then colored over the white edges with the same pencils as I'd used on the box.

I wanted to put the greeting in a speech bubble, but didn't have one that was the right size. I stamped the greeting on white cardstock, & then die cut it with one of the coordinating dies for "A Birdie Told Me." I made sure to place the die so the right side was close to that side of the greeting. Then I shifted the die cut in the die, & ran it through my machine again to make the speech bubble shorter. I misjudged the die placement the second time, so the greeting was off-center. But I just stamped the little heart from "Special Delivery" to fill in the space.

I glued my leaves along the bottom of the panel, & then glued my images in place. After I trimmed off the overhanging bits of the leaves, I adhered my panel to a cream mat that I'd mounted to a white card base. I will send this card to Send a Smile 4 Kids, to help a hospitalized child celebrate their birthday.

I'm also entering this card in the following challenges:

The Paper Funday Challenge #57: "Anything Goes" (not playing the optional twist)

Saturday, September 16, 2023

I Be-leaf in You


Lawn Fawnatics is having a color challenge at their blog. I don't have most of the ink colors they suggested as matches, but chose some Distress inks that looked pretty close. I got the inspiration for my design from this card I found on the Lawn Fawn website. I created this card to send to Send a Smile 4 Kids, hopefully to cheer up a hospitalized child.

For the background, I cut a panel of 140 lb. watercolor paper. I used Picked Raspberry, Seedless Preserves, & Evergreen Bough Distress inks to ink smoosh on my panel. Once I had covered the background with color, I felt it was a little too bold for what I wanted. So I squeezed a little white acrylic craft paint on my non-stick mat, thinned it with a bit of water, & smeared it onto my paper with my finger. I wanted just a little more color, though, so when the paint layer dried, I ink smooshed a bit more Evergreen Bough onto the panel. I dried it with my heat tool, then set it aside while I worked on the other elements for my card.

I die cut several leaves from watercolor paper, using the "Stitched Leaves" & "Small Stitched Leaves" sets from Lawn Fawn. I ink smooshed them with the same colors as the background, adding in Fossilized Amber & Shabby Shutters Distress inks. The Shabby Shutters came out a bit too pale, so I smooshed those a second time with Mowed Lawn ink. I did 2-3 colors on each leaf, just for interest.

I stamped my images, from Lawn Fawn's "You Autumn Know" stamp set, onto Strathmore Vellum Bristol paper. I used my Prismacolor pencils to color them, then die cut them with the coordinating dies. I also cut a few more plain die cuts for each image, then stacked them behind my images. This gives them some dimension so they stand out a bit from the background.

I glued my leaves around my background, as in the inspiration card, & cut off the bits that overhung the edges. For the frame, I used the largest of Lawn Fawn's "Large Stitched Rectangle" & "Small Stitched Rectangle" die sets. I nested the smaller inside the larger, and ran them through my die cutting machine with white cardstock. I added a few cardstock strips behind the sides of my frame to beef it up a bit, then adhered it to my card. I glued my images in place, overlapping the frame slightly. I stamped the greetings onto white cardstock. I don't have any banner dies to cut on that particular curve, so I penciled an outline around each & cut them out with scissors. I went over the eyes of the mouse on the leaf with a black glaze pen to help them pop, glued my banners in place, & that finished this card.

I'm also entering this card in the following challenges:

The Paper Funday Challenges #57: "Anything Goes" (not playing the optional twist)

Friday, September 15, 2023

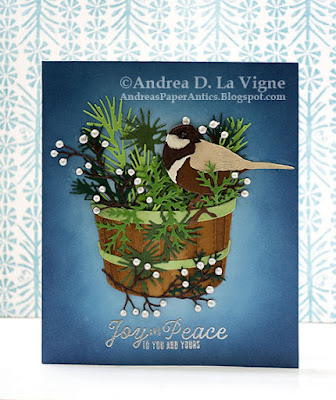
Joy and Peace


This has been the second week of the September challenges at Christmas Card Throwdown. This challenge is a color challenge to use green, brown, & blue. I admittedly struggled a bit, not so much because it's a difficult color combo (I don't think it is), but just trying to decide how I wanted to incorporate those colors into a card. Plus, trying to get into the holiday card making mentality. But, it's the second week of September, & the holidays will be here before we know it. So I decided to take the plunge & get making! :)


My design inspiration came from a home decor piece we have that is a bird sitting in a basket, surrounded by an autumnal arrangement of greenery & fruit. I decided to create something similar with a more wintry feel. For the basket, I chose Concord & 9th's "Freshly Picked" die set. The bird came from Honey Bee Stamps' "Lovely Layers: Winter Birds" die set, & the foliage from Sizzix/Tim Holtz's "Holiday Greens" die set. I pulled the greeting from the October 2020 My Monthly Hero Kit from Hero Arts (discontinued). 

I chose a few different shades of brown cardstock from my scrap stash for the bird. I die cut the pieces,  & then used liquid glue to assemble the bird. Instead of die cutting the beak & eye, since they are so tiny, I used a black pen to color in the beak & added the eye with Ebony Black Nuvo Crystal Drops.

I die cut the greenery from an assortment of green cardstocks - also from my scrap stash. I used kraft cardstock to die cut the base pieces for the basket, & a pale green for the bands. For the berry branches, I used dark brown cardstock. I'm happy to say, except for the card front panel, I actually used only scraps for all the elements!

For the basket, I used Gathered Twigs Distress ink to shade both of the kraft pieces. I added additional shading to the edges of the back piece with Walnut Stain Distress ink, & used Bundled Sage to shade the green bands. Finally, I glued all the pieces together. I arranged my greenery & berry branches in the basket, gluing them to the back of the basket as I went. After I had a few greenery pieces glued in place, I went ahead & added my bird so I could better integrate him into the arrangement. Finally, I glued one branch & a green sprig to the front of the basket.

I had initially intended to make this an A2-size card, but when I laid my completed basket arrangement on a panel, I quickly realized I had to upsize! I cut a 5x7" panel from light blue cardstock, but decided that was a bit too tall, so I cut it 1" shorter, to a final size of 5x6". I ink blended around the outside of the blue panel with Faded Jeans Distress ink, then added Chipped Sapphire around the very edges to darken that area up. I left the middle with no ink, to create a glowing effect around my focal point.

After I finished ink blending & adhered my card front to a white card base, I glued down my arrangement. I struggled with the placement a bit, since if I centered the whole piece - measuring from the end of the bird's tail on the right to the edge of the greenery on the other side, the basket itself was off-center. I finally just kind of "fudged" it a bit, so that while nothing is perfectly centered, it still looks balanced. Then I added the berries with Ivory Seashell Nuvo Crystal Drops. I let all that dry overnight, and finished by heat embossing my greeting with Ranger Silver Super Fine Detail embossing powder.

I'm also entering this card in the following challenges:

The Paper Funday Challenges #57: "Anything Goes" (not playing the optional twist)

Saturday, September 2, 2023

Peaceful Lighthouse


This card took quite a bit of pre-planning & also focus while I was making it. Thankfully, I was able to use the masks from the Waffle Flower "Lighthouse Stencil-n-Stamp" set I used for the bulk of my design to help me determine where to position everything before I started stenciling & stamping.

Once I had my design worked out, I began by ink blending the sand area with Distress inks. I used Antique Linen first, and then darkened/warmed it with Tea Dye. I added Chipped Sapphire over the area to the far left, just to differentiate that spot & make it look "rocky."

I positioned the sand & lighthouse masks to protect those areas, & then ink blended the sky with Mustard Seed, Wild Honey, Worn Lipstick, & Chipped Sapphire Distress inks. That was probably the easiest part of the whole card! After I had all the colors down, I added the light beam with that stencil & Lawn Fawn's Yeti white pigment ink.

For the water area, I taped the Hero Arts "Waves" stencil (discontinued) in place, & masked above it with yellow Frog tape. I ink blended with the same colors as the sky, minus the Chipped Sapphire. Then I removed the stencil. The white areas that the stencil had covered seemed a bit too stark, so I blended over them with the same colors as before to try & get a tone-on-tone effect. That didn't give enough contrast, though, and the colors actually looked kind of "mushy." So I positioned the "Waves" stencil back where I had had it, & inked over it with Chipped Sapphire, making sure to go dark enough that it covered the underlying colors, rather than just blending with them. It's a rather stylized look, but I think it came out OK.

I removed just the lighthouse mask, & stamped the lighthouse with Versafine Onyx Black ink. I stamped it about 3 times, just to get a good solid coverage. The area right above the sand mask didn't really stamp due to the thickness of the mask under the bottom of the stamp. Fortunately I was able to use a black marker to fill in the missing part. I also stamped the birds in black. I used the stencil to add the light in the windows. I blended yellow & pink ink to the top part where you can see through the glass to the sky behind. To add a little something extra in the corners, I pierced holes & made French knots with a pale rose embroidery floss. Finally, I matted the panel with blue cardstock & adhered it to a white A2-size card base. I decided a greeting on the front would detract from the scene, so I'll just write a personal message inside.

I'm entering this in the following challenges:

Thursday, August 31, 2023

With Deepest Sympathy


The mother of a friend of ours recently passed away, so I made this sympathy card to send. The photo for Inspiration Station's Challenge #52 served as my jumping-off point. In particular, I was drawn to the butterflies, wildflowers, & the colors and ethereal quality of the atmosphere.

I began by die cutting a piece of 140 lb. watercolor paper with one of the "Nested A2 Arches" dies from Scrapbook.com. I inked it with Salvaged Patina, Mustard Seed, & Shabby Shutters Distress inks. I spritzed water droplets onto the panel, let them sit for a minute or two, then picked the drops up with a towel. I wanted kind of a 2-tone effect, with some spots darker than others, so I inked over the Mustard Seed area with Squeezed Lemonade Distress ink & added another layer of Shabby Shutters at the bottom of the panel. (I didn't feel the Salvaged Patina area needed another layer of ink.) Then I spritzed more droplets on & soaked them up.

I die cut 3 of the Sizzix/Tim Holtz "Wildflowers" from white cardstock. I inked the flower portions with a Versamarker pen, and added a coat of Abandoned Coral Distress Embossing Glaze. I repeated the process once again to get a more solid coating. Then I did the same with Mowed Lawn Embossing Glaze for the stems & leaves. I glued them to my background, & trimmed off the overhanging bits. I then adhered my arch to a navy mat.

I stamped one of the Picket Fence Studios "Butterfly Beauties" butterflies onto a scrap of green cardstock with Lawn Fawn's Deep Sea ink. I die cut it with the coordinating die, & also die cut 2 more butterfly shapes from the same cardstock. Using a trick I learned from Jennifer McGuire, I folded each of the plain die cuts in half. I glued half of one behind the left half of the stamped butterfly, and the other behind the right half. Then I glued just the other halves of the folded butterfly die cuts to my card front, so the stamped one would pop up slightly.

I chose a greeting from Simon Says Stamps' "Sympathy Greetings Mix" stamp set (discontinued). I had initially planned to stamp the greeting on a strip of cardstock & adhere it to my card. But I was pleasantly surprised when I discovered that this particular greeting nestled perfectly along the curve of the arch with the flower under it. So I used Deep Sea ink to stamp it there. Talk about serendipity! Finally, I added my card front to a white A2 card base.

Friday, May 26, 2023

Happy Mother's Day


I based the design & floral embellishments for this card on Try Stampin' on Tuesday's Sketch #607 challenge.


I began by creating the flower layers with an old punch from The Paper Studio. I punched 3 layers for each flower, then glued them together, adding glue just to the centers. I finished them off by adding a gem in the middle of each.

I embossed the panel to go behind the flowers with the "Floral Fantasy" embossing folder from Cuttlebug (discontinued). I matted it with navy cardstock to help it stand out, then adhered that to my white A2 card base.

I cut a strip from an inky background I'd made several months ago. I adhered that to my card, and then glued the flowers over it.

I stamped a greeting from Simon Says Stamp's "All About Mom" stamp set in Lawn Fawn Deep Sea ink. Finally, I die cut a vine using one of the Spellbinder's "Sprigs" dies (discontinued), and glued that next to the greeting.

I'm also entering my card in 613 Avenue Create's May challenge: "Anything Goes" (playing the optional twist of "Say It with Flowers")

Saturday, May 6, 2023

A Better Dad


I am excited to be the Guest Designer for this month's challenge at Send a Smile 4 Kids! Their theme this month is "Cards 4 Dads/Special Guys." I created this Father's Day card to go along with that theme. My design is based on Sketch #SC783 at Splitcoaststampers.com.

I stamped the mice & dandelion (from Lawn Fawn's "Dandy Day" set) onto a scrap of Strathmore vellum bristol paper. I colored them with my Prismacolor colored pencils. It doesn't show up much in the photo, but I added a little light grey to the fluff on the dandelion. Then I die cut them with the coordinating dies. I actually had to redo the dandelion, since I apparently really messed up aligning the die with the stamped & colored image! So I tried die cutting first, taping the die cut from the back into the negative space, lining up the stamp with the die cut, & stamping. It's still not absolutely 100% perfect, but like Jennifer McGuire says, it's handmade, not Hallmark!

For the background scene, I used one of the "Grassy Hillsides Borders" dies from Lawn Fawn to cut the grass from green cardstock. I added a bit of shading with Mowed Lawn Distress ink. I wanted the father & baby mouse to be looking up at the other mouse, hence my decision to have them on a hill. I found a blue patterned paper with a bokeh look that I'd gotten as a gift with purchase from Lawn Fawn. I thought the bokeh supported the magical idea of blowing dandelions, so I used it for the sky. I adhered my sky & grass pieces to a backing of white cardstock, just so I didn't have to fiddle with them as smaller individual elements. After gluing down my mice & dandelion to the background, I also stamped the flying seeds on the sky paper.

I stamped my greeting, also from "Dandy Day," in black on a scrap of grey cardstock. I cut that into a strip, as per the sketch. I adhered my strip & scene panel to a piece of patterned paper from Crate Paper's "Botanical Gardens" 6x6" pad. Finally, I mounted my card front to a white A2-size card base. 

Friday, March 17, 2023

Happy St. Patrick's Day


I used the sketch for Try Stampin' on Tuesday's Challenge #597, plus the photo from Inspiration Station's Prompt #47 challenge as the basis for my card. The inspiration photo made me think of Ireland - perfect for a St. Patrick's Day card!

I used Honey Bee Stamps "Plaid Background" stencils (discontinued) to create my background. For the hashed stripes, I brought in a stamp from My Favorite Things' "Plaid Background Builder" set (also discontinued). I used Twisted Citron & Salvaged Patina Distress inks for the stenciled portion of the plaid, & Mowed Lawn Distress Oxide ink for the stamping.

I googled "Irish blessing" to get the blessing for the main panel. I found one (I forget the site name), & decided it fit with the sketch design perfectly. I created a blank "canvas" in Photoshop the size I wanted the main panel. I copied & pasted the text for the blessing, & formatted it with the Celtic Hand font. It took a bit of fiddling with the font size to get the lines of text to come out how I wanted, but I prevailed! I printed that onto a panel of light green cardstock. I also created the greeting in Photoshop, using the Ramsey SD font. I printed that onto a strip of light blue-green cardstock.

For the shamrocks, I created a pattern using the custom shape tool in Photoshop. I printed that onto copy paper. The cardstock I chose to stitch on was too thick to see through to use my lightpad to transfer the pattern. So I traced the pattern onto tracing paper, placed that on the back of each circle, & used it as a guide to pierce my stitching holes. I used green DMC floss to do the stitching.

To assemble my card, I adhered the plaid panel to a white A2-size card base. Then I added the greeting strip & stitched circles. At this point, I realized I'd forgotten to add the twine. I prefer to keep the insides of my cards "clean," so I carefully peeled away the top part of the front plaid panel, & taped the ends of a length of twine behind the panel. Then I tied a knot with another piece of twine around the first. I used a little liquid glue on the knot to keep it from coming untied, & added more glue behind the knot to keep it in place. I stuck the top of the background panel back to the card base, & that finished this card.

I'm also entering this card in Double Trouble's Challenge #133, "Use the Color Green." I'm playing the optional twist of adding plaid.

Thursday, March 9, 2023

You're a Winner


I created this card based on the sketch for Try Stampin' on Tuesday's Challenge #596. I rotated the sketch 90 degrees. For the purple banner in the sketch, I have a panel running the height of the card. I used the white block for my greeting.


I began by stamping the game controller from Simon Says Stamp's "All Boy" stamp set (discontinued). I colored it with my Zig Clean Color Real Brush markers, then fussy cut it. I stamped my greeting onto a strip of patterned paper from the Recollections "Paddywack" 6x6" pad with Mermaid Lagoon Distress Oxide ink.

I die cut a circle from pink houndstooth paper from the My Mind's Eye "Adorbs" 6x6" patterned paper pad, & glued it to my background panel. I trimmed down a scrap from an inky technique piece I'd done months ago that has been sitting on my desk, & adhered it overlapping the circle, as per the sketch. I glued the greeting banner & game controller in place, & and adhered the panel to a white A2-size card base.

Wednesday, February 15, 2023

Hope Your Day Blooms with Happiness


The current Lawn Fawnatics challenge is "Interactive Cards." I created this card with Lawn Fawn's "Magic Picture Changer" & "Magic Picture Changer Add-on" die sets. I also used the "Garden Before 'n Afters" stamp set for the images & greeting.

I began by tracing the openings with a pencil in the 2 dies that create the magic picture changer onto pieces of Strathmore Smooth Bristol paper. This helped me to know where to stamp my images so they would both show up in the window. I stamped the images on their respective panels, & colored them with my Zig Clean Color Real Brush markers. Then I lined the dies up & cut out the pieces.

I die cut the frame for the magic picture changer from a patterned paper from Lawn Fawn. (I don't know the name, as it was just a gift with purchase.) After I assembled the magic picture changer, I adhered the frame in place, making sure my adhesive didn't interfere with the mechanism. I die cut the "pull" stopper piece from pink cardstock, & glued it to the pull tab. I also heat embossed my greeting with white embossing powder onto the same pink cardstock, cut it into labels, & glued those to the frame.

I die cut a piece of plaid patterned paper (another gift with purchase from Lawn Fawn) with the largest of Lawn Fawn's "Large Stitched Rectangle" dies, & adhered it to my white A2-size card base. I adhered the magic picture changer with foam tape, to make it easier for the recipient to pull the tab. And that finished this card!

Tuesday, January 31, 2023

Out of This World Birthday

I had created a multi-colored inky background following a Jennifer McGuire tutorial that came out not to my liking. I was kind of disappointed at my "fail," since I had followed her instructions to the letter. Rather than chuck it, though, I decided to do something different with it. So I inked over the whole panel with Black Soot Distress ink & splattered with Gansai Tambi Starry Colors White Gold watercolor to make a galaxy background. That became the basis for this birthday card.

I stamped several images from Lawn Fawn's "Beam Me Up" set onto scraps of Strathmore Smooth Bristol paper, and colored them with my Zig Clean Color Real Brush Markers. For shading & added dimension, I used a damp paintbrush to draw more diluted color out to the highlight areas. Finally, I die cut them with the coordinating dies.

I used an oval die to cut the "planet" from light grey cardstock, & adhered that to the bottom of my background panel. I trimmed off the excess, & glued my images to that. I stamped a greeting from "Beam Me Up" in black on the bottom of the planet. I matted the panel with a dark plum cardstock, & adhered that to a white A2-size card base. Finally, I used Ranger Multi Medium Matte to glue googly eyes on to each of the aliens. I love how this card came out, & I think it will bring a smile to a child's face. And to think, it all started with a "failed" background!

I'm entering this card in the following challenges: