Tuesday, February 27, 2018

Happy Spring Chicks


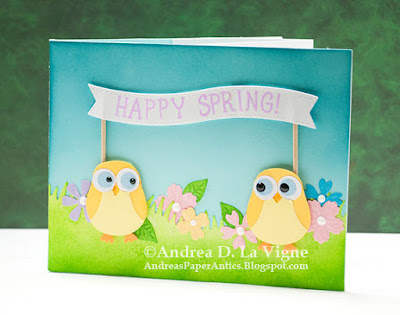
This month's challenge at Live Love Cards has been about birds. I decided to create this "Happy Spring" card, using Stampin' Up's "Owl" punch (discontinued) to make chicks. After seeing a YouTube video tutorial at Maymay Made It's channel, I decided to make this an interactive card.

I began by creating my chicks. I punched the pieces for 4 little birds from yellow, blue & white cardstocks. I assembled the chicks, except for the eyes, since I wasn't sure at that point which way I wanted them to be looking. For the feet, I had punched extras of the bottom of the body part from orange, so I just cut off the yellow feet and glued the orange to the bottom back of each chick. I also die cut several flowers and leaves using the "Bitty Blossoms" set from Our Daily Bread Designs & an old "Flower & Leaf Trio" die (discontinued) from My Favorite Things. I die cut & embossed the flowers from colored cardstocks, and the leaves from Canson XL Mixed Media paper. I also die cut several grass sections from mixed media paper, for both the front & inside, using Lawn Fawn's "Grassy Hillside Borders" dies.

I used Twisted Citron & Mowed Lawn Distress inks to color the grass panels. I also used Mowed Lawn to color the leaves. I decided to add Simply White Nuvo Crystal Drops to the centers of the flowers. I also decided to use the Ebony Black Nuvo drops for the pupils on the chicks' eyes. The latter created a couple of problems for me!

After I planned my layout, I went ahead & glued on the chicks' eyes, then added the Nuvo drops, so they would have a chance to dry before I assembled my card. Unfortunately, when I was applying the drop to the second eye on the first chick, I didn't have the bottle perpendicular to my desk, so the drop kind of blobbed out to one side! I ended up having to scrape the whole eye off (gently) with my craft knife, punch a new eye, glue it back on, and then redo the Nuvo drop. This time, I made sure I held the bottle right! I didn't have that problem on any other chicks, though I did mess up one after the fact, when I put my hand in the wet drop! So I had to scrape, re-punch, re-glue, and reapply the pupil to that one as well.

View of inside of card
For my card base, I used 2 pieces of cardstock cut to 11x4.25", rather than the folded single letter-size sheet that Maymay used. I scored one in fourths (along the long side), and scored the other just in the middle, at the 5.5" mark. I had noticed on hers, because she scored the whole sheet, that the sides were a bit "floppy." So I decided to score the "outside" sheet just in the middle, to avoid this floppiness. I die cut an oval in the 2 middle panels of the inside piece, with a Spellbinders "Classic Ovals LG" die. To create a "sky" backdrop, I adhered a piece of blue cardstock to the inside of my "outer" panel (the one I'd scored only in the middle). I also cut & scored the inner strips to put my elements on for the box part, and glued them in place.

Close-up of inside scene
I used liquid glue to adhere my grass pieces in place on the strips inside the box, and ATG adhesive to apply the grass to a panel of blue cardstock that I'd cut for the card front. I used Broken China Distress ink to add some shading to the sky on the front panel, just along the top & sides, to give it a bit more depth.

After I'd let the Nuvo drops dry for at least 24 hours, I went ahead and glued all my flowers, leaves, & chicks in place. I put 2 chicks on the front of the card, and 2 on the inside. Getting everything glued in place inside the box portion was admittedly a struggle, but I finally managed!

I die cut a banner with a die from Mama Elephant's "Tags a Lot" set, and stamped "Happy Spring!" with Lawn Fawn's "Claire's ABC's" in Lawn Fawn Fresh Lavender ink. I adhered that with foam tape to the card front. I then glued 2 toothpicks, one at each end. They are positioned so that it looks like either they are staked in the ground behind the chicks, or the chicks are holding them. Whichever way the viewer prefers! :) Finally, I finished adhering the inner panel to the outer, and this card was done!

Despite my struggles with this card, I'm really happy with how it came out! I am sending this to Send a Smile 4 Kids, so hopefully a hospitalized child will smile! :)

Monday, February 19, 2018

Make Today Fabulous


This is my fourth and final card for My Favorite Things' Creative Olympics 2018. The last event of the games is "Speed Cardmaking." Basically, using only MFT products, make a card in 20 minutes or less. Whew! This card is actually my third attempt. On the first try, I just ran out of time, and I messed up the stamping on the second card. I guess the third time was the charm, since I finished it with a whopping 41 seconds to spare! :)

I die cut my background panel with the scalloped rectangle from "Blueprints 20" (discontinued). I marked a line slightly above where the bottom edge of my upper panel would go, and used that to guide my stamping. I took one of the paint stroke stamps from "Abstract Art" (also discontinued) and stamped my rainbow. I began in the middle with Hero Arts Lime Green ink, then moved to Hero Arts Soft Pool & Cornflower, and Lawn Fawn Fresh Lavender inks. I finished by going right to left from the green, starting with Hero Arts Butter Bar, then stamping with Hero Arts Orange Soda & Lawn Fawn Guava.

I die cut my upper panel from white cardstock with the same scalloped rectangle die. Then, using my background panel as a guide, I taped down one of the "Stitched Scallop Basic Edges" dies, and ran it through my die cutting machine to finish cutting the upper panel.

For the greeting, I used "Simply Fabulous Sayings." I used my Stamp-a-Ma-Jig to help with placement, since I was running low on time. I stamped the "Fabulous" first with Delicata Black Shimmer ink. I had cut apart the "Make Today" stamp from the same set, so I could stamp the words on either side of the "l" in "Fabulous." I stamped those in Black Shimmer as well. Finally, I covered the back of that panel with foam tape, and adhered it to my background, lining up the scallops along the 2 sides & top. I mounted my panel to a white card base--and stopped my timer! I was so glad to get this done, and successfully to boot! :)

Happy Birthday Fancy Fold


My Favorite Things' Creative Olympics 2018 continues! I created this card for their "Crafty Biathlon" event. I chose the options of camouflage die-cutting with an alternative fold (center step card).

After creating my card base, I started on stamping my center panel. I used MFT's "Abstract Art" stamp set (apparently discontinued) with Memento Dandelion & Grape Jelly; Hero Arts Fresh Peach & Raspberry Jam; and Lawn Fawn Guava inks. I stamped several of the splatters on a panel of white cardstock. I then stamped the side panels with one of the candle images from "Big Birthday Sentiments," using the same ink colors plus Memento Cantaloupe for the bottom candles. Finally, I used the other candle image from "Big Birthday Sentiments" for the long strip along the bottom.

Once I had finished all the stamping, I die cut the word "Happy" from my main panel with one of the "Happy Duo" dies (discontinued) from MFT. I also die cut it 5 more times from purple cardstock. After I matted the panel with the same purple cardstock, I glued in one of the purple happy die cuts, and glued the centers of the letters from the stamped panel. I stacked the rest of the purple die cuts on top, using liquid glue to adhere them, and finally glued the stamped happy on top.

Detail shot of the camouflage die cut greeting
For the "birthday," I used one of the stamps from MFT's "Birthday Greetings." I masked off everything on the stamp but the birthday word, inked it up with Versamark, removed my masking tape, and stamped onto a scrap of vellum. I heat embossed that with Ranger Super Fine Detail Gold embossing powder, and trimmed it into a small strip. I used a piece of Kool-Tak clear foam tape behind the middle, and Plus vellum adhesive on either end to adhere it over the bottom of the "happy" die cut.

After matting my strips with purple, I adhered them and my main panel in place on the card base. I really like how this card turned out, & I hope whoever I send it to likes it, too! :)

I'm also entering this card in the following challenges:

Simon Says Stamp's Wednesday challenge: "Add a Die Cut"
Through the Craft Room Door: "Anything Goes"

Saturday, February 17, 2018

Have a Lovely Birthday


This card is for the "Freestyle" competition in My Favorite Things' "2018 Creative Olympics." Participants can create any sort of card they want, but the kicker is that it has to be a winter-themed card. I decided to create a birthday card. I used the "Sophisticated Snowflake" stamp set (discontinued), the "Birthday Greetings," and the "Blueprints 15" die set (also discontinued) for my card.

I began by die cutting my panels with the "Blueprints 15" dies. I cut the stitched rectangle and the smallest wonky rectangle from teal cardstock, and the middle panel from white. I knew I wanted to stitch a snowflake on the smallest panel. After I spattered White Gold paint from the Gansai Tambi Starry Colors watercolor set onto the panel, I marked the vertical & horizontal centers on the back with a pencil. I used one of the largest snowflakes from "Sophisticated Snowflake" and stamped it in Versafine Onyx Black ink onto the back of the panel, centered over my pencil marks. I used my paper piercer to poke holes along the image, and then stitched through the holes with #5 perl cotton. I did French knots in the center & along each of the "arms" of the snowflakes, following the design of the stamp.

I used 2 smaller snowflake stamps from the same set for my background. I stamped them with Lawn Fawn Yeti white pigment ink onto my panel, and let that dry. The ink kind of dries back, so it gives a more subtle pattern. After the ink had dried, I spattered it with more White Gold watercolor.

For the greeting, I marked a line 1/2" up from the bottom edge of my middle panel, and used my Stamp-a-Ma-Jig to line up my stamp along that line. I stamped with Memento Bahama Blue ink, which matches the teal cardstock pretty well. Finally, I erased my pencil line.

I adhered the white panel to the stitched rectangle, and used Scor Tape to adhere the small blue panel on top. Finally, I mounted the panel to a white A2 card base, which gave about a 1/16" mat on all sides of my panel.

Thoughts & Prayers


My Favorite Things has been celebrating the Olympic Games by having their own set of "games." This is my entry for the "Stamping Slalom" challenge, which is to use at least 3 MFT stamp sets to create a card. I used "Get Well Wishes," (discontinued) "Watercolor Flowers," (apparently also discontinued) & the "Romantic Script" background stamp. (I trust a background stamp counts as a "set"!) I also used the "Blueprints 20" die set (also discontinued).

To create my "patterned paper" background panel, I first die cut a piece of white cardstock with the stitched rectangle die from "Blueprints 20." I masked off the edges outside the stitching lines with blue painter's tape, to maintain a clean border while I stamped. I stamped several flowers, using "Watercolor Flowers," on my panel. For the yellow flowers, I used Memento Cantaloupe, Hero Arts Butter Bar, & Simon Says Stamp Sunshine inks. I chose Altenew Frosty Pink and Hero Arts Bubble Gum & Pale Tomato for the pink flowers. The purple inks are Memento Lulu Lavender, Lawn Fawn Fresh Lavender, & Hero Arts Orchid. I used Memento Danube Blue for the flower centers, and Altenew Frayed Leaf & Forest Glades with Hero Arts Moss ink for the leaves.

Detail of script stamping over/behind the flowers

After I had finished stamping the flowers & leaves, with the tape still in place, I inked up a portion of the "Romantic Script" background stamp with Memento Desert Sand ink. I didn't mount the stamp on a block, but just curved it to stamp partial impressions on my background. I wanted a subtle texture--nothing "in your face." Once I had finished that, I removed the tape from around the edges.

For the quilt-like panel, I first die cut the frame from lavender cardstock with the "Blueprints 20" die. I die cut 6 of the heart squares with the same die from a paler lilac cardstock; and finally cut hearts (again with the same die) from pink, green, & yellow cardstocks. I glued the frame to my background, then glued the squares (minus hearts) in place, and finally glued the hearts in the squares.

I used Lawn Fawn Yeti ink to stamp one of the greetings from "Get Well Wishes" on a banner I'd die cut with another "Blueprints 20" die, then heat embossed it with Recollections Snow embossing powder. I had heard the tip about using white pigment ink for white heat embossing--that it can give better results--from another card maker on YouTube. Unfortunately, I found my results were rather less-than-ideal. So, since I had used my MISTI, I just put the banner back in place, inked up the (clean) stamp with Versamark, stamped it, and heat embossed with the same powder. Much better results. I guess I'll be sticking with my old standby, Versamark! :)

Before I adhered my greeting, I die cut a scalloped rectangle (again, from a "Blueprints 20" die), and matted my background panel. I adhered that to a white A2 card base, and adhered my greeting banner. I like this particular greeting, because even though it comes from a "get well" set, it works equally well as a sympathy greeting.

I'm also entering this card in the following challenges:

Simon Says Stamp's Wednesday Challenge: "Add a Die Cut"
Through the Craft Room Door: "Anything Goes"
613 Avenue Create #206: "Anything Goes"

Sunday, February 4, 2018

Smile


Lawn Fawnatics' Challenge #21 is an inspiration challenge. They posted a mood board, and challenged participants to create a project (using Lawn Fawn products, of course) inspired by the colors, photos, etc. I created this encouragement shaker card to send to Send a Smile 4 Kids. The colors and the bokeh effect in one of the photos inspired me.

I used the "Sweet Smiles" stamp set by Lawn Fawn for my focal point. I stamped the gumball machine & several gumballs onto a scrap of Strathmore Smooth Bristol paper with Versafine Onyx Black ink. I also stamped some of the faces included in the set on the gumballs. I hit the paper with my heat tool a bit, just to make sure the ink was dry & wouldn't smear. Then I colored the images with my Zig Clean Color Real Brush markers, adding in a red Tombow marker for the machine itself. I used a water brush to blend out the colors and add shading.

For the greeting, I used Lawn Fawn's "Owen's ABC's" to spell out "smile." I stamped with Hero Arts Red Royal & Ultra Pink inks, alternating the colors. Then I used a 1/2" circle punch to punch out the letters. I thought this alphabet set went well with the gumball theme of the card.

Before I die cut my gumball machine, I used a craft knife to cut out the center part of the "bowl," to create my shaker window. I then die cut the machine with the coordinating die, and used my 1/2" punch to punch out the gumballs. I cut a piece of vellum with a Lawn Fawn "Large Cross-Stitched Rectangle" die, positioned my gumball machine on that, and traced around where my window would be with a pencil. I cut that out of the vellum panel, and then adhered the machine, some gumballs, and the greeting letters to the vellum.

I cut a piece of red bokeh-patterned paper (from Lawn Fawn, but I don't know the name) with another "Large Cross-Stitched Rectangle" die for my background. I traced the window area through the vellum/gumball machine panel, and cut that out with my craft knife. Then I adhered my vellum panel in place, hiding the adhesive behind the images.

I used the same rectangle die as for the patterned paper to cut 2 pieces of white 2mm-thick craft foam. I traced the opening for the shaker on each piece of foam, and cut it out with scissors, a little larger than the paper opening, so the edges of the foam wouldn't show.

I backed the window in my patterned paper with a piece of transparency, and adhered that panel to my foam pieces, which I adhered together with Scor Tape. To get the best seal between the foam layers around the shaker window, I glued the foam pieces with Ranger Multi Medium Matte, just around the opening. Then I set the panel under some acrylic blocks to let the glue dry thoroughly.

After the glue had dried, I filled the shaker with the remaining gumballs and some pink seed beads. I adhered another piece of transparency over the back to seal in the shaker material. (I got this tip from Nina-Marie Trapani.) After backing the window with a scrap of the red bokeh paper, I used more Scor Tape to adhere my card front to a white A2 card base.

I'm also entering this card in Simon Says Stamp's Wednesday "Anything Goes" challenge.