

Day 2 of class was dedicated to interactive cards. I took my inspiration for my first card from Stephanie Klauck's lesson. She used a stamp of a house, and cut the door so it would open and reveal a tree behind. I didn't have that stamp set, so I used Spellbinders' "Edwardian Door" die instead.
I die cut my door once from white cardstock, and again from burgundy, just for the door part. I cut out the burgundy piece, and glued it to the white door, sandwiching a piece of yellow cardstock in between to look like the lights were on in the house.
For the background, I wanted it basically plain, but not just flat. So I cut a piece of green cardstock to 4.25x5.5" and scored lines every 1/4", to give something of a "siding" effect. Then I glued the door onto that.
 |
| Card with "door" opened |
To keep the door from contacting the Stickles when it was closed, I applied foam tape to the back of the panel. I centered the watercolored tree in the door opening, and adhered that panel behind the door. Finally, I adhered the entire front panel to an A2 card base.
My second card was inspired by Jennifer Rzasa's lesson for Day 3 of class, which focused on watercolor cards.
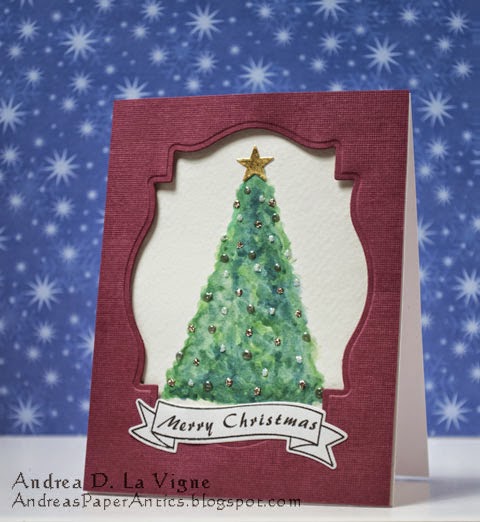
I began by die cutting & embossing a window in a piece of burgundy cardstock, using a Spellbinders' "Labels Eighteen" die. I cut a piece of watercolor paper the same size, and laid the burgundy panel on top. I made light pencil marks where the edges of the window were, and then marked out the outline of my tree. I used Masters Touch watercolors to paint the tree, and applied Mercury Glass & Star Dust Stickles, and silver dots with a Viva Paper Pen. I also die cut a star using one of the dies from My Favorite Things' "Blueprints 13" set, and glued it to the top of the tree.
I used one of the stamps from Avery Elle's "Build a Banner" set for the greeting banner. I stamped it with Versafine Onyx Black ink, and cut it with the coordinating die. I scanned it into my computer, and created the greeting in Photoshop, printing it directly on the banner.
After the "ornaments" had sufficient time to dry, I adhered the window panel over the watercolor piece with foam tape, to give a bit of dimension and shadow. I glued the banner towards the bottom, and adhered the entire panel to an A2 card base. I will be sending both cards to the Caring Hearts Card Drive, to be sent to a resident in a nursing home who might otherwise not get any Christmas cards.
No comments:
Post a Comment
I love to hear your ideas on my work, so let me know what you think!