Showing posts with label online card classes. Show all posts

Wednesday, May 27, 2020

Get Well Soon


I've been participating in Online Card Classes' "Spring Card Camp 2." On Day 8 of camp, Kristina Werner had a lesson on "Faux Dip Dye." I combined that with Julie Ebersole's lesson on Day 11 on "Anti-Coloring" for my card.

I did the faux dip dye technique first, with 140 lb. watercolor paper and my watercolors. I cut the paper a little larger than I intended the finished panel size to be, so I could tape it to my cutting board. I tore the bottom edge, and taped the other 3 sides to my board. I created a gradient that went from pink to purple to black at the bottom. I don't know that the purple tones shine through the black, as Kristina said, but I still think it looks OK. After I dried the panel with my heat tool one last time, I removed the tape & cut the paper to size.

For the "anti-coloring," I used the "Mondo Hydrangea" stamp from Essentials by Ellen. I stamped it with Versamark ink onto a scrap of white cardstock, and heat embossed with Wow Persian Indigo embossing powder. It doesn't show up in the photo well, but it is very shiny & glittery in real life. I die cut it with the coordinating die, and played around a bit with placement on my panel. Finally, I glued it to my panel, and set a couple of acrylic blocks on top while the glue dried, to keep everything flat. After the glue had dried, I trimmed off the overhanging bits of the flower.

I heat embossed a greeting from Miss Ink's "Magnolia Sympathy" onto a scrap of pink cardstock. I cut that into a narrow strip, and glued it in place. Finally, I matted my panel with lavender cardstock, and adhered that to a white A2-size card base.

I'm entering this card in the following challenges:

Tuesday, May 19, 2020

Happy Birthday

The theme for My Favorite Things' Birthday Project Challenge over the past month has been "Circles." I decided to make a circle shaped card, with a twist. Caly Person's lesson on Day 7 of Online Card Classes' "Spring Card Camp 2" inspired me to do a vellum overlay frame on my card front.

I die cut my card front from a light green cardstock with the largest of the "Beaded Circles" dies from Spellbinders (discontinued). I cut a second piece from Essentials by Ellen's 40 lb. vellum, and die cut a circle from the center of that. Since I didn't have much surface area on the vellum to apply adhesive without making an unsightly mess, I decided to stitch it to my card front. I offset the vellum layer on the cardstock, taped the two pieces together, and used a plastic canvas circle as a guide to pierce stitching holes. Then I stitched with a pale yellow embroidery floss.

I cut my card base from a piece of white cardstock I'd folded. I positioned a circle die so it hung off the folded edge just a bit, and die cut through both layers. I also die cut a circle with the same die from yellow cardstock, to show through the little openings in the "Beaded Circles" card front. Finally, I adhered all the layers together.

For my image, I stamped the cake from Lawn Fawn's "Birthday Before 'n Afters" on a scrap of Strathmore Smooth Bristol paper. I colored it with a combination of Tombow & Zig Clean Color markers, then cut it with the coordinating die. I stamped the greeting, from My Favorite Things' "Big Birthday Sentiments" (discontinued), in Lawn Fawn Guava ink onto a scrap of white cardstock. I cut the greeting into labels, and adhered them and the cake to the front of my card. (I did make sure my cake & greeting would be parallel to the surface the card stands on.)

I cut a small sliver off the bottom of the card base back, so the card will stand when open.

I'm also entering this card in the following challenges:

613 Avenue Create Challenge #233: "Anything Goes" (not playing the twist)
Incy Wincy Designs: "Anything Goes"

Sunday, May 3, 2020

Stellar Mother's Day Card

I made this card for my brother & sister-in-law to give our mom for Mother's Day. He got a telescope last year, so I thought Lawn Fawn's "Super Star" stamp set would be perfect! The design & technique were inspired by Julie Ebersole's lesson in Online Card Classes' Spring Card Camp (Day 4).

I stamped the telescope from "Super Star" on the front of the card base & die cut it (having opened the card first) to give me a window. I used Lawn Fawn's "Smitty's ABCs" to stamp the greeting, lining up the letters in my MISTI stamp positioning tool. Not easy to do, since they are small & fiddly stamps, but I managed! I wanted the ends of the words to go around the outline of the telescope die cut opening. Thankfully, I had just enough room for the "Mother's" word, even though I hadn't planned it out that way! I used the small heart stamp from "Super Star" to fill in the "gaps" in front of the "Happy" & "Day." I stamped the greeting with Peacock Feathers Distress Oxide ink & the hearts with Abandoned Coral Distress Oxide.

View of inside of card
I closed the card, placed it in my MISTI, and stamped the telescope on the inside of the card through the window in the front. I also stamped the mouse from "Super Star" twice, masking the first one so the second would be behind it. I figured, this card is coming from two people--there should be two mice! I also stamped & white heat embossed the constellations & a few more stars from "Super Star," as well as the greeting.

I masked the telescope & mice, and masked off an area for the ground with a piece of masking paper I'd cut. I inked the sky with Distress inks in shades of blue, ending by adding a little Black Soot at the very top to give the sky some depth. I masked the bottom of the sky with the other half of my hill mask, & inked the ground with Mowed Lawn & Peeled Paint Distress inks. To add some more "starry" accents, I kept the image & ground masks in place, & spattered gold watercolor on the sky.

This is where my second "mistake" came into play. (The first had been smudging black ink onto the mouse in back, which I'd camouflaged by coloring him grey.) I wanted to see how my card would look when closed, so I mindlessly closed it--without waiting for the watercolor to dry completely. Yep--gold & blue Distress ink spots transferred to the inside of the card front! At this point, having finished the inside, I was NOT about to start over. Nor was cutting the card apart an option, since the front & back of the design are kind of "married." So I found a piece of patterned paper from the My Mind's Eye "Blue Floral" 6x6" patterned paper pad, that complemented the scene inside the card. I cut it to A2 size, adhered it to the inside front of my card, & trimmed off any overhanging bits around the edges. Then, I popped the telescope die in its opening on the front of the card, opened the card so I only cut through the front, & ran it through my die cutting machine. Ink & paint spots covered! Even with that hiccup, I still love how the card came out.

I'm entering this card in the Lawn Fawnatics Challenge #75: "Spectacular Skies."

Wednesday, April 22, 2020

Have a Fabulous Day


I have been participating in Online Card Classes' "Spring Card Camp," which is going on this month. I created this card, inspired by Debby Hughes' lesson on Day 5. I'm entering it in Creative Knockouts' Challenge #346: "Spring is on the Way."

I cut a panel of watercolor paper and taped it to a board. I applied clear water to the whole panel, then dropped in watercolors. I dried it with my heat tool, added a die cut stencil, and applied more watercolor. I let that air dry, then peeled off the stencil.

I stamped the butterfly from Hero Arts' "Butterfly & Flower" set (discontinued) onto a scrap of Strathmore Smooth Bristol paper with Versafine Onyx Black ink. I hit that briefly with my heat tool, just to make sure the ink dried thoroughly. The coordinating die doesn't cut the body, which is actually a separate stamp, so I fussy cut the image instead. Then I colored the butterfly sections with my Zig Clean Color Real Brush Markers. I applied a small amount of color at the base of each wing section, then used a damp paintbrush to draw the color out to the end & create shading.

I stamped the greeting from the same set onto another scrap of bristol, and die cut it with a Hero Arts "Nesting Oval Infinity" die. Because the background panel had a few hard lines from the watercolor drying against the tape, I also die cut it with a Hero Arts "Rounded Rectangle Infinity" die. Finally, I adhered a panel of pink cardstock to a white A2-size card base, adhered my main panel, & glued on a few 5mm & 8mm Darice Crystal sequins.

I'm also entering my card in the following challenges:

The House that Stamps Built #DCC A120: "April Showers (Something Wet)" (used watercolor)
Die Cut Divas: "All About Animals"
A Blog Named Hero: "Watercolor"

Wednesday, October 16, 2019

Merry Christmas Poinsettia


The current challenge at Christmas Card Throwdown is to use white, blue, & brown on a holiday card. I got my inspiration from a lesson on die cut inlay by Jennifer McGuire in Online Card Classes' "Holiday Card Workshop 2013."

I cut a piece of cherry wood veneer paper to 4x5.25". I laid my dies (Simon Says Stamp's "Merry Christmas" & Poppystamps "Blooming Poinsettia") on it to gauge placement. To make sure the greeting was positioned straight & in the right position, I die cut it first from a scrap of vellum. I laid that on my panel, beside the smaller poinsettia die, and taped it in place. I removed the flower die, & snugged the greeting die into the negative space on the vellum. Then I ran that through my die cutting machine. To make sure I didn't lose any pieces, I pressed a piece of yellow Frog tape to the back of my panel, over the die cut area. Then I carefully poked out all the greeting pieces--positive & negative--so they stuck onto the tape. I removed the tape from the panel, & set that aside.

Next I die cut my smaller poinsettia die from the panel. I then laid the larger die over the negative space, and die cut that. To color the pieces, I blended on Broken China & Peacock Feathers Distress Oxide inks. I also sponged on a little Tumbled Glass Distress Oxide ink to the edges of the smaller flower for highlighting. Then I put the smaller flower & the pieces left from die cutting the larger flower into a container for safe keeping.

I cut another 4x5.25" piece from white cardstock. I applied double-sided adhesive to one side, removed the release paper, and adhered my wood panel to that. I inlaid my poinsettia pieces, starting with the die cut pieces I'd cut last, then adding the smaller (inner) flower.

I colored the greeting by pressing it into my Lawn Fawn Yeti white pigment ink pad. I set that aside to dry. I think I might not have let it dry long enough, because when I tried to inlay it into place on the panel, it wouldn't stick to the exposed adhesive. No worries--liquid glue to the rescue! :) I squirted a small amount of glue where the greeting went, and pressed the die cut words into place. Finally, I added more glue into the spaces in the letters, & inlaid the die cut negative pieces. Thankfully, I didn't lose any pieces--not even the tittle! (Things don't always go that well with this technique.)

To finish the card, I went over the veins in the poinsettia with a white gel pen. I adhered my panel to a white A2 card base, flush with with the bottom & right sides. Finally, I added Simply White Nuvo Crystal Drops to the flower center, and in the upper left & lower right corners of the panel.

I'm also entering this card in 613 Avenue Create's Challenge #226: "Anything Goes." (not playing the twist)

Wednesday, October 18, 2017

Three Holiday Cards

Online Card Classes' "Merry Making" class is winding down this week. :( It's been another fun class, and I've learned quite a few techniques for card making--not just for the holidays, but year-round. These are 3 more cards I made for class


Kristina Werner had a lesson on Day 5 of stenciled watercolor. I used The Crafters Workshop "Mini Rosetta" stencil for this card. I adhered it to a piece of Strathmore Smooth Bristol paper with repositionable spray adhesive, and colored with my Zig Clean Color Real Brush Markers & a water brush. When that was dry, I removed the stencil, and stamped my greeting from Our Daily Bread Designs' "Christmas Ornament" set in the lower left corner.

I rounded the 2 opposite corners of my panel with the 1/2" side of my Corner Chomper. I matted that with black and then with pink, rounding the corresponding corners each time. Finally, I adhered it to a white A2 card base.


Gina K., a guest instructor, inspired this next card. I used one of the branch images from WPlus9's "Spring Blooms" stamp set with Altenew Forest Glades & Hero Arts Forever Green inks to make my wreath. I filled in with a berry stamp from the same set with Altenew Ruby Red ink.

For the greeting, I stamped a banner from Avery Elle's "Build a Banner" set (discontinued) onto white cardstock, and heat embossed with Ranger Super Fine Detail Gold embossing powder. I curved the greeting, from Hero Arts' "Vintage Christmas Post" stamp set, to match the curve of the banner, and stamped & gold heat embossed that as well. Finally, I die cut it with the coordinating "Build a Banner" die. I tied a bow with some red satin ribbon, and adhered it to the top of my wreath with a glue dot. I adhered my banner in place, using foam tape in the middle and Scor Tape at either end. I matted that panel with black, and adhered it to a piece of green cardstock, before mounting it to a white card base.


Jennifer McGuire had a lesson on Day 1 of class that inspired this card. I took a piece of blue cardstock that I had cut to 4x5.25", spattered water on it, and heat embossed with Recollections Snow embossing powder for the background. I die cut Winnie & Walter's "Peace" die 4 times from navy cardstock, and glued them all together with Ranger Multi Medium Matte. After that dried, I heat embossed along the top of the die cut with white, to make it look like snow.

I stamped "on Earth" from Clearly Besotted's "Holiday Sentiments" set (apparently discontinued) onto a scrap of white cardstock. I cut that into a strip to go under my die cut "peace." I die cut a heart from vellum using Little B's "Hearts" die set. I positioned the heart on my background, and taped it in place with a couple of small pieces of painter's tape. I glued my "peace" on top of that, and glued the white strip below it, then removed the tape. I did not actually adhere the vellum directly to my panel; the glue on the greeting pieces is all that holds it in place. Finally, I mounted my card panel to a white A2 card base.

Tuesday, October 17, 2017

Merry Christmas


Julie Ebersole had a lesson on Day 4 of "Merry Making" at Online Card Classes on camouflage die cutting. I've done this before, but I still love how it produces that, "How'd she do that???" factor!

I stamped a panel of white cardstock with images from My Favorite Things' "Sophisticated Snowflake," (discontinued) using Hero Arts Cornflower & Soft Lilac and Memento Summer Sky inks. I filled in some of the small empty areas with a snowflake image from Hero Arts' "Color Layering Christmas Tree." Once I'd finished, I stamped the "Christmas" from Clearly Besotted's "Holiday Sentiments" (apparently discontinued) in Versafine Onyx Black ink.

Detail of the greeting
I used the "Merry" die from Winnie & Walter to complete my greeting. I die cut it from the panel, and 4 more times from white cardstock. I stacked those together, and adhered it back into the negative space in my stamped panel. I really love how this came out!

Christmas Blessings


On Day 1 of Online Card Classes' "Merry Making" class, Kristina Werner had a lesson on bokeh backgrounds. I created this card based on that lesson.

I cut a panel of 140 lb. watercolor paper and taped it to a cutting board. I used Peacock Feathers & Faded Jeans Distress Oxide inks, adding a bit of Black Soot Distress ink at the bottom to create an ombre. Then I did the bokeh effect with a wet paintbrush, following the instructions in Kristina's tutorial.

I stamped several snowflakes from My Favorite Things' "Sophisticated Snowflake" set (discontinued), and heat embossed with Ranger Silver embossing powder. I stamped some additional snowflakes with Lawn Fawn Yeti white pigment ink, just for another, more subtle look.

For my greeting, I used Simon Says Stamp's "Christmas Blessings" die. I cut it once from white cardstock & again from black. I glued the black onto my panel, then overlaid the white, slightly offset to give a shadow appearance.

To finish my card, I matted my panel in grey & navy cardstocks, trimming a 1/16" border on each. Then I adhered it to a white A2 card base.

Sunday, October 15, 2017

Happy Merry Joyous Christmas


On Day 2 of Online Card Classes' "Merry Making" class, Jennifer McGuire had a lesson on using scoring lines through an image on your card. I ended up making 2 cards with this technique.

After scoring my panel for my first card, I placed it in my MISTI and positioned my reindeer stamp. (This stamp is quite old, and I have no clue who made it or what the name is.) I inked up the top portion of the stamp with Hero Arts Soft Lilac ink, and daubed the lower edge of the ink with a dry cloth to soften the transition. I stamped that on my panel, inked up again in the middle of the image with Memento Sweet Plum, daubed the top & bottom edges, and stamped. I repeated one more time with Memento Elderberry ink for the bottom portion of the stamp. I also stamped the greeting, from My Favorite Things' "Joyous Christmas Sentiments," (discontinued) in Elderberry.


On my second card, I did the same basic steps. This time, though, instead of 3 dye inks, I used just Delicata Silvery Shimmer pigment ink. I had a few more spots on the score lines where the ink got in the groove than on my first card. But, on both cards, I just touched those areas up with a white gel pen. All that was left was to adhere the panels to white A2 card bases. These cards really came together quickly, and I can see where this technique would be good for mass production.

Merry Christmas Reindeer


I've been participating this past week in Online Card Classes' holiday card class, "Merry Making." Shari Carroll inspired this card with her lesson on Day 2, demonstrating "paint resist."

I cut a panel of Strathmore Smooth Bristol paper to 4-1/8x5-3/8" for my background. I stamped the Hero Arts "Newspaper Background" stamp with silver paint, following the tutorial. I also used Distress inks in Iced Spruce, Bundled Sage, & Stormy Sky on my background. Finally, I stamped around the perimeter with images from Hero Arts' "Pine Branches" set.

I die cut Impression Obsession's "Reindeer" (apparently discontinued) from more bristol paper, and colored him with 3 shades of brown Tombow markers. Then I blended the colors with a water brush. I ran him through my Xyron machine to coat the back with adhesive. Because his antlers are so delicate, I didn't want to use liquid glue, and have it ooze out the sides. Finally I adhered him to my panel.

For the greeting, I stamped half of one of the "Build a Banner" images from Avery Elle (apparently also discontinued) onto more bristol, and heat embossed it with Ranger Silver embossing powder. I also took a greeting from Hero Arts' "Vintage Christmas Post" stamp set, curved it to match the banner, and stamped & heat embossed it. I fussy cut the banner out, inked it with Stormy Sky, and adhered it with Scor Tape on either end & a bit of foam tape in the center.

I cut 2 small slits on either side of the reindeer's neck, and threaded through some red ribbon, taping the ends to the back. I also pierced a small hole on either side of the banner end, and threaded red embroidery floss through those holes. I threaded the other ends through the slit along the back of the reindeer's neck, so it looks like he's pulling the banner. Finally, I tied a bow from the same red ribbon, and adhered it with a glue dot.

To finish my card, I adhered my background to a piece of burgundy cardstock cut to A2 size, and mounted it on a white card base.

I'm entering this card in A Blog Named Hero's October challenge, "Calling All Critters."

Tuesday, June 27, 2017

Magic Slider Birthday Card


A Blog Named Hero's challenge theme this month has been "Interactive." I decided, since I needed a birthday card for a family member, I'd wow her a little with a magic slider card. I followed the instructions from Kelly Marie Alvarez's lesson in Online Card Classes' "Clear & Sheer" class.

After I cut & scored a panel for the magic slider portion of my card, I die cut a window in the front of that with a Lawn Fawn "Small Stitched Rectangle" die. I used a pencil to draw lines on the inside of this card around the window area. Then I stamped the balloons from Hero Arts' "Happy Birthday" set (discontinued). Because I was masking, I had to stamp on the card & the acetate piece I'd cut for the window at the same time. I stamped first on the card, then the acetate for each balloon cluster. Then I masked the image on the card, moved my stamp, stamped on the card, repositioned the acetate over the card, stamped, and so on. I used Memento Tuxedo Black ink for the card, and Staz-on Jet Black ink for the acetate. I also used my MISTI tool, which I feel is pretty important to make sure the images on the acetate & card line up well. I also stamped the "Happy Birthday" greeting from the same stamp set, though just on the card, not the acetate. Kind of an extra surprise when she pulls up the insert.

After I had finished stamping, I put my acetate aside and colored the images on the card with my Prismacolor colored pencils. I used paper stumps dipped in Gamsol to blend the colors out & give some shading to the balloons. I then lined up my acetate with the image, & adhered it to the front window portion of my card with Scor Tape.

Insert halfway up
I used 1/4" wide cardstock strips along the sides & bottom of my colored card to create the channel for my insert. I cut the insert from white cardstock, and added another strip to the bottom, to act as a stopper. I cut a slit along the fold of the card, for the insert to slide up & down through. Then I slipped the insert through the slot, and adhered the front of the card to the back with more Scor Tape, sandwiching the insert in between.

For the pull tab, I die cut 2 hearts with a Nellie's Choice "Straight Hearts" die from a scrap of pink chevron patterned paper. I inked both hearts with Worn Lipstick Distress ink, just to knock the pattern back a bit. Then I stamped the "pull" & arrow from My Favorite Things' "Interactive Labels" set on one of the hearts. I glued that to the top of the insert, and glued the other heart to the back.

Insert all the way up
To create a mat for my magic slider, I used a Prima chevron stencil & Worn Lipstick to ink up a 4.25x5.5" piece of pink cardstock. I added Scor Tape to both sides of a piece of craft foam, adhered that to the back of my slider card, & adhered the foam-backed slider to my mat. Finally, I mounted my card front to a white A2 card base.

I'm also entering this card in the following challenges:

Dies R Us Challenge #75: "Celebrations"
613 Avenue Create #198: "Anything Goes"

Wednesday, May 31, 2017

Prayers to You and Your Family


I decided to make one more card for a2z Scrapbooking's May Challenge: "Sentiment Focus." I got my inspiration from a lesson in an older Online Card Classes' class, "Stretch Your Dies."

To create my background layer, I first watercolored several scraps of 140 lb. watercolor paper with blue, green, & yellow Winsor & Newton Cotman watercolors. After they dried, I die cut leaves from those pieces using Lawn Fawn's "Stitched Leaves" dies. I arranged several of my die cuts close together on my work surface, and stuck a piece of Glad Press 'n Seal to the front of them. I taped the largest of Lawn Fawn's "Small Stitched Oval" dies over the whole thing, and ran it through my die cutting machine. To be honest, I wasn't sure it would stay together & not get overly stuck with the Press 'n Seal, but it came out perfectly! I added pieces of foam tape to the back of each leaf, and set that aside.

I chose Hero Arts' "Prayers" stamp and cut set for my greeting. Using my MISTI, I stamped the "prayers" onto a strip of Essentials by Ellen 40 lb. vellum with Versafine Onyx Black ink. I removed that stamp and, with the vellum in the same place in my MISTI, I placed my 2 smaller greeting stamps below the main word. I picked those up with the door of my MISTI, and stamped them in Versafine as well. Finally, I sprinkled Recollections Clear Detail embossing powder over the ink, and melted it with my heat gun. I cut the vellum strip shorter, and created a V-notch in each end.

After I peeled the backing papers from my foam tape pieces, with the leaves still stuck to the Press 'n Seal, I flipped the whole piece over onto a 4x5.25" panel of ivory cardstock. I got it as centered as possible, and pressed down to adhere my leaves to the panel. Finally, I oh-so-carefully removed the Press 'n Seal--which, I'm happy to say, did NOT rip any of my leaves! I applied bits of Perfect Paper Adhesive to the back of my vellum banner, hiding the glue behind the thicker lines in "prayers," and adhered that on top of my leaves. I placed 2 acrylic blocks over the banner, just to hold it down until the glue dried.

I inked around the front of a white A2 card base with Stormy Sky & Bundled Sage Distress inks. I felt these colors complemented the colors in the leaves. I rounded the corners of both my ivory panel & card base with the 1/2" side of my Corner Chomper. Once the Distress inks had dried, I used my ATG to adhere the ivory panel to the card base.

I'm also entering my card in Simon Says Stamp's Wednesday "Anything Goes" challenge.

Thursday, May 18, 2017

Sparkle & Shine - Two More Cards


Today is almost the last day for Online Card Classes' "Sparkle & Shine" class. :( I must admit, I was hesitant when I first heard about this class to sign up. How much can one possibly do with glitter & foil? Well, after having learned my lesson when I didn't sign up for the "live" version of their "Heat Wave" class (which I later regretted), I went ahead & registered. And Jennifer, Kristina, & their guest artist instructors did not disappoint! I have learned quite a few new techniques, and some tips that improved my experience with foiling. If you ever want to have a great class experience, which is not too costly, head on over there!

For my first card, I used the "Hi" die from Winnie & Walter, along with a supporting greeting from Hero Arts' "You're a Rainbow" stamp set (discontinued). To create my background, I "inked" up the "Capture Prism" stamp (discontinued), also from Hero Arts, with leafing glue, and stamped on my cardstock panel. I foiled that with Heidi Swapp Gunmetal foil. The results were a bit "sketchier" that I'd really expected, but I kind of like the look. (You can see what I did with the remainder of that foil piece on my next card below.)

I die cut the "hi" from black cardstock, and from blue shimmer cardstock. I also heat embossed the supporting greeting with Ranger Silver embossing powder on a strip of vellum. I wrapped one end of the strip around the right side of the "i," adhering it to the back with a little ATG tape, and adhered the other end under the left side of the "h."

After determining placement, I used Perfect Paper Adhesive to glue my blue "hi" to the foiled panel, and then glued the black one on top, slightly offset. I cut another piece of the blue shimmer cardstock into an "L" shape for my mat "layer." Finally, I adhered that to a white A2 card base, and mounted my foiled panel on top.


I created my background for my thank you card by foiling a sheet of homemade toner paper with the leftover foil from my "hi" card. I had heard about this technique before this class, but had never been sure about all the black toner showing through the "openings" in the foil. But when I saw Gina K demonstrate this in class, I decided to try it. And I must admit, I kind of like it! After foiling my toner paper, I trimmed it down to slightly smaller than 4x5.25".

I stamped the "Bee Balm" & "Hummingbird" images, both from Our Daily Bread Designs, onto a scrap of Strathmore Smooth Bristol paper, with Hero Arts Charcoal ink. I fussy-cut the flower (just in case I messed up the cutting, I wouldn't have to redo all the coloring), and colored both images with my Tombow Markers, blending the colors mainly with the markers themselves. I did use a water brush just a little on the pale grey parts of the bird's body. After I'd finished coloring, I used the coordinating die to cut out the hummingbird. Then I used Perfect Paper Adhesive to glue both the flower & bird to my background.

For the greeting, I applied Stick It adhesive to both sides of a piece of black craft foam. After running it through my die cut machine (without dies) to stick the adhesive firmly, I peeled off the release paper on one side and adhered my green cardstock to that. Then I ran it through my die cut machine again, with the Simon Says Stamp "Thanks" die. I popped the die cut out from the surrounding cardstock, and adhered it to my background, over the flower stem. Finally, I matted the foiled panel with purple cardstock, adhered it to a white A2 card base, and added some more sparkle with 2 coats of clear Wink of Stella on the hummingbird.

I'm entering my cards in the following challenges:

a2zScrapbooking's May Challenge: "Sentiment Focus" (1st card only)

Second card only:
Our Daily Bread Designs: "Just Say Thanks"
Simon Says Stamp Work It Wednesday: "April Showers Bring May Flowers"
Pile It on #130: "Animal"
Simon Says Stamp Wednesday Challenge: "A Bit of Sparkle"

Tuesday, May 16, 2017

Happy Mail Owl


On Day 6 of Online Card Classes' "Sparkle & Shine" class, Heather Ruwe had a lesson on "Faux Ombre Embossing with Distress Inks." I used that technique with this card.

To create the background, I used Mustard Seed, Fossilized Amber, & Rusty Hinge Distress inks and Winnie & Walter's "Madison" Creative Screenings stencil. I wanted to go for a more gender-neutral card, and knew I would use the "Curious Owl" stamp by Hero Arts. I thought the stencil resembled feathers, hence my choice.

After finishing the background, following Heather's instructions, I stamped the owl onto a scrap of Strathmore Smooth Bristol paper with Hero Arts Wet Cement ink. I colored that with my Zig Clean Color Real Brush markers, using a water brush (sparingly) to blend the color a little in places. Then I set that aside to dry, before fussy cutting him out.

I stamped an envelope from Technique Tuesday's "Random Act of Cardness" set onto bristol paper with Wet Cement, and fussy cut it out. I used a craft knife to cut along the sides of the owl's beak, and slipped the envelope into the slits, gluing it in place with a bit of liquid glue.

I figured the owl would blend into the background too much if I adhered him directly to it, but also didn't want to cover up a lot of the stenciled panel. So I die cut a piece of Essentials by Ellen 40 lb. vellum with a Lawn Fawn "Large Stitched Oval" die. I stamped a greeting from the "Snail Mail" set, also by Technique Tuesday, on the vellum above where the owl would go with Ranger Archival Coffee ink. That turned out to be a mistake, since the greeting didn't show up against the background, even with the vellum to mute the colors on my panel. So I used a fine-tip black marker to trace over the letters. It's not absolutely perfect, but it's close enough for me, and at least I didn't have to die cut and re-stamp another oval! :)

To complete the card, I adhered the owl to the oval with foam tape, and used Scor-Tape pieces on the back of the vellum (behind the owl) to adhere it directly to my background. I felt the panel needed a little more definition, so I machine-stitched around the perimeter with black thread. I finished by adhering the card front to a white A2 card base. I will leave this card in our mailbox for our postal carrier, just as a little appreciation card, as part of Jennifer McGuire's #ShareHandmadeKindness campaign.

I'm entering this card in the following challenges:

A Blog Named Hero: "Watercoloring"
Pile It On #130: "Animal"
613 Avenue Create: "Anything Goes"

Glitter Balloons


I've been participating in Online Card Classes' "Sparkle & Shine" class. On Day 1 of class, Jennifer McGuire had a lesson on "Glitter Die Cut Inlay." I used her tutorial as inspiration for this card.

I die cut my balloons from purple cardstock using 4 of the "Party Balloons" dies from Lawn Fawn. I added the panel to my adhesive sheet, & sprinkled on some glitter, creating a gradient effect. After burnishing the glitter in, I adhered that panel to a 4.25x5.5" piece of white cardstock.

I poked holes at the base of each balloon, and threaded crochet twine through the holes. I tied the twine in bows, and then, for each balloon, cut one end short, leaving the other end long. I pulled the long ends around the bottom of the card, and taped them on the back.

For the greeting, I used the "Happy" stamp from Simon Says Stamp's "It's Your Birthday," and one of the "Birthday" stamps from Sweet 'n Sassy Stamps' "Script Birthdays" set. I stamped them on a scrap of yellow cardstock in Versamark, and heat embossed with Ranger Super Fine Detail Gold embossing powder. I cut that into a strip, & trimmed one end at an angle. I adhered it to my panel with a little ATG tape, & used my Tim Holtz Tiny Attacher to staple two gold staples in one end. Finally, I mounted my card front to a white A2 card base, and dotted the knots of the bows with a little Perfect Paper Adhesive glue to keep them from coming undone.

Saturday, May 13, 2017

Happy Mother's Day - Times 3!


Yes, here in the U.S., Mother's Day is this weekend! Even though it's on Sunday, my brother, sister-in-law, & I are celebrating with our mom Saturday, so my brother & his wife can spend Sunday with her parents & grandmother. I made three cards total to give to our mother: one from me, one from my brother & sister-in-law, and one from our 3 cats (I call Mama their Grandma! LOL). This first one is from me.

I got my inspiration from this card that Jennifer McGuire had on her YouTube channel & blog. Debby Hughes' lesson in Online Card Classes' "Sparkle & Shine" class also provided inspiration for the background. I used Simon Says Stamp's "Leaves Background" stamp, Versamark, & Perfect Pearls to stamp the background, then stamped over it with My Favorite Things' "Romantic Script" background stamp. It's very subtle, & doesn't show up well in the photo, but it has a nice shimmer.

I used a Nellie's Choice "Straight Hearts" die to cut the window, and Simon Says Stamp's "Happy" die & Lawn Fawn's "Smitty's ABCs" for the greeting. I also stamped the "Frangipani" from Our Daily Bread Designs on watercolor paper, heat embossed with Ranger Silver Pearl powder, and watercolored the flowers with my Inktense pencils. I fussy cut the image, cutting off the leaves, then inked those with Twisted Citron & Mowed Lawn Distress inks, sprayed them with Perfect Pearls solution, and let them dry. Finally, I glued the leaves to the flower cluster, cut a piece of white cardstock the same shape, glued the flower cluster to the card front, & backed it with the white cardstock piece. I stamped "Mother's Day" in Hero Arts Ultra Pink ink, to play off the flowers, and assembled my tulle shaker card, following Jennifer's instructions.


For my second card, I took the design idea from this post that I found via Pinterest. I stamped multiple flowers & leaves on a piece of white cardstock, using Paper Smooches' "Botanicals 2" stamps & Hero Arts Lemon Yellow, Cornflower, Lime Green & Bubble Gum; and Lawn Fawn Wild Rose & Fresh Lavender inks. I used Colorbox Putty ink to stamp some of the flowers & leaves, just as a "placeholder." After cutting the first part of my greeting with Winnie & Walter's "Happy" die, I applied adhesive with my Zig 2-way glue pen to the Putty-colored images. I let that dry so it was tacky, then foiled them with various colors of Heidi Swapp foil. Again, the photo doesn't do it justice, but it has a nice shine in real life!

After die cutting a frame from an A2 size white cardstock panel with a Taylored Expressions' "Frame in Frame" die, I used my laser printer to print "Mother's Day" on the center portion. I then foiled that with Rose Gold Heidi Swapp foil & my mini Minc machine. I added white craft foam to the back of the "happy" & the frame, then adhered everything to my A2 card base.


This third card is from our cats. I thought the bird patterned paper, from Crate Paper's "Bloom" 6x6" pad was particularly cute for a cat card! I used these instructions to guide me in completing this card. I used 2 of the "Straight Hearts" dies for the window. For the heart on the belly band, I die cut one that was a little smaller than the window, printed "Happy Mother's Day" on it with my laser printer, and foiled it with Heidi Swapp Mint foil & my Minc. I adhered that to a piece of teal cardstock, & used my scissors to cut a small border.

For the card base, I inked a piece of Strathmore Smooth Bristol paper with Cracked Pistachio, Evergreen Bough, & Pine Needles Distress inks to create an ombre. Then I stamped My Favorite Things' "Romantic Script" background stamp in Hero Arts Soft Granite ink over both sides. I don't know really why I chose that particular stamp, since this is a not-so-elegant cat card, but I just wanted a little extra visual texture & interest.


I stamped Rubbernecker Stamps' "Cat on Yarn Basket" image onto another panel of bristol paper. I colored it with my Tombow markers, using a water brush to blend the color on the cat & basket. We actually don't currently have a black cat, but I thought that would be a nice compromise, rather than trying to decide which of our cats would be featured. I did go over the eyes & mouth with a black marker, and added white gel pen detailing for the whiskers, just to make them pop more. Then I adhered that inside my card. Finally, I printed my greeting (created in Photoshop) onto a piece of pink cardstock, & adhered it to the bristol panel, so it would be below the window in the card front.

I'm entering my cards in the following challenges:

Simon Says Stamp's Work It Wednesday: "April Showers Bring May Flowers" (first card only)
Through the Craft Room Door: "Anything Goes" (cat card only)
Pile It On #130: "Animal" (cat card only)
Die Cut Divas: "May Flowers" (first 2 cards only)

Wednesday, November 30, 2016

Two Christmas Cards


I'm getting down to the finish line on our holiday cards--FINALLY!!!! These are 2 more that I made.

For my first, I took inspiration from one of Debby Hughes' lessons from Online Card Classes' "Holiday Card Workshop 2014." (OCC is not having a holiday card class this year, so I pulled this one out of my vault.) I die cut a tag from 140 lb. watercolor paper with Pretty Pink Posh's "Stitched Duo 3" die. I stamped the greeting, from "Very Merry Christmas," (apparently retired) and a crystal from "Christmas Crystals" (both Hero Arts sets) in Versamark onto the tag, and heat embossed with Ranger Liquid Platinum. I also added a line from the top of the crystal to the "M" with a fine-tip glue pen, and heat embossed that. I wet the tag with plain water, and used it to soak up Festive Berries Distress ink, which I'd applied to an acrylic block and watered down. I was going for a "dyed" look, but may have gotten a little carried away with the ink. I think it still looks good, though! :)

I created a tag reinforcer by punching some red cardstock with a 1/2" circle punch. I glued that to my tag, let the glue dry, and punched through both layers with a 1/4" hole punch. I backed my tag with fun foam, to give some dimension.

For the background, I cut a mat from white cardstock, and inked around the perimeter with Festive Berries. I let that dry, then adhered a piece of patterned paper from my scrap stash. I had rounded the patterned paper's corner with the 1/2" side of my Corner Chomper, to mimic the curve of the tag and give that area a bit more finished look. I adhered my tag, and mounted the card front to a white A2 card base. Finally, I rounded the upper corner of the base/mat.


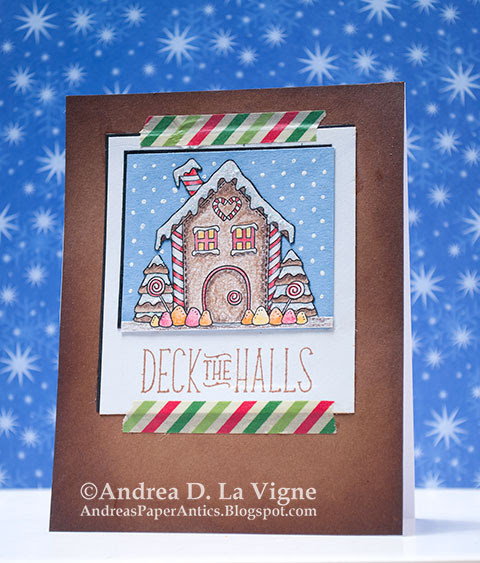
I used Sketch #SC571 from Splitcoaststampers.com for my second card design. I printed the "Gingerbread House" digi image from Jane's Doodles onto a piece of Canson XL Mixed Media Paper, and colored it with my Prismacolor colored pencils. I fussy cut the image, and glued it to a piece of blue cardstock. I used a white gel pen to add dots to the background.

For the Polaroid look, I cut a piece of white cardstock to the size in the sketch. I also cut a piece of black cardstock, and layered it behind the white, slightly offset, to give a shadow look. I stamped my greeting, from Lawn Fawn's "Deck the Halls" set with Colorbox Chestnut Roan chalk ink. I added another piece of black behind my focal image, and then adhered that to the white mat.

I cut a piece of kraft cardstock to 4.25x5.5", and inked around the edges with Tea Dye & Gathered Twigs Distress inks. I wanted to give a "slightly-burned gingerbread" look to the background. I adhered my main panel to the background, added some striped washi tape pieces to create the look of a taped-up photo, and mounted it to a white A2 card base. I added a bit of sparkle to the gumdrops with my clear Wink of Stella pen, and Diamond Stickles to the frosting on the roof, chimney, & trees.

Wednesday, October 12, 2016

Happy Birthday - with a Surprise!


Online Card Classes' "Wild Card" class is winding down this week, but I still found time to create a card inspired by Jennifer McGuire's lesson on Day 3.

I created my A2 card base from Simon Says Stamp's Fog cardstock. I placed it in my MISTI, and stamped the front with the "Painted Diamonds Background" stamp from Hero Arts. I then heat embossed that with Ranger Silver Pearl embossing powder, to give a subtle, shimmery tone-on-tone design.

I used Essentials by Ellen vellum for my belly band. I die cut a balloon with one of Lawn Fawn's "Party Balloons" dies, and attached that to the vellum strip with temporary adhesive. Then I stamped the greeting, from "Big Birthday Wishes" (Simon Says Stamp), in Versamark ink over both pieces, and heat embossed with Stampendous Sapphire PEARLustre embossing powder. Since the embossing powder didn't stick "cleanly" where the balloon overlapped the vellum, I removed the balloon, touched up the blank areas with a glue pen, applied more powder, and melted it. Finally, I glued the balloon in place permanently.

Inside of card
I die cut more balloons from paper scraps using another "Party Balloons" die. I adhered them to the inside, and tied lengths of crochet thread around the bottoms. To secure the thread, I added a dot of Perfect Paper Adhesive to each balloon, and after that dried, cut the strings. And that finished off this card!

Thank You Flower


My mom had a birthday recently, and received gifts from several people. So she asked me to create thank you cards that she could use to send to them. I have been taking Online Card Classes' "Wild Card" class, & decided to make a shaped thank you card, based on Debby Hughes' lesson on Day 1 of class.

I used the largest of DoCrafts' Xcut "Flower Bloom" dies to cut my card front & base pieces. I cut the front out of 140 lb. Strathmore watercolor paper. I then stamped the greeting (Stampabilities' "Thank You Circle Seal") in Versamark ink in the center of my flower, and heat embossed it with Recollections Snow embossing powder.

To color my flower, I used fingertip sponge daubers. I blended Crushed Olive Distress ink over the flower center first, spreading the color a little beyond the greeting. Then I blended Wild Honey Distress ink, starting from the outer edges with a heavier application, and getting lighter as I went towards the center. I had thought about spritzing it with water, but liked how it turned out so well that I just left it as is. Finally, I created my card base and adhered my main panel to the front of that.

Monday, October 10, 2016

Merry Christmas Pop Up


Day 3 of Online Card Classes' "Wild Card" class was all about pop-ups! I created one based on Kelly Marie Alvarez's & Laura Bassen's lessons.

I stamped my elements for the inside of the card, using the Christmas tree & snowman from Hero Arts' "Joy Snowman" & trees from Hero Arts' "Winter Cheer" stamp sets (both discontinued). I colored the ornaments on the Christmas tree with a red marker, the green doodads with a darker green marker, and added dots around the ornaments with a silver gel pen. I then die cut my images with the coordinating dies. I also die cut 2 snowy hills using Lawn Fawn's "Stitched Hillside Borders" dies.

For my background, I blended a sky with Tumbled Glass, Broken China, & Salty Ocean Distress inks. I let that dry thoroughly, then stamped my greeting, from Hero Arts' "Joy to the World," in Versamark ink. I heat embossed that with Ranger Super Fine Detail White embossing powder.

Side view of inside
I created my pop up, following the instructions in class. I didn't have any pop-up dies, so I used a ruler & craft knife to cut the mechanisms.

Front of card with belly band
For the outside of the card, I cut & scored a piece of green cardstock. I ran it through my die cutting machine with Darice's "Snowflake Swirl" embossing folder, to emboss just the front of the card. I created a belly band from a scrap of patterned paper I had in my stash. I die cut a snowflake from white cardstock using one of the "Paper Snowflakes, Mini" dies by Sizzix for Tim Holtz. I backed it with a dark blue circle I die cut with a Spellbinders "Standard Circles LG" die. Finally, I adhered it to the belly band.

I'm entering my card in Through the Craft Room Door's "Anything Goes" challenge.