Showing posts with label thinking of you. Show all posts

Thursday, September 29, 2022

Dragonfly Good Vibes

I have had the Sweet 'n Sassy Stamps "Dragonfly Dreams" stamp set for several months, & had yet to get it inky. I finally had some time to play recently, & decided to break out this set & try some ink color combinations. I actually created 3 dragonflies, die cut with the coordinating dies. This is one that I used on my card. The design is from Operation Write Home's Sketch #B-15.

I first die cut the dragonfly from white cardstock. This is a builder stamp set, so I just figured it would be easier to get everything lined up right if I die cut first. I started with the base layer for the wings. I chose a few colors of Distress Oxide inks, & used sponge daubers to apply the ink to the wings. I began with Salvaged Patina in the center, then moved out to Seedless Preserves, Villainous Potion, Uncharted Mariner, and finally Wilted Violet at the tips. I had hoped the colors would blend more smoothly, but I think they came out OK in the end.

For the overlay of the wings, I heat embossed with Ranger Clear Holographic embossing powder. I figured it would be a great way to add some sparkle & shine to the wings. I stamped the first layer of the body with Lawn Fawn's Hippo ink, then went over it with StazOn Jet Black ink. The two middle legs overlap the wings, & I needed the StazOn ink for it to show up on the heat embossed area.

I die cut a circle from tan cardstock, & ink blended it with Brushed Corduroy Distress ink, then inked the edges with Walnut Stain Distress ink. I stamped the Concord & 9th "Weathered Wood Background" on that with Ground Espresso Distress Oxide ink.

I cut a piece of patterned paper from The Paper Studio's "Peaceful Meadows" mat stack pad to size, & adhered it to a 4-1/4" square card base. I glued my circle to the top of my card base, making sure it didn't make it taller than 5-1/2", so it would still fit in an A2 size envelope. I glued my dragonfly to that. Finally, I adhered my greeting strip, which was a gift from another card maker.

I'm entering this card in the following challenges:

Paperfunday Challenge #45: "Anything Goes" (playing the optional Thinking of You twist)

Monday, June 27, 2022

A Banner Hello

I have had the gold die cut strips, made with Spellbinders' "Octagon Strips and Accents" dies (discontinued), for several months. I had made them to use on a project, but that ended up not working out. They were too good to chuck, though, so I held onto them. The other day, I finally decided this was The Time to use them.

I used the outer die in the set to cut 2 backing pieces of peach pearlized cardstock, & glued the gold die cuts to those. I used the same die with the corresponding insert to cut another strip from purple cardstock. I wanted something to break up the gold banners, and give me a third element. I cut a third peach piece to back the purple strip for continuity, & glued them together.

For the background, I applied Golden's Light Molding Paste through Hero Arts' "Deco Pattern" stencil. I left kind of a ragged edge towards the bottom right corner, so I could add a die cut greeting. I die cut the greeting from Hero Arts' "Hello Stamp & Cut" set once from gold & once from the purple I'd used for the third strip. I glued the purple down to my background panel, then layered the gold on top, offset so the purple provided a shadow.

After I decided how long I wanted my banners, I cut each strip to length. I wanted to stitch them, but with the thickness of the layered banners, I couldn't stitch straight through to the card front. So I poked holes along the top of each banner, & stitched with white thread. Then I used liquid tacky glue to glue just the tops of the banners along my panel, lining up the stitching lines & letting the rest of each lift up. Finally, I matted my panel with a light teal cardstock that I'd adhered to a white A2-size card base.

I'm entering this card in the following challenges:

Sunday, October 18, 2020

Thinking of You

The theme of the October Monthly Mix challenge at Gina K Designs is "Color Blocking." I created this card for a friend of my mom's who is going through some trying times right now.
 
A photo I found on Pinterest inspired the background design. I decided to do a nearly-one-layer card, and ink the background, rather than cutting & adhering sections of cardstock. I used Distress inks in Milled Lavender, Dried Marigold, Squeezed Lemonade, Tattered Rose, Cracked Pistachio, & Tumbled Glass. (I was going for kind of a pastel rainbow vibe.) I began by penciling in guidelines on my panel, using a T-square ruler to make sure everything was straight & square. I taped off the 1" strip along the left side with one long piece of yellow Frog tape, and used more Frog tape pieces to mask off each triangle as I went along. I inked each triangle section one by one, making sure to spread my colors out so no two adjacent sections were the same color.
 
Once I finished the left column, I removed my tape and dried the ink with my heat tool. I then taped off that column to mask it. I repeated the same inking process on the wider column, taping off to mask as I went with each color.
 
I heat embossed the flower & greeting, from Gina K's "Peaceful Florals" set, with Ranger Liquid Platinum embossing powder. I figured the background was too pretty to cover up, so decided not to stamp & color the flower on a separate panel. To mat my panel, I found a textured platinum metallic cardstock in my stash. I trimmed that to leave a 1/16" border on all sides, then adhered that to a white A2-sized card base.

Wednesday, April 1, 2020

Agapanthus Hello


Hero Arts has started a new series of challenges on their blog, called "Stay Crafty with Hero." The current challenge is "Never Seen Ink." Basically, take your older stamps that you've never used and use them! Hero Arts products, while encouraged, are not required. I pulled out Altenew's "Versatile Vases" stamp set for my card as my never-inked set.

I cut a panel of Strathmore Smooth Bristol paper to 3-3/4x5". After lining the vase stamp up in my MISTI, I stamped it with Lawn Fawn's Kiddie Pool ink, dried it with my heat tool, and then added "water" with a pale blue Tombow marker. I blended that color out with a damp paintbrush. I put the panel back in my MISTI & positioned the agapanthus stamp (from Stampendous' "Agapanthus Thanks" stamp set). I masked off the bottom of the vase with a piece of yellow Frog tape, and "inked" up the flower stem with a green Tombow marker. I stamped that, and repeated to get a better impression. I cleaned off the stem, and added color to the flower portion with a purple marker. After I stamped that twice, I used my paintbrush to blend the color in the center of the flower out just a bit, to help fill in the area.

I die cut a tag from a scrap of bristol paper with the smallest of the "Pinpoint Main Street Tags" dies (discontinued) from Poppystamps. I used my purple marker & damp paintbrush to do kind of an ombre on the tag. I dried that with my heat tool, and stamped the "hello" from "Versatile Vases" with Versafine Clair Morning Mist ink. I pierced a hole through the end of the tag, and used some thin jute twine to tie a bow through the hole. I pierced 2 more holes on either side of the vase, & threaded twine through them, taping the ends to the back of the panel. I used a thin foam dot at the end of the tag, and double-sided tape for the rest, and adhered it in place. The foam dot gives it just a bit of lift, for added depth & dimension.

I matted the panel with lavender cardstock, leaving a 1/8" border. I adhered that to a piece of green cardstock, and trimmed that to a 1/16" border on all 4 sides. Finally, I mounted the card front to a white A2-size card base.

I'm also entering this card in the following challenges:

Dies R Us Challenge #142: "Anything Goes Using Any Brand of Die DRU Sells" (used a Poppystamps die)
613 Avenue Create Challenge #231: "Anything Goes" (not playing the twist)

Saturday, March 28, 2020

Card Drive for Seniors


Ellen Hutson, based in Issaquah, WA, is having a card drive to collect cards for senior citizens in one of their local nursing & rehab facilities. Because of the current COVID-19 pandemic, nursing home residents are not permitted to have visitors. While they may not be able to see people face-to-face, hopefully cards will prove to be the next best thing. Ellen Hutson needs encouraging cards, with messages written on the inside for the residents. I created 2 cards for this drive.


For my first card, I used Sketch #SC579 from Splitcoaststampers.com as the basis for my design. I chose the "Daisy Kitty" & "So Much to Say #1" by Inky Antics for my image & greeting. I stamped the image in Altenew Vanilla Cream ink onto a panel of Strathmore Smooth Bristol paper. I colored it with my Tombow water-based markers. I added a bit of a very pale yellow to the daisy petals, just to help them stand out a little bit.

I used a 2" circle punch to punch out the opening in the patterned paper (from Pink Paislee's "Summer Lights" 6x6" pad). I adhered that and the top strip to my bristol paper panel, matted everything with a light green cardstock panel, & adhered it to my card base.

For the greeting, I chose the "sending you" & "warm hugs" stamps from "So Much to Say #1." To keep the greeting shorter so it would fit in the space I had, I masked the "you," inked up "sending" with Lawn Fawn's Forget-Me-Not ink, and stamped (after removing the masking tape from the stamp, of course!). Then I lined up the "warm hugs" stamp, inked again with the same color, & stamped it. I cut that into a small strip, and adhered it to my card.

I chose Newton's Nook's "Newton's Birdhouse" image for my second card. I stamped it onto a panel of Strathmore Vellum Bristol paper with Memento Tuxedo Black ink. Since this was a new stamp, I had to stamp it about 3 times to get a good black outline. I colored it with my Prismacolor colored pencils, using Gamsol on a blending stump to blend just the kitty's fur, so it would look nice & soft. I also added grass with 2 green pencils, to ground the image.

I stamped my greeting, also from the "So Much to Say #1" set, in Lawn Fawn's Blue Jay ink, onto a strip of Bazzill Icy Mint cardstock. I die cut 3 hearts from a scrap of patterned paper I had in my stash, using the 3 smallest of Hero Arts' "Nested Hearts Infinity" dies. I assembled my card, following Sketch #SC639, also at Splitcoaststampers.com, and using papers from the "Summer Lights" pad. I matted everything with a mint-green cardstock, and adhered it to my card base.

I'm also entering these in the following challenges:

Die Cut Divas: "Anything Goes" (second card only)
613 Avenue Create #231: "Anything Goes" (playing the colored pencils twist on my second card)
The House that Stamps Built Challenge #DCC M420: "It's Raining Cats & Dogs"

Tuesday, February 18, 2020

One Stamp, Two Cards

Send a Smile 4 Kids' current needs includes Spring & Easter cards. I used one stamp--Northwoods Rubber Stamps' "Small Wagon with Bunnies and Chicks"--on both a general Spring card and an Easter card.

For my Spring card, I used Sketch #SC617 at Splitcoaststampers.com for my design. I stamped the image onto a scrap of Strathmore Vellum Bristol paper with Lawn Fawn's Doe ink. I used my Prismacolor colored pencils to color the scene. Even though I used a semi-dark ink, it still has the basic effect of no-line coloring because of the generally darker colors I used. After I finished coloring, I die cut it with a circle die.

I used patterned papers from the "Hello Sunshine" 6x6" pad from Doodlebug Designs. I added in yellow & teal cardstocks for the background strip & blue banner, respectively. I die cut a larger circle from a solid green paper in the pad. I adhered the yellow strip to the background patterned paper, added the green circle & banners, and finally adhered the focal circle. I wrapped green baker's twine around the top of the panel, adhering the ends to the back with a little double-sided tape. I tied a bow from the same twine, and glued it in place with a bit of liquid glue. After matting the panel with an A2-size piece of darker yellow cardstock, I adhered it to a white card base.

Using the same image, I added an Easter greeting ("Happy Easter 02" from Stampabilities) to my second card. For my design, I turned to Sketch #SC568, also at Splitcoaststampers. I stamped the image this time with Ink on 3's Fade Out ink, so I could do some true no-line coloring. I again used my Prismacolor pencils, and die cut it with the same circle die as in my first card.

I cut a piece of teal patterned paper from Simple Stories' "Vintage Bliss" 6x6" pad to 5.25x4". I added a butterfly paper from the same pad, matting that with a light grey cardstock. The butterfly paper kind of visually "melted" into the mat, so before I adhered it, I inked around the edges with Pumice Stone Distress ink to add definition.

I stamped my greeting with Evergreen Bough Distress Oxide ink onto a strip of tan cardstock that I had also inked with Pumice Stone. The green ink actually matches the chevron patterned paper I used perfectly! I adhered that strip in place, & added my image circle, the perimeter of which I had inked with Pumice Stone. I matted the whole piece with yellow cardstock, & adhered that to a white A2 card base.

I'm entering my cards in the following challenges:

Simon Says Stamp's Wednesday Challenge: "Two or More Patterned Papers"
613 Avenue Create: "Anything Goes" (playing the "banners & bows" twist with my first card)
Send a Smile 4 Kids Challenge: "Easter or Spring Cards 4 Kids OR Anything Goes 4 Kids"
Dies R Us Challenge #139: "Wild Things (Animals)"

Wednesday, May 8, 2019

Sending Hugs

A friend of mine is going through a rough patch right now, so I made her this card, just to let her know I'm thinking about her. I got inspiration from this card I saw on Pinterest. I used Waffle Flower's "Lotus" stamp set for the images, and Altenew's "Painted Encouragement" for the greeting.

I started by stamping the leaf stem & the bloom with Versafine Onyx Black ink onto a panel of Strathmore Smooth Bristol paper, then heat embossed with Recollections Clear Detail embossing powder. I masked the stem, and stamped & heat embossed the leaf. Finally, I masked the leaf & flower, and stamped & heat embossed the last stem, as well as the greeting.

I used my Tombow markers to color the images, with the inspiration card as a guide for color selection. I blended the colors with a damp paintbrush.

I had stamped the greeting a little too far to the left, and the design was a bit unbalanced as a result. So I ended up cutting 1/4" off the right side & top, to make the panel 3.75x5". I matted it with dark green cardstock and trimmed it to leave a 1/16" border on all sides. Finally, I adhered it to a white A2-size card base. This card was super simple to make, and only took me about an hour! I considered adding splatters or something, since I just have a problem with leaving white space. But I didn't want to risk ruining the card, so I just left it alone.

I'm entering this card in the following challenges:

Through the Craft Room Door: "Anything Goes"
Creative Knockouts #296: "Friendship"
613 Avenue Create #221: "Anything Goes" (not playing the twist)

Saturday, August 25, 2018

Foxy Hi


My fifth & final card for My Favorite Things' "Summer School 2018 Session 2." The lesson for Day 2 was Visual Triangle. I've had this fox tag from the Echo Park "The Story of Fall" ephemera pack for at least a few years now, and hadn't used it yet. I have some of the ephemera pieces from that collection in a baggie, designated for card making. So I decided this would be the perfect time to use this tag! I did punch a hole through the top and added some brown hemp twine, but otherwise, kept the tag in its original state.

I first cut a piece of grey cardstock to 4x5.25". I taped it to the back of My Favorite Things' "Small Brick Wall" stencil, and applied Ranger Texture Paste over the stencil. When I had a fairly even coating of paste, I carefully removed the stencil, cleaned it & my palette knife, and set the panel aside to dry.

After the paste had dried thoroughly, I taped the stencil back over the pattern. I inked the bricks with Rusty Hinge, Fired Brick, & Vintage Photo Distress inks. I also went over parts with Antique Linen Distress Oxide ink, just to try and give a bit of lighter distressing, but I don't think it really had any effect in the end. When I finished inking, I removed the stencil.

I adhered my tag on to my panel with liquid glue. I wanted to make sure it would adhere to the textured surface, and I figured a generous coat of glue would do the trick. Of course, that meant weighting it down under some acrylic blocks for a few hours to dry, but that was no big deal.

For the greeting, I used a My Favorite Things' "Happy Hellos" die (discontinued). I cut it out of a scrap of green cardstock. I know there is no green in the tag or the background, but I felt a pop of it would help spice up the overall red-orange/neutral color palette a bit. I used liquid glue to adhere the letters to the tag.

To create my visual triangle, I chose 3 wood veneer leaves from my stash, and green & brown buttons. I used glue dots to adhere the buttons, and Ranger Multi Medium Matte to glue down the leaves. After the glue on the leaves had set up a bit so they wouldn't fall off, I pierced holes through the buttons into the background panel with my paper piercer, and stitched through the buttonholes with cream embroidery floss. I used small pieces of Scor Tape to adhere the floss ends to the back side of the panel.

Because my panel was so bumpy now, I decided to use Scor Tape to adhere it to a red mat, rather than my ATG gun, which might have messed up some of the elements on the front of the panel. I matted my panel, and adhered the whole thing to a white A2 card base. Now it's time to get the rest of the ephemera bits & pieces used up!

Saturday, May 26, 2018

Thinking of You


The challenge theme for Challenge #97 at Dies R Us is "Birds." I created this card, featuring the owls from Hero Arts' "Li'l Hoot" stamp set, to send to Lea Lawson for the Layton's Legacy card drive. Lea is collecting handmade cards to give to parents in the Neonatal Intensive Care Unit (NICU) at her local hospital. This card by Debby Hughes inspired the mountain background for mine.

I began by stamping the owls onto a scrap of 140 lb. watercolor paper with Versafine Onyx Black ink. I heat embossed with clear powder, and used my Mijello Mission Gold watercolors to paint them. After I fussy cut the image, I set that aside.

For the mountains, I actually used one of the Spellbinders "Pennants Mega" triangle dies (discontinued) to die cut 9 of them from Canson XL Mixed Media paper. I inked the triangles with Hickory Smoke Distress ink, and used Pumice Stone Distress ink to shade along the edges. I used the same die to cut pieces for the snow caps (also from mixed media paper), and cut along the bottom edge of each with a pair of decorative-edge scissors. I used liquid glue to adhere the snow caps to the tops of the mountains.

I cut another piece of mixed media paper to 4.25x5.5" for my background. I die cut a mask from masking paper with a We R Memory Keepers "Nesting Circles" die, and tore a piece of delicate surface Frog Tape to serve as a mask between the land & sky. I applied the upper tape mask to my panel, and inked below it with Hickory Smoke, to create the appearance of even more mountains in the distance.

After I had finished, I applied the other (bottom) side of the tape mask, making sure to match up with the curves of the first piece. I removed my top mask, and applied the negative portion of my circle mask to my panel. I inked the moon with Scattered Straw Distress ink. I dried that with my heat tool, applied the positive mask over the moon, and removed the negative mask. Finally, I inked the sky with Faded Jeans, Blueprint Sketch, Chipped Sapphire, & a little Black Soot ink around the edges. I used the "Falling Stars" stencil from Simon Says Stamp and Distress Grit-Paste to stencil the stars. I carefully removed the stencil & masks, and let the paste dry thoroughly.

After I glued my mountains & owls in place, I used a greeting I'd die cut with the Sizzix/Tim Holtz "Celebration Words Script" set. I applied glue to the back of each die cut, and adhered them in place over the mountains. I even managed to keep the tittles for the 2 "i" letters, and glued them in place as well. I adhered my panel to a white A2 card base, and this card was done!

I'm also entering this card in the following challenges:

A Blog Named Hero: "Watercolor"
613 Avenue Create #209: "Anything Goes" (not playing the optional twist)

Monday, January 1, 2018

Just Chicken In


The mood board for the current Ellen Hutson Pin-Sights challenge is all about wild colors! While I used many of the same colors, I went with a little lighter version for my card.

Pin-Sights mood board
I began with the background, using one of the stamps from the Essentials by Ellen "Wonky Backdrops" set. I cut a panel of white cardstock to 5.25x4", and used a makeup applicator to ink up part of my stamp with Hero Arts Bubble Gum ink. I inked the other side with Memento Cantaloupe, and stamped on my panel. I repeated the process with Memento Dandelion & Pear Tart; and Delta Emerald dye inks, going in basically rainbow order to create a gradient. I did the whole process 2 more times to finish filling in the panel.

For the image panel, I first cut another piece of white cardstock with a Hero Arts "Postage Stamps" die. I stamped the bird from the Essentials by Ellen "Twelve Days" on that with Hero Arts Black dye ink, and colored it with my Prismacolor colored pencils. I used Gamsol on a paper blending stump to blend & smooth the colors.

The greeting I wanted from "12 Days Companion Greetings" (discontinued?) fit perfectly on one of the "Delightful Day Conversation Bubbles" dies from Taylored Expressions. I first inked a piece of white cardstock with Pear Tart, using the direct-to-paper method. I stamped my greeting in black onto that, and die cut it. I then adhered that in place on my focal panel.

I matted my image panel with black cardstock, leaving a 1/16" border on all sides. I adhered that to my stamped background, and matted it with black as well. Finally, I mounted my card front to a white A2 card base.

I'm also entering this card in the following challenges:

613 Avenue Create #204: "Anything Goes"
Through the Craft Room Door: "Anything Goes"

Wednesday, December 27, 2017

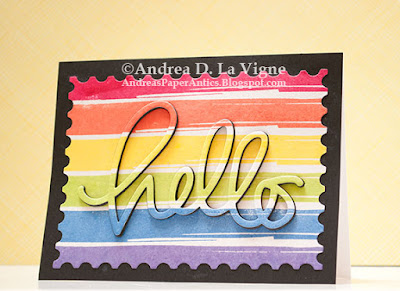
Rainbow Striped Hello


I am in the process of making 2 card sets for gifts for friends. This is one of the designs I came up with. I was inspired by this card that I had made some time ago, combined with the 2-Tier Eclipse technique that I used in this card.

To create the background, I first cut a panel of white cardstock to 5.5x4.25". I stamped the longest brushstroke from Avery Elle's "Brushed" stamp set across it, going in rainbow order. I used Altenew Ruby Red; Memento Morocco, Dandelion, Danube Blue, & Grape Jelly; and Hero Arts Lime Green inks to do my stamping. After I had finished, I didn't like the way the stripes simply stopped, kind of squared off at the right end of the panel. So I used a Hero Arts "Postage Stamps" die to cut the panel down.

I centered the "Big Hello" die from Simon Says Stamp on my panel, taped it in place, and ran it through my die cutting machine. I also cut a piece of black craft foam with the same die. After matting my stamped panel with an A2-size piece of black cardstock, I glued the craft foam die cut into the negative space in the panel. I also glued the inner pieces of the letters from my die cut hello, and finally used more liquid glue to adhere the hello that I'd die cut from my panel on top. To finish, I adhered my panel to a white A2 card base.

Wednesday, September 13, 2017

Sunny Thoughts


My Favorite Things is having their third annual "Card Design Superstar" challenge. I created this card for their "Coloring Virtuoso" category.

I cut a panel of Strathmore Mixed Media paper to 4.25x5.5". I stamped the little girl from My Favorite Things' "Sunny Thoughts" set (sadly discontinued) in Hero Arts Charcoal ink onto my panel. I went ahead & masked her off so I could work on my background before I spent a lot of time coloring. That way, if the background went awry, I wouldn't have "wasted" my coloring time! :)

For the sky, I used the "Mini Cloud Edges" stencil and Stormy Sky Distress ink. I started towards the top of my panel with the inking, then gradually moved down, using different portions of the stencil so all my clouds didn't look identical. I did leave a bit of a gap in the inking towards the left side. I used painter's tape to mask off a section there, & inked a sun ray with Squeezed Lemonade & Mustard Seed Distress inks. I moved my tape, inked the next ray, and repeated one more time. I made sure the rays got down to the girl's umbrella.

I ink blended Shabby Shutters & Peeled Paint Distress inks for the foreground and middle ground. I decided to put a hedge of sorts behind the girl, so I made that a bit darker. I made quick strokes for grass blades with a green Inktense pencil, then went over them with a damp paintbrush, just to "set" the color. (Inktense pencils become permanent after water has been applied & dried.) I also added variation into the hedge with a couple other green Inktense pencils, using a water brush to pick up the color & apply it in a mottled fashion to my inked area, just to add some texture.

Finally, it was time to remove my mask & color the little girl. I used my Inktense pencils for that as well, picking up the color from the pencils with a damp paintbrush & applying it to the paper. (This is my preferred method for these pencils, since it gives me more control & I get get softer colors.) For her face, I wet the paper first with clean water, then dropped the color in, to get a smoother blend. On the white bands of the umbrella, I actually went in with a light, gradated wash of yellow, to make it look like the sun rays are shining through the material. After I had finished coloring her, I let the paper dry completely & added more grass blades in front of her boots. I set that color with a damp paintbrush to finish.

After letting the panel dry for several hours, I stamped a greeting from "Sunny Thoughts" in Versamark ink over the hedge portion. I heat embossed that with Recollections Snow embossing powder. I let that cool, then adhered my card front to a white A2 card base.

Tuesday, September 5, 2017

Gonna be O.K.


Sandy Allnock recently posted about sending encouragement cards to the rescue workers in the Houston, TX, area. Since we live only a few hundred miles north of there, I've been seeing a lot from friends about the devastation & horrors; but also about the generosity that has been going on there. I decided to make a few cards to send to the first responders in the area.

Sandy suggested making cards aimed at both men & women. This first one of mine definitely falls in the latter category! I really decided to play & experiment a little with the flowers & leaves on this card. Using the "Bold Blooms" stamps from the Essentials by Ellen line, I first tried "inking" up 2 of the stamps with Tombow markers, misting with water, and stamping onto Strathmore Smooth Bristol paper. While that was nice, I didn't really like the uncolored spaces between the stamp lines. So I tried again, this time misting the paper rather than the stamp. Again, an OK look, but now a bit too mushy. Finally, I just scribbled spots on scraps of bristol paper with the markers, spritzed it generously with water, and dried that with my heat tool. Then I stamped the leaf & flower in Versamark ink, and heat embossed with Ranger Liquid Platinum embossing powder. Finally--I had the definition I wanted, and the all-over color! I created a total of 5 each of the smaller flower & leaf, & cut them out with the coordinating dies.

For my panel, I stamped the "Wood Plank Background" from My Favorite Things onto a piece of ivory cardstock, with Hero Arts Wet Cement ink. I wanted some interest in the background, but didn't want it to compete with my main elements.

I stamped the greeting, from Essentials by Ellen "Up the Happy" set, in Versamark on another scrap of bristol, and heat embossed it with Liquid Platinum. I die cut it with a Simon Says Stamp "Stitched Circles" die. To create an ombre look, I took one of my pink markers that I had used on the flowers and colored the bottom part of the circle, bringing the color up maybe 1/4 of the way. Then I took my water brush, and spread the color up the rest of the circle, letting it fade out to a pale pink at the top.

To complete my card, I adhered the greeting, so it is centered on a "line" about 1/3 of the way from the right side of the card, in accord with the Rule of Thirds. I arranged my flowers & leaves, and glued them to the panel with liquid glue. When that had dried, I trimmed off the overhanging bits with scissors. Finally, I adhered my card front to a white A2 card base.

I'm entering this card in the following challenges:

Ellen Hutson's August "Pin-Sights" challenge
Simon Says Stamp's Wednesday challenge: "Anything Goes"
613 Avenue Create: "Anything Goes"

Thursday, June 22, 2017

Floral Slider Card


The craft for Day 4 of My Favorite Things' Camp Create is "Sensational Sliders." I must admit, I could count the number of slider cards I've ever made on one hand, probably with at least 1 or 2 fingers left over! But I decided to take the plunge and make a slider card.


I decided to make my slider a floral arrangement. So I stamped all the images from MFT's "Watercolor Flowers" set multiple times. For the red flowers I used Hero Arts Bubble Gum, Memento Lady Bug, & Altenew Ruby Red inks. I stamped the purple flowers with Lawn Fawn Fresh Lavender, Hero Arts Orchid, & Memento Sweet Plum. I used Memento Dandelion & Cantaloupe with Simon Says Stamp Sunshine ink for the yellow flowers; and Altenew Frayed Leaf & Forest Glades and Hero Arts Forever Green for the leaves. I finished with Hero Arts Navy ink for the flower centers. After I had finished stamping all the flowers & leaves, I cut them out with the coordinating dies.

I stamped Inkadinkado's "Mason Jar" on a scrap of Strathmore Smooth Bristol paper with Hero Arts Soft Pool ink. After I stamped the flower stems with Forest Glades & Frayed Leaf, I colored the water area with a light blue Tombow marker. I blended the color out with a water brush, & fussy cut the image.

To create the flower arrangement, I took some of the flowers & leaves I'd stamped and die cut, and positioned them around the top of the jar. Once I had the arrangement like I wanted, I glued them to the jar & to each other, so they were all in one piece. I arranged the rest of my flowers & leaves in another cluster, and glued them to a scrap of white cardstock. Once the glue had dried, I cut that out with my scissors.

Card with flower arrangement extended
For the slider, I created a channel on the back of the jar with 1/4" wide strips of bristol paper. I also cut a strip of bristol for the pull mechanism, and added a narrow strip to the bottom of it, to act as a stopper. I adhered my second flower cluster to the pull strip with Scor Tape, & determined where I wanted the slider to stop. I glued another strip of bristol across the back of my jar at that stop point, adding the glue only to the ends of the strip, so the pull strip would slide freely, and the stopper would catch on the cross strip. I die cut a heart with a Nellie's Choice "Straight Heart" die from a patterned paper scrap, and glued it upside-down on the top of my pull strip. I trimmed off the bristol that showed from behind the heart, and stamped the "pull" & an arrow from MFT's "Interactive Labels" set in Versafine Onyx Black ink.

I cut a piece of black dot paper from Pebbles' "Garden Party" 6x6" pad and a strip of chevron paper from Basic Grey's "Fiction" 6x6" pad for my background. I adhered the chevron strip to the bottom of the dot paper, and adhered my focal image with Scor Tape. I ended up having to pull it apart, though, because the slider mechanism caught on the paper seam. So I added a piece of Scotch tape over the seam where the jar would cover it, and reattached my jar. That worked!

I used MFT's "Happy Hellos" (discontinued) for the greeting. I adhered a piece of patterned paper to fun foam with Stick It on both sides of it, and die cut my "hi" from that. I adhered that to my card front over the jar. All that was left was to mount my card front to a white A2 card base. I'll have to make an envelope that's larger than A2, since the pull tab sticks out over the top of my card. But hey--I'm glad everything works in the end! :)

Sunday, June 11, 2017

Dude, Sup?


Simon Says Stamp's Monday Challenge this week has been "Masculine." I decided to make this card to send to Send a Smile 4 Kids. I used the "Truck Single" stamp from Our Daily Bread Designs & 2 greetings from Paper Smooches' "Slang Gang" stamp set.

I began by creating my background. I cut a piece of white cardstock to 4.25x5.5", and laid a strip of orange washi tape (Recollections brand) at a diagonal. I lined that up on my grid mat, so the tape went horizontally, then used the lines on my mat to space out the rest of my washi tape strips. I added in a black & white tape that makes me think of road markings, since it kind of goes with the truck. After I had applied all the tape, I just trimmed off the overhanging pieces.

For the greeting, I wanted something that might suit a teenage boy. Or, at least, a very tomboyish teenage girl! :) I chose the "dude" & "sup?" stamps from "Slang Gang." I die cut 2 arrows with one of the dies from My Favorite Things' "Blueprints 18" set out of grey cardstock. Then I heat embossed the words with Ranger Super Fine Detail White embossing powder, and set those aside.

I stamped the truck in the lower right corner of a scrap of white cardstock with Memento Tuxedo Black ink. I colored it with my Prismacolor colored pencils, pulling my color scheme from the washi tape I had used. After I'd finished the coloring, I adhered that panel to the bottom front of my white A2 card base.

To pull my design together, I die cut an arc from the bottom of my washi tape panel with the curved die from Avery Elle's "Custom Panels." I tacked my greeting arrows down with a little ATG tape, and stapled the left end of each with my Tim Holtz Tiny Attacher. I added a piece of craft/fun foam to the back of that panel with Scor Tape, and adhered it to my card base, flush with the top edge. This was really a quick card to pull together. Hopefully, it will bring a smile to the recipient's face!

I'm also entering this card in the following challenges:

Simon Says Stamp's Wednesday Challenge: "Make It Masculine"
Creative Knockouts' Challenge #197: "Washi Tape Wonder"
Dies R Us #74: "Masculine"
Send a Smile 4 Kids: "Anything Goes 4 Kids"

Tuesday, May 16, 2017

Happy Mail Owl


On Day 6 of Online Card Classes' "Sparkle & Shine" class, Heather Ruwe had a lesson on "Faux Ombre Embossing with Distress Inks." I used that technique with this card.

To create the background, I used Mustard Seed, Fossilized Amber, & Rusty Hinge Distress inks and Winnie & Walter's "Madison" Creative Screenings stencil. I wanted to go for a more gender-neutral card, and knew I would use the "Curious Owl" stamp by Hero Arts. I thought the stencil resembled feathers, hence my choice.

After finishing the background, following Heather's instructions, I stamped the owl onto a scrap of Strathmore Smooth Bristol paper with Hero Arts Wet Cement ink. I colored that with my Zig Clean Color Real Brush markers, using a water brush (sparingly) to blend the color a little in places. Then I set that aside to dry, before fussy cutting him out.

I stamped an envelope from Technique Tuesday's "Random Act of Cardness" set onto bristol paper with Wet Cement, and fussy cut it out. I used a craft knife to cut along the sides of the owl's beak, and slipped the envelope into the slits, gluing it in place with a bit of liquid glue.

I figured the owl would blend into the background too much if I adhered him directly to it, but also didn't want to cover up a lot of the stenciled panel. So I die cut a piece of Essentials by Ellen 40 lb. vellum with a Lawn Fawn "Large Stitched Oval" die. I stamped a greeting from the "Snail Mail" set, also by Technique Tuesday, on the vellum above where the owl would go with Ranger Archival Coffee ink. That turned out to be a mistake, since the greeting didn't show up against the background, even with the vellum to mute the colors on my panel. So I used a fine-tip black marker to trace over the letters. It's not absolutely perfect, but it's close enough for me, and at least I didn't have to die cut and re-stamp another oval! :)

To complete the card, I adhered the owl to the oval with foam tape, and used Scor-Tape pieces on the back of the vellum (behind the owl) to adhere it directly to my background. I felt the panel needed a little more definition, so I machine-stitched around the perimeter with black thread. I finished by adhering the card front to a white A2 card base. I will leave this card in our mailbox for our postal carrier, just as a little appreciation card, as part of Jennifer McGuire's #ShareHandmadeKindness campaign.

I'm entering this card in the following challenges:

A Blog Named Hero: "Watercoloring"
Pile It On #130: "Animal"
613 Avenue Create: "Anything Goes"

Saturday, April 29, 2017

Thinking of You


a2zScrapbooking's challenge theme for April is "Getting to Know You." The idea is to take your favorite Hero Arts product and create a project. One of my favorite stamp sets is "Year Round Sentiments." This set was originally created with Operation Write Home in mind, but it has several greetings that are still useful for general card making. I combined that with one of the dragonflies from "Winged Friends," which I don't think I've used before.

I began by creating a blank, portrait-oriented A2-size canvas in Photoshop. I created a white rectangle shape layer 1/4" shorter & narrower than my canvas, and centered it, giving me a 1/8" border on all sides. Then I opened the dragonfly image file, copied it to my canvas, and made it (much) smaller. I positioned the first dragonfly within the rectangle layer, and clipped it to that shape so my 1/8" border would be preserved. I then duplicated the dragonfly layer, and positioned the duplicated image in another area, also clipping it to my rectangle layer. I continued in this manner until my background was full of dragonflies. Because they were all clipped to the smaller rectangle shape, none of them extended into my border area.

I created another 4x6" blank canvas in Photoshop, and copied one of the dragonflies to that. I printed my background design onto a 4.25x5.5" piece of white cardstock, and printed my separate dragonfly onto a piece of 140 lb. watercolor paper that I'd cut to 4x6". (This just made it easier to print the single dragonfly, without my having to adhere my watercolor paper to a letter-size piece of copy paper to run it through my printer.)

Not knowing what colors dragonflies come in, I googled dragonfly images. I was surprised to see just how colorful they can be! I chose one image, and used that as a guide to paint my dragonfly. I colored it with my Inktense pencils, using my preferred method of applying color, by picking it from the pencil with a damp paintbrush & applying it to my paper. When I had finished with that, I set my image aside to dry.

To give a more finished appearance to my background, I drew around the edges with a grey marker & ruler. I didn't really like how that looked, so I went over it with a fine-tip black marker. I like the way the grey acts as a sort of "shadow" for the black lines better.

For my greeting, I chose the "Thinking of you" from "Year Round Sentiments." I stamped it on a piece of white cardstock, with Hero Arts Navy ink. I cut it into a banner, and dragged the edges across my Navy ink pad. Then I adhered it to my card front panel. I fussy cut the dragonfly I'd colored, and ran a grey Tombow marker around the edges, to camouflage the white core of the paper. I used Perfect Paper Adhesive to glue it in place, overlapping the greeting banner slightly. After using my Tim Holtz Tiny Attacher to staple the end of the banner, I adhered my card front to a white A2 card base. Finally, I added some shimmer to the dragonfly's wings with my Clear Wink of Stella pen.

I'm also entering this card in the following challenges:

A Blog Named Hero "Anything Goes"
Simon Says Stamp's Wednesday "Anything Goes"
Through the Craft Room Door "Anything Goes"

Tuesday, February 28, 2017

Floral Hugs


I created this card for both the current Fusion challenge & the Essentials by Ellen February Pin-Sights challenge. I followed the sketch for the Fusion challenge, with my color inspiration coming from the Pin-Sights mood board.


I began by cutting a piece of light pool-colored cardstock to 4.25x5.5". I embossed it with the "Brick" embossing folder from Taylored Expressions. Since I really struggle with leaving a lot of "white space" on my projects, this gave some interest to the background without adding a lot of "stuff."

To create my flowers, I stamped 2 of the images from the Essentials by Ellen "Bold Blooms" set onto white cardstock. For the solid flower, I used Hero Arts Pool ink, and Versamark for the scribbly flower. I heat embossed the larger flower with Ranger Silver embossing powder. After drying the solid flower with my heat tool, I added the center stamp and heat embossed that with silver as well. Finally, I die cut both with the coordinating dies. I inked the scribbly flower with Tumbled Glass Distress ink, and also inked the edges of the solid flower to help camouflage the white border and make it blend in more.

For the greeting panel, I die cut a piece of white cardstock with one of the "Large Cross Stitched Rectangle" dies from Lawn Fawn. I laid my flowers where I wanted them to overlap the panel, and lightly traced around them with a pencil. That helped me position my greeting, from the Essentials by Ellen "All Inside" stamp set. I stamped that in Versamark, and heat embossed it with the same silver powder I'd used on the flowers. Then I took a pool-colored Tombow marker, colored the bottom part of each letter, and used the Tombow blender marker to fade the color up in the letters to almost white.

I adhered my greeting panel to the background, and glued my flowers in place with Perfect Paper Adhesive. I felt the panel was a little bottom-heavy, so I decided to add some gems. I colored clear gemstones with Adirondack alcohol ink in the color Stream. I daubed up the extra ink with a paper towel, let them dry for several seconds, then glued them to my card with Ranger Multi Medium Matte. Finally, I adhered my card front to a white A2 card base.

I'm also entering this card in the following challenges:

Simon Says Stamp's Wednesday challenge "Anything Goes"
613 Avenue Create #194: "Anything Goes"

Tuesday, February 21, 2017

Creative Knockouts #181


Challenge #181 at Creative Knockouts is a recipe challenge. You have to use 1 image, 2 embellishments, & 3 patterned papers. I really struggled with this one. The image & patterned paper requirements weren't too hard, but applying embellishments without creating a visual triangle--which by definition requires at least 3 items--proved a bit stressful! But I'm happy with the end result, and hopefully the recipient will be, too. :)

I started with a really old sketch from Operation Write Home. I believe it was #8 (out of a total of 259 sketches). The sketch as is has 2 background panels, split with a diagonal line running from the upper right corner to the bottom left, and a focal/greeting piece in the middle. Because I needed 3 patterned papers, I tweaked the sketch slightly. I created a portrait-oriented, A2-size blank "canvas" in Photoshop, and drew 2 diagonal lines, to create 3 areas that represented my patterned paper panels. I printed that onto a piece of copy paper and cut it apart to use as a pattern for cutting my patterned papers.

For the image, I used the "Lily Block" digi image from Sweet 'n Sassy Stamps. I sized it to fit on a 2.5" diameter square, with a 1/8" white border around the block. I then printed that onto a piece of Strathmore Smooth Bristol paper. I found a photo of a purple lily online, and colored my image based on that with my Zig Clean Color Real Brush markers.

After cutting my patterned papers (from my scrap stash), I adhered them directly to the front of a white A2 card base. I mounted my image panel, and then came the time to decide on my embellishments. I found a small wood veneer butterfly (I believe by The Paper Studio) in my stash, and a purple flower-shaped button that I felt would be perfect. I threaded the button with yellow embroidery floss, and painted the butterfly with a Ranger Adirondack Gold paint dauber. Finally, I used Perfect Paper Adhesive to glue both pieces in place, & set 2 acrylic blocks on the button to keep it in contact with the card while the glue dried. I just love the bold colors in this card, and felt it didn't really need a greeting. It can then be used for pretty much any occasion. I will send this card in my next package to Send a Smile 4 Kids. I figure it will be a good card for an older girl in one of their hospitals.

I'm also entering my card in the following challenges:

Send a Smile 4 Kids: Easter or Spring Cards 4 Kids
Simon Says Stamp's Wednesday Challenge: Fantastic Florals

Saturday, February 4, 2017

Lovely Lotus


Our Daily Bread Designs is having a color challenge this month. They posted a color palette, and challenged participants to create a card using at least 3 colors from that image. I went with light purple, dark purple, red-violet, & yellow. For my design, I went with Sketch #SC598 from Splitcoaststampers.com.

our daily bread designs color challenge palette

I stamped the "Lotus" image from ODBD onto a piece of 140 lb. watercolor paper, in Hero Arts Charcoal ink. I wanted the lines to show, but be softer than a black outline. After cutting it with the largest of Spellbinders "Classic Ovals LG" dies, I used my Inktense pencils to color it in. My preferred method is to pick up the color from the pencil with a damp paintbrush, and then apply it to my paper. I layered my colors, until I got the intensity & shading I wanted. Once that had dried, I watercolored the background with Frayed Burlap Distress ink, to give a kind of "antique-y" glow. I then added some blue to the water with Salty Ocean Distress ink.

I chose 3 patterned papers from my scrap stash. I cut the red-violet pattern with a Spellbinders "Standard Circles LG" die. I cut a piece of dark purple cardstock to 4.25x5.5", and adhered that to my white A2 card base. Next, I mounted a piece of yellow cardstock, cut slightly smaller, to that. Finally, I layered my patterned paper pieces on top, and added my focal oval. I threaded white crochet twine through a purple button & tied it in a bow. I threaded more twine through 2 smaller yellow buttons, and knotted that. Then I glued my buttons to the card with Ranger Multi Medium Matte.