

I'm getting down to the finish line on our holiday cards--FINALLY!!!! These are 2 more that I made.
For my first, I took inspiration from one of Debby Hughes' lessons from Online Card Classes' "Holiday Card Workshop 2014." (OCC is not having a holiday card class this year, so I pulled this one out of my vault.) I die cut a tag from 140 lb. watercolor paper with Pretty Pink Posh's "Stitched Duo 3" die. I stamped the greeting, from "Very Merry Christmas," (apparently retired) and a crystal from "Christmas Crystals" (both Hero Arts sets) in Versamark onto the tag, and heat embossed with Ranger Liquid Platinum. I also added a line from the top of the crystal to the "M" with a fine-tip glue pen, and heat embossed that. I wet the tag with plain water, and used it to soak up Festive Berries Distress ink, which I'd applied to an acrylic block and watered down. I was going for a "dyed" look, but may have gotten a little carried away with the ink. I think it still looks good, though! :)
I created a tag reinforcer by punching some red cardstock with a 1/2" circle punch. I glued that to my tag, let the glue dry, and punched through both layers with a 1/4" hole punch. I backed my tag with fun foam, to give some dimension.
For the background, I cut a mat from white cardstock, and inked around the perimeter with Festive Berries. I let that dry, then adhered a piece of patterned paper from my scrap stash. I had rounded the patterned paper's corner with the 1/2" side of my Corner Chomper, to mimic the curve of the tag and give that area a bit more finished look. I adhered my tag, and mounted the card front to a white A2 card base. Finally, I rounded the upper corner of the base/mat.
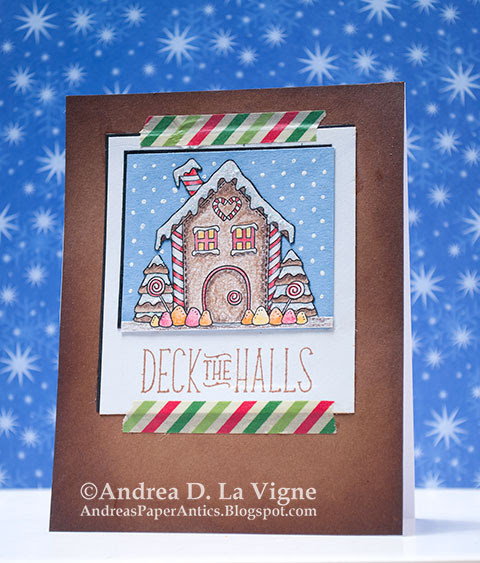
I used Sketch #SC571 from Splitcoaststampers.com for my second card design. I printed the "Gingerbread House" digi image from Jane's Doodles onto a piece of Canson XL Mixed Media Paper, and colored it with my Prismacolor colored pencils. I fussy cut the image, and glued it to a piece of blue cardstock. I used a white gel pen to add dots to the background.
For the Polaroid look, I cut a piece of white cardstock to the size in the sketch. I also cut a piece of black cardstock, and layered it behind the white, slightly offset, to give a shadow look. I stamped my greeting, from Lawn Fawn's "Deck the Halls" set with Colorbox Chestnut Roan chalk ink. I added another piece of black behind my focal image, and then adhered that to the white mat.
I cut a piece of kraft cardstock to 4.25x5.5", and inked around the edges with Tea Dye & Gathered Twigs Distress inks. I wanted to give a "slightly-burned gingerbread" look to the background. I adhered my main panel to the background, added some striped washi tape pieces to create the look of a taped-up photo, and mounted it to a white A2 card base. I added a bit of sparkle to the gumdrops with my clear Wink of Stella pen, and Diamond Stickles to the frosting on the roof, chimney, & trees.
No comments:
Post a Comment
I love to hear your ideas on my work, so let me know what you think!