Friday, September 15, 2023

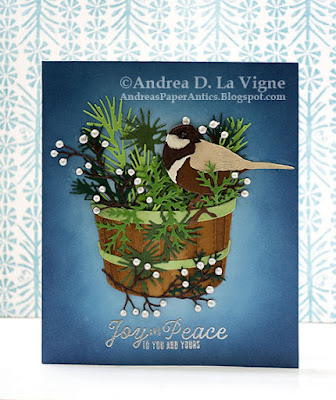
Joy and Peace


This has been the second week of the September challenges at Christmas Card Throwdown. This challenge is a color challenge to use green, brown, & blue. I admittedly struggled a bit, not so much because it's a difficult color combo (I don't think it is), but just trying to decide how I wanted to incorporate those colors into a card. Plus, trying to get into the holiday card making mentality. But, it's the second week of September, & the holidays will be here before we know it. So I decided to take the plunge & get making! :)


My design inspiration came from a home decor piece we have that is a bird sitting in a basket, surrounded by an autumnal arrangement of greenery & fruit. I decided to create something similar with a more wintry feel. For the basket, I chose Concord & 9th's "Freshly Picked" die set. The bird came from Honey Bee Stamps' "Lovely Layers: Winter Birds" die set, & the foliage from Sizzix/Tim Holtz's "Holiday Greens" die set. I pulled the greeting from the October 2020 My Monthly Hero Kit from Hero Arts (discontinued). 

I chose a few different shades of brown cardstock from my scrap stash for the bird. I die cut the pieces,  & then used liquid glue to assemble the bird. Instead of die cutting the beak & eye, since they are so tiny, I used a black pen to color in the beak & added the eye with Ebony Black Nuvo Crystal Drops.

I die cut the greenery from an assortment of green cardstocks - also from my scrap stash. I used kraft cardstock to die cut the base pieces for the basket, & a pale green for the bands. For the berry branches, I used dark brown cardstock. I'm happy to say, except for the card front panel, I actually used only scraps for all the elements!

For the basket, I used Gathered Twigs Distress ink to shade both of the kraft pieces. I added additional shading to the edges of the back piece with Walnut Stain Distress ink, & used Bundled Sage to shade the green bands. Finally, I glued all the pieces together. I arranged my greenery & berry branches in the basket, gluing them to the back of the basket as I went. After I had a few greenery pieces glued in place, I went ahead & added my bird so I could better integrate him into the arrangement. Finally, I glued one branch & a green sprig to the front of the basket.

I had initially intended to make this an A2-size card, but when I laid my completed basket arrangement on a panel, I quickly realized I had to upsize! I cut a 5x7" panel from light blue cardstock, but decided that was a bit too tall, so I cut it 1" shorter, to a final size of 5x6". I ink blended around the outside of the blue panel with Faded Jeans Distress ink, then added Chipped Sapphire around the very edges to darken that area up. I left the middle with no ink, to create a glowing effect around my focal point.

After I finished ink blending & adhered my card front to a white card base, I glued down my arrangement. I struggled with the placement a bit, since if I centered the whole piece - measuring from the end of the bird's tail on the right to the edge of the greenery on the other side, the basket itself was off-center. I finally just kind of "fudged" it a bit, so that while nothing is perfectly centered, it still looks balanced. Then I added the berries with Ivory Seashell Nuvo Crystal Drops. I let all that dry overnight, and finished by heat embossing my greeting with Ranger Silver Super Fine Detail embossing powder.

I'm also entering this card in the following challenges:

The Paper Funday Challenges #57: "Anything Goes" (not playing the optional twist)

Saturday, September 2, 2023

Peaceful Lighthouse


This card took quite a bit of pre-planning & also focus while I was making it. Thankfully, I was able to use the masks from the Waffle Flower "Lighthouse Stencil-n-Stamp" set I used for the bulk of my design to help me determine where to position everything before I started stenciling & stamping.

Once I had my design worked out, I began by ink blending the sand area with Distress inks. I used Antique Linen first, and then darkened/warmed it with Tea Dye. I added Chipped Sapphire over the area to the far left, just to differentiate that spot & make it look "rocky."

I positioned the sand & lighthouse masks to protect those areas, & then ink blended the sky with Mustard Seed, Wild Honey, Worn Lipstick, & Chipped Sapphire Distress inks. That was probably the easiest part of the whole card! After I had all the colors down, I added the light beam with that stencil & Lawn Fawn's Yeti white pigment ink.

For the water area, I taped the Hero Arts "Waves" stencil (discontinued) in place, & masked above it with yellow Frog tape. I ink blended with the same colors as the sky, minus the Chipped Sapphire. Then I removed the stencil. The white areas that the stencil had covered seemed a bit too stark, so I blended over them with the same colors as before to try & get a tone-on-tone effect. That didn't give enough contrast, though, and the colors actually looked kind of "mushy." So I positioned the "Waves" stencil back where I had had it, & inked over it with Chipped Sapphire, making sure to go dark enough that it covered the underlying colors, rather than just blending with them. It's a rather stylized look, but I think it came out OK.

I removed just the lighthouse mask, & stamped the lighthouse with Versafine Onyx Black ink. I stamped it about 3 times, just to get a good solid coverage. The area right above the sand mask didn't really stamp due to the thickness of the mask under the bottom of the stamp. Fortunately I was able to use a black marker to fill in the missing part. I also stamped the birds in black. I used the stencil to add the light in the windows. I blended yellow & pink ink to the top part where you can see through the glass to the sky behind. To add a little something extra in the corners, I pierced holes & made French knots with a pale rose embroidery floss. Finally, I matted the panel with blue cardstock & adhered it to a white A2-size card base. I decided a greeting on the front would detract from the scene, so I'll just write a personal message inside.

I'm entering this in the following challenges:

Thursday, August 31, 2023

With Deepest Sympathy


The mother of a friend of ours recently passed away, so I made this sympathy card to send. The photo for Inspiration Station's Challenge #52 served as my jumping-off point. In particular, I was drawn to the butterflies, wildflowers, & the colors and ethereal quality of the atmosphere.

I began by die cutting a piece of 140 lb. watercolor paper with one of the "Nested A2 Arches" dies from Scrapbook.com. I inked it with Salvaged Patina, Mustard Seed, & Shabby Shutters Distress inks. I spritzed water droplets onto the panel, let them sit for a minute or two, then picked the drops up with a towel. I wanted kind of a 2-tone effect, with some spots darker than others, so I inked over the Mustard Seed area with Squeezed Lemonade Distress ink & added another layer of Shabby Shutters at the bottom of the panel. (I didn't feel the Salvaged Patina area needed another layer of ink.) Then I spritzed more droplets on & soaked them up.

I die cut 3 of the Sizzix/Tim Holtz "Wildflowers" from white cardstock. I inked the flower portions with a Versamarker pen, and added a coat of Abandoned Coral Distress Embossing Glaze. I repeated the process once again to get a more solid coating. Then I did the same with Mowed Lawn Embossing Glaze for the stems & leaves. I glued them to my background, & trimmed off the overhanging bits. I then adhered my arch to a navy mat.

I stamped one of the Picket Fence Studios "Butterfly Beauties" butterflies onto a scrap of green cardstock with Lawn Fawn's Deep Sea ink. I die cut it with the coordinating die, & also die cut 2 more butterfly shapes from the same cardstock. Using a trick I learned from Jennifer McGuire, I folded each of the plain die cuts in half. I glued half of one behind the left half of the stamped butterfly, and the other behind the right half. Then I glued just the other halves of the folded butterfly die cuts to my card front, so the stamped one would pop up slightly.

I chose a greeting from Simon Says Stamps' "Sympathy Greetings Mix" stamp set (discontinued). I had initially planned to stamp the greeting on a strip of cardstock & adhere it to my card. But I was pleasantly surprised when I discovered that this particular greeting nestled perfectly along the curve of the arch with the flower under it. So I used Deep Sea ink to stamp it there. Talk about serendipity! Finally, I added my card front to a white A2 card base.

Friday, May 26, 2023

Happy Mother's Day


I based the design & floral embellishments for this card on Try Stampin' on Tuesday's Sketch #607 challenge.


I began by creating the flower layers with an old punch from The Paper Studio. I punched 3 layers for each flower, then glued them together, adding glue just to the centers. I finished them off by adding a gem in the middle of each.

I embossed the panel to go behind the flowers with the "Floral Fantasy" embossing folder from Cuttlebug (discontinued). I matted it with navy cardstock to help it stand out, then adhered that to my white A2 card base.

I cut a strip from an inky background I'd made several months ago. I adhered that to my card, and then glued the flowers over it.

I stamped a greeting from Simon Says Stamp's "All About Mom" stamp set in Lawn Fawn Deep Sea ink. Finally, I die cut a vine using one of the Spellbinder's "Sprigs" dies (discontinued), and glued that next to the greeting.

I'm also entering my card in 613 Avenue Create's May challenge: "Anything Goes" (playing the optional twist of "Say It with Flowers")

Saturday, May 6, 2023

A Better Dad


I am excited to be the Guest Designer for this month's challenge at Send a Smile 4 Kids! Their theme this month is "Cards 4 Dads/Special Guys." I created this Father's Day card to go along with that theme. My design is based on Sketch #SC783 at Splitcoaststampers.com.

I stamped the mice & dandelion (from Lawn Fawn's "Dandy Day" set) onto a scrap of Strathmore vellum bristol paper. I colored them with my Prismacolor colored pencils. It doesn't show up much in the photo, but I added a little light grey to the fluff on the dandelion. Then I die cut them with the coordinating dies. I actually had to redo the dandelion, since I apparently really messed up aligning the die with the stamped & colored image! So I tried die cutting first, taping the die cut from the back into the negative space, lining up the stamp with the die cut, & stamping. It's still not absolutely 100% perfect, but like Jennifer McGuire says, it's handmade, not Hallmark!

For the background scene, I used one of the "Grassy Hillsides Borders" dies from Lawn Fawn to cut the grass from green cardstock. I added a bit of shading with Mowed Lawn Distress ink. I wanted the father & baby mouse to be looking up at the other mouse, hence my decision to have them on a hill. I found a blue patterned paper with a bokeh look that I'd gotten as a gift with purchase from Lawn Fawn. I thought the bokeh supported the magical idea of blowing dandelions, so I used it for the sky. I adhered my sky & grass pieces to a backing of white cardstock, just so I didn't have to fiddle with them as smaller individual elements. After gluing down my mice & dandelion to the background, I also stamped the flying seeds on the sky paper.

I stamped my greeting, also from "Dandy Day," in black on a scrap of grey cardstock. I cut that into a strip, as per the sketch. I adhered my strip & scene panel to a piece of patterned paper from Crate Paper's "Botanical Gardens" 6x6" pad. Finally, I mounted my card front to a white A2-size card base. 

Friday, March 17, 2023

Happy St. Patrick's Day


I used the sketch for Try Stampin' on Tuesday's Challenge #597, plus the photo from Inspiration Station's Prompt #47 challenge as the basis for my card. The inspiration photo made me think of Ireland - perfect for a St. Patrick's Day card!

I used Honey Bee Stamps "Plaid Background" stencils (discontinued) to create my background. For the hashed stripes, I brought in a stamp from My Favorite Things' "Plaid Background Builder" set (also discontinued). I used Twisted Citron & Salvaged Patina Distress inks for the stenciled portion of the plaid, & Mowed Lawn Distress Oxide ink for the stamping.

I googled "Irish blessing" to get the blessing for the main panel. I found one (I forget the site name), & decided it fit with the sketch design perfectly. I created a blank "canvas" in Photoshop the size I wanted the main panel. I copied & pasted the text for the blessing, & formatted it with the Celtic Hand font. It took a bit of fiddling with the font size to get the lines of text to come out how I wanted, but I prevailed! I printed that onto a panel of light green cardstock. I also created the greeting in Photoshop, using the Ramsey SD font. I printed that onto a strip of light blue-green cardstock.

For the shamrocks, I created a pattern using the custom shape tool in Photoshop. I printed that onto copy paper. The cardstock I chose to stitch on was too thick to see through to use my lightpad to transfer the pattern. So I traced the pattern onto tracing paper, placed that on the back of each circle, & used it as a guide to pierce my stitching holes. I used green DMC floss to do the stitching.

To assemble my card, I adhered the plaid panel to a white A2-size card base. Then I added the greeting strip & stitched circles. At this point, I realized I'd forgotten to add the twine. I prefer to keep the insides of my cards "clean," so I carefully peeled away the top part of the front plaid panel, & taped the ends of a length of twine behind the panel. Then I tied a knot with another piece of twine around the first. I used a little liquid glue on the knot to keep it from coming untied, & added more glue behind the knot to keep it in place. I stuck the top of the background panel back to the card base, & that finished this card.

I'm also entering this card in Double Trouble's Challenge #133, "Use the Color Green." I'm playing the optional twist of adding plaid.

Thursday, March 9, 2023

You're a Winner


I created this card based on the sketch for Try Stampin' on Tuesday's Challenge #596. I rotated the sketch 90 degrees. For the purple banner in the sketch, I have a panel running the height of the card. I used the white block for my greeting.


I began by stamping the game controller from Simon Says Stamp's "All Boy" stamp set (discontinued). I colored it with my Zig Clean Color Real Brush markers, then fussy cut it. I stamped my greeting onto a strip of patterned paper from the Recollections "Paddywack" 6x6" pad with Mermaid Lagoon Distress Oxide ink.

I die cut a circle from pink houndstooth paper from the My Mind's Eye "Adorbs" 6x6" patterned paper pad, & glued it to my background panel. I trimmed down a scrap from an inky technique piece I'd done months ago that has been sitting on my desk, & adhered it overlapping the circle, as per the sketch. I glued the greeting banner & game controller in place, & and adhered the panel to a white A2-size card base.