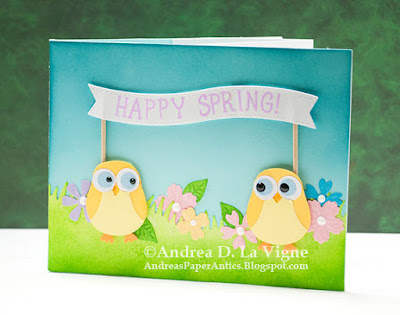
This month's challenge at Live Love Cards has been about birds. I decided to create this "Happy Spring" card, using Stampin' Up's "Owl" punch (discontinued) to make chicks. After seeing a YouTube video tutorial at Maymay Made It's channel, I decided to make this an interactive card.
I began by creating my chicks. I punched the pieces for 4 little birds from yellow, blue & white cardstocks. I assembled the chicks, except for the eyes, since I wasn't sure at that point which way I wanted them to be looking. For the feet, I had punched extras of the bottom of the body part from orange, so I just cut off the yellow feet and glued the orange to the bottom back of each chick. I also die cut several flowers and leaves using the "Bitty Blossoms" set from Our Daily Bread Designs & an old "Flower & Leaf Trio" die (discontinued) from My Favorite Things. I die cut & embossed the flowers from colored cardstocks, and the leaves from Canson XL Mixed Media paper. I also die cut several grass sections from mixed media paper, for both the front & inside, using Lawn Fawn's "Grassy Hillside Borders" dies.
I used Twisted Citron & Mowed Lawn Distress inks to color the grass panels. I also used Mowed Lawn to color the leaves. I decided to add Simply White Nuvo Crystal Drops to the centers of the flowers. I also decided to use the Ebony Black Nuvo drops for the pupils on the chicks' eyes. The latter created a couple of problems for me!
After I planned my layout, I went ahead & glued on the chicks' eyes, then added the Nuvo drops, so they would have a chance to dry before I assembled my card. Unfortunately, when I was applying the drop to the second eye on the first chick, I didn't have the bottle perpendicular to my desk, so the drop kind of blobbed out to one side! I ended up having to scrape the whole eye off (gently) with my craft knife, punch a new eye, glue it back on, and then redo the Nuvo drop. This time, I made sure I held the bottle right! I didn't have that problem on any other chicks, though I did mess up one after the fact, when I put my hand in the wet drop! So I had to scrape, re-punch, re-glue, and reapply the pupil to that one as well.
 |
| View of inside of card |
 |
| Close-up of inside scene |
After I'd let the Nuvo drops dry for at least 24 hours, I went ahead and glued all my flowers, leaves, & chicks in place. I put 2 chicks on the front of the card, and 2 on the inside. Getting everything glued in place inside the box portion was admittedly a struggle, but I finally managed!
I die cut a banner with a die from Mama Elephant's "Tags a Lot" set, and stamped "Happy Spring!" with Lawn Fawn's "Claire's ABC's" in Lawn Fawn Fresh Lavender ink. I adhered that with foam tape to the card front. I then glued 2 toothpicks, one at each end. They are positioned so that it looks like either they are staked in the ground behind the chicks, or the chicks are holding them. Whichever way the viewer prefers! :) Finally, I finished adhering the inner panel to the outer, and this card was done!
Despite my struggles with this card, I'm really happy with how it came out! I am sending this to Send a Smile 4 Kids, so hopefully a hospitalized child will smile! :)


No comments:
Post a Comment
I love to hear your ideas on my work, so let me know what you think!