Thursday, December 31, 2015

Two Thank You Cards

Now that Christmas is over, it's time to think about thank you cards. Coincidentally, Live Love Cards' challenge this month has been to create thank you cards. These are 2 of mine.


I found this post through Pinterest, and used one of the cards there for inspiration for my first card. I die cut 5 tags using three of the "Mini Tags" dies by Pretty Pink Posh, from various colors of cardstock. I also die cut the "thank" letters from white cardstock with Hero Arts' "Alphabet Uppercase" dies. I glued the tags in rainbow order onto a piece of kraft cardstock that I'd cut to 4.25x5.5", and then adhered the letters onto them.

For the "you," I used an old set of alphabet stamps by The Paper Studio (no longer available). I placed the card front in my MISTI, and used a clear plastic grid sheet to help me position the letters. I then stamped in Versamark ink, and heat embossed the word with Ranger Super Fine Detail White embossing powder. I added 3 rows of dashed lines with a white gel pen, both to ground the "you" & fill in the left side of the card front a bit. Finally, I adhered the panel to a white A2 card base and rounded the top corners with my 1/2" Corner Chomper.


I got the inspiration for my second card also through Pinterest. I began by cutting 2 pieces of kraft cardstock to 4.25" wide. I taped them together, overlapping them about an inch, and die cut through both layers with one of the "Snow Drifts" dies from My Favorite Things. I then separated the panels and trimmed them down to fit an A2 card, with a 1.25" gap in between.

I cut a piece of Strathmore Smooth Bristol paper to 4.25x5.5". I used my kraft panels as a guide to mark where the gap would be between them. I stamped my flowers & leaves, using 2 of the stamps in "Bold Blooms" from Essentials by Ellen, in that gap, using Ranger Archival Jet Black ink. I colored over the images with my Zig Clean Color pens, and blended the color out a bit with my water brush. Then I set that aside to dry.

I used my sewing machine to stitch around both kraft panels with black thread. Then I used my MISTI to help me position the greeting, from Technique Tuesday's "A Million and One" mini stamp set, on the lower panel. I stamped that in Versafine Onyx Black ink, to be sure to get a nice crisp impression.

To finish my card, I applied foam tape to the back of each kraft panel, and adhered them to my bristol piece, lining up the sides evenly. I felt the card needed a little something more, so I sponged over the kraft with Antique Linen Distress ink. This gave it a bit of soft, subtle texture, without competing with the stamping. Finally, I mounted the card front to a white A2 card base.

Sunday, December 27, 2015

Christmas Over???


Christmas Day 2015 may be in the history books now, but the time for making holiday cards is not. Even though I got ours done earlier this year than last (we sent them out on the 21st, rather than Christmas Eve), I'd like to be done with them even earlier next year! In the spirit of that, I made this one for Merry Monday Challenge Blog's Challenge #185: "Boots."


I must admit, this theme had me stumped. I just don't have many holiday stamps or digi images with boots. But I took a cue from this card by Nina, the hostess of this week's challenge. She used 2 panels from some holiday patterned paper, one of which shows a little girl wearing boots. I had the same paper, but had already used that particular panel. But I found the one I used for this card, featuring a Santa wearing--yes--boots!

I also had 3 greeting labels on my desk, that I'd made for other cards using Simon Says Stamp's "Christmas" set & Spellbinders "Grommet Tags" die. But they hadn't fit those designs. So I pulled one out and decided it would be perfect for this one. I created my card base for a 4.5x7.25" card, to accommodate the focal panel & greeting label. (It's a bit of an odd size, I know, but I have several envelopes that fit that size card, so I'm trying to use them up.)

I cut a panel of dark blue cardstock to 4.25x7", and added snow to the background, by sponging Ranger Adirondack Snow Cap pigment ink over Simon Says Stamp's "Falling Snow" stencil. The stencil isn't large enough for this background, so I fudged a bit by moving it around. I just had to be careful to mask off at the top edge, so I wouldn't get ink where I didn't want it! I rounded the corners with the 1/4" side of my Corner Chomper, and stitched around the perimeter 3 times with my sewing machine.

I rounded the corners of my focal panel with the 1/8" Corner Chomper, and adhered that in place. I threaded 3 lengths of white crochet thread through the holes in the label, and adhered the label to the background, centered below the image. I ran some ATG adhesive on the back of the blue panel, and stuck the ends of my thread on that, being sure to spread them out evenly. Finally, I rounded the corners of my white card base with the 1/4" Corner Chomper, and mounted my card front to that.

I'm also entering this card in the following challenges:

Simon Says Stamp's Monday: "Winter Wonderland"
Simon Says Stamp's Work It Wednesday: "Holiday Cards"
Pile It On #98: "Anything Christmas/Winter"
Through the Craft Room Door: "Anything Goes"

Sunday, December 20, 2015

Sending Hugs and Prayers


Now that I have finished(!) all of our Christmas cards for this year, I can turn my attention to other cards. I recently learned that the brother of a friend of mine passed away, so I decided to make this card for her as a sympathy card. Our Daily Bread Designs is having a sketch challenge this week, which I used as inspiration for my design, so I'm also entering it in that.


I first die cut the bird with the coordinating "Chickadee" die (by ODBD) from white cardstock. I used my MISTI and quite a bit of fiddling to get the stamp lined up. (It's a rubber stamp, so not all that easy. It does come with registration points on the stamp, to help line it up with the die, but I cut them off so I could also use it without the die.) Finally, when I got my die cut in place, I stamped the "Chickadee" image, also by ODBD, using Memento Tuxedo Black ink. I then colored in the berries, branch, and a bit on the bird with colored pencils. (I used a photo I found online for color reference on the chickadee itself.) Then I set that aside.

Because of the space my bird & greeting were going to take up, I decided to rotate the background of the sketch 90 degrees, keeping the other elements oriented the same as in the sketch. I cut a piece of pale blue cardstock to 2x5", and matted that with a darker blue, leaving a 1/16" border on 3 sides. I also die cut the "prayers" from the "Prayers" stamp/die set by Simon Says Stamp & Hero Arts from white cardstock. I lined up the stamp with the die cut, again using my MISTI, and stamped it 3 times in Tuxedo Black, just to get a good dark impression. For my background, I chose one of the patterned papers from Authentique's "Seasons Essentials" 6x6" pad, and cut it to 4-1/8x5-3/8".

I glued a white doily to the right side of my background panel, and adhered the blue strip over that, lining it up with the right edge as well. After working out the placement, I glued down my chickadee, and then the greeting, overlapping the bird slightly with the "prayers." At this point, I realized I'd forgotten to glue down my ribbon piece, so I carefully peeled up the focal/greeting panel, and stuck a short piece of white satin ribbon underneath. I wrapped the other end around the background panel, and adhered it to the back. Finally, I stamped "Sending hugs and," also from the "Prayers" set, on the blue panel. I matted the whole piece with a pale blue cardstock, added 3 silver heart-shaped brads to the upper left corner, and mounted it to a white A2 card base.

I'm also entering my card in the following challenges:

Simon Says Stamp Wednesday "Die Crazy"
Through the Craft Room Door "Anything Goes"

Wednesday, December 16, 2015

A Pair of Holiday Tags

Ellen Hutson has been having a "12 Tags of Christmas with a Feminine Twist" series at their CLASSroom blog. I'm not sure if they have in the past, but this year they've invited anyone to play along, and create one or more tags inspired by something their designers and/or guest designers have done for this series. These are 2 that I created.


My first tag was inspired by one that Dawn Woleslagle created for Day 12, using a stamp that she created by die cutting some fun foam. I used one of the dies from the Essentials by Ellen "Poinsettia & Pine" set to die cut my foam stamp. I adhered it to an acrylic block, and colored it with Marvy Uchida LePlume II water-based markers. After I colored the die cut, I daubed it with my water brush to activate the color more. Then I stamped that on a tag I'd created by die cutting some white cardstock with the "Stitched Duo 3" die by Pretty Pink Posh. I did both first- and second-generation stamping, about 5 or 6 times total. Dawn had used a Heidi Swapp toner pen to outline her images and then foil them. I don't have that pen (yet!), so I sketched around mine with a silver gel pen.

I die cut a circle from the center with a Simon Says Stamp "Stitched Circles" die. I also die cut a piece of plain white cardstock with that same die, and cut my letters with dies from the Hero Arts "Alphabet Uppercase" set. For the letters, I did one set out of white and a second out of black. I ran them through my Xyron Sticker Maker, and adhered them to my white circle, offsetting the white from the black to create a drop shadow effect. I cut a second tag from white, and adhered it to the back of the first, to provide a place to adhere my word panel. Finally, I cut a circle of white fun foam, and used double-sided tape to adhere it between my die cut greeting circle & the tag. I die cut a tag reinforcer from some silver shimmer cardstock using one of the Mama Elephant "Tags a Lot" dies, and glued that in place. After punching the hole in the tag, I knotted some white & silver ribbon through that.


Carolyn Peeler's tag on Day 1 inspired my second creation. I used the "Stitched Duo 1" die by Pretty Pink Posh to cut a tag from some kraft cardstock. Because I wanted the tag longer than the die, I used some partial die cutting. I cut all but the bottom part first, then lined the die up with the cut lines, and cut all but the top, thus creating a longer tag. I stamped a greeting, from Mama Elephant's "Jolly and Merry" set, on the tag in Versamark ink, and heat embossed it with Ranger Super Fine Detail White embossing powder.

For my watercolor piece, I die cut a piece of 140 lb. watercolor paper with the same tag die. I stamped one of the snowflakes from My Favorite Things' "Sophisticated Snowflake" set twice with Versamark, and white heat embossed them.

I spritzed that panel with water, and used my water brush to dilute & pick up Distress inks in Cracked Pistachio, Picked Raspberry, and Mermaid Lagoon, which I daubed over and around the embossed snowflakes. The Cracked Pistachio ended up not showing up very well, but I think it turned out fine anyway. Once I had the panel covered in color, I sprayed it generously with my homemade Perfect Pearls mist to add some shimmer. I used a paper towel to pick up some of the color that was pooling on the snowflakes, and then left the panel to air dry.

Once my watercolor piece had dried, I trimmed it shorter. I cut a piece of lace trim, and glued that towards the bottom of my tag with Perfect Paper Adhesive. I adhered the panel over the top of the lace, and used my sewing machine to do a zigzag stitch along the top & bottom of the panel. I also did 2 rows of straight stitching above the greeting.

I die cut a tag reinforcer from some pink cardstock, using another die from "Tags a Lot." After gluing it in place, I punched the hole, and threaded some white ribbon, pink & white baker's twine, jute twine, and silver thread through the hole. I tied all that in a bow, and this tag is done!

I'm also entering these tags in Simon Says Stamp's Wednesday "Tag It" challenge.

Saturday, December 12, 2015

Catch the Bug Christmas Chaos--Final!

The "Christmas Chaos" challenge series at Catch the Bug Challenge Blog ends today. Thankfully, I got the final 2 days' projects D-O-N-E!


The theme for Day 6 was "Gift Wrap." I created a gift card holder, using the instructions from this article. I used a patterned paper from The Paper Studio's "Christmas Basics" 6x6" pad to create my "gift box." I adhered a piece of red ribbon to the front of both the base & lid.

Gift card holder "box" open with gift card inside
After cutting a tag from white cardstock with a die from Mama Elephant's "Tags a Lot" set, I printed the "Little Penguin Winter - Decorate Tree" image from Bugaboo Stamps onto that. I colored it with colored pencils, glued the red tag reinforcer (also from a "Tags a Lot" die) to the tag, adhered another red tag to the back, and punched a hole. I threaded 2 pieces of red & green baker's twine through the hole & knotted them. I inserted the twine into a bow I tied from the same red ribbon, and glued that to the top of the lid. That finished this relatively quick & easy project.


My card for Day 7--a bingo challenge--was also fairly quick & easy. For my elements, I used the first column--snowflake, embossing, & pink and teal. I used this week's Friday Freebie image from Bugaboo--"AKV Winter - Snow Shoe." After flipping the image in Photoshop & sizing it, I printed it on a piece of Strathmore Mixed Media paper.


I used my Inktense pencils to color the image, picking up the colors from the pencils with a damp paintbrush & applying them to the paper. After the image had dried, I painted the sky area with a wash of Tumbled Glass Distress ink, then set that panel aside to dry completely.

I cut 2 pieces of patterned paper from the BoBunny "Candy Cane Lane" 6x6" pad to size. I stamped 3 of the images from the "Sophisticated Snowflake" stamp set by My Favorite Things on the teal piece with Versamark ink. Then I heat embossed those with Ranger Super Fine Detail White embossing powder.

After double-matting my focal image with teal & pale pink cardstocks, I adhered it to the pink patterned paper piece, then adhered that to my teal background panel. Finally, I matted that with a pink cardstock panel that I'd cut to 4.25x5.5".

I die cut one of the "Mini Tags" by Pretty Pink Posh from white cardstock. I used Versafine Onyx Black ink to stamp the "Merry Christmas" greeting from Hero Arts' "Merry Christmas Message" on that. I then heat embossed it with Recollections Clear Detail embossing powder. For my snowflake element, I die cut one with a Spellbinders "Banner & Trees" die from hot pink cardstock. I adhered it peeking out from under the tag, which I popped up with foam tape. All that was left was to mount the card front onto a white A2 card base.

I'm also entering both projects in the following challenges:

Simon Says Stamp's Monday challenge: "Holly Jolly Stamping"
Through the Craft Room Door: "Anything Goes"
Craft Your Passion Challenge #291: "Anything Goes"
Pile It On #98: "Anything Christmas/Winter"

I'm entering my first project only in Simon Says Stamp's Wednesday challenge: "Tag It."

Thursday, December 10, 2015

Two More Holiday Cards


The theme for Day 4 of "Christmas Chaos" at Catch the Bug Challenge Blog was a recipe challenge. Use an image from Bugaboo Stamps, a one-word greeting, two embellishments, and three layers of paper. (I assume the focal panel & base don't count as layers.) I used Sketch #177 from Operation Write Home for my design.

I chose Bugaboo's newest image, the "Christmas Moose Ornaments." After flipping & sizing the image in Photoshop, I printed him on a piece of 140 lb. watercolor paper, and colored him with my Inktense pencils & a damp paintbrush.

I used patterned papers from 2 different collections from The Paper Studio: "Christmas Candyland" (red plaid) & "Woodland Wonderland" (banner & woodgrain pieces). I cut them all to size, and inked around the edges with Walnut Stain Distress ink. I also inked the edges of the focal panel. Then I adhered all my layers together.

I die cut my greeting using the "Scripty Joy" die by Lawn Fawn, from some dark green cardstock. I glued it in place with Ranger Multi Medium Matte, and added a coat of clear Wink of Stella shimmer, followed by a coat of Glossy Accents. I also coated the ornaments with Wink of Stella & Glossy Accents. I used Multi Medium to glue down 2 buttons, and when that had dried, I poked holes through the buttons & the paper underneath and threaded some black embroidery floss through. I knotted the floss in each button, and finally matted the panel with some pale teal green cardstock, before mounting it to a white A2 card base.


My second card, inspired by the Day 5 challenge, is also from a recipe of sorts. They posted several "treat" recipes, and said to pick one and make it funny. I chose the "Sugar Cookie with Sprinkles": make your card a shape other than a rectangle or square, and use 3 pieces of bling & ribbon.

I added a greeting from Doodle Pantry to the "Marshmallow Snowman - Candycane" image, and printed that onto a piece of Strathmore Mixed Media paper. Then I die cut that with a Spellbinders "Grand Ovals" die (discontinued). Since this is a holiday card from us here in Texas, I decided to "toast" the marshmallows. It doesn't show up in the photo that well, but I used a brown Inktense pencil and a wet paintbrush to paint around the edges of each marshmallow. This is probably the closest thing we'd get to a snowman for the most part here! I also colored the candy cane, scarf, earmuffs, and arms with Inktense pencils, blending with a damp brush. For the sky, I added a wash of Stormy Sky Distress ink.

I die cut another, larger piece of blue cardstock with another "Grand Ovals" die, and stamped it with the Hero Arts "Irregular Arrow Bold Prints" background stamp and Hero Arts Pool ink. I created my card base by die cutting 2 pieces of 110 lb. white cardstock with a "Grand Scalloped Ovals" die (discontinued), also from Spellbinders. I scored the end of one piece about 1/2" from the edge, and adhered the other to that above the fold. This created a top fold, scalloped oval card. To help the card stand up, I trimmed off about 1/2" from the bottom of the back panel, leaving a straight edge. I also die cut a scalloped oval from cream cardstock, and adhered that to the front of my card base.

To assemble my card, I adhered the stamped oval to the card base, and adhered the focal panel to that, centering both. I tied a bow from some red & white gingham ribbon, and used Perfect Paper Adhesive to glue that & three clear gems to the front of my card. And another card is DONE! I figure by now I'm probably about 5/8 of the way through with our holiday cards. Stressed? Me? Nooooo...! LOL

I'm also entering both cards in the following challenges:


I'm also entering my second card only in the following challenges:

Wednesday, December 9, 2015

Joy Joy Joy


I am still working frantically on our holiday cards for this year. Yes, I know--it's getting close to Christmas. Yes, I know--I should have done more earlier. But what fun would the holidays be without stress & pressure??? LOL Thankfully, Catch the Bug Challenge Blog's "Christmas Chaos" series this week is helping with my efforts. Day 3 was a color challenge. They posted this photo, with candy cane colors, to use as a palette for your card:


I chose the "Girl Gingerbread - Cocoa" image for my card. I printed her on a scrap of 140 lb. watercolor paper, punched with a 2" circle punch, and painted her with my Inktense pencils & a damp paintbrush. Then I went around the perimeter with Brushed Corduroy Distress ink, just to provide some contrast & definition.

I printed the "Joy" from Doodle Pantry's "Holiday Greetings" 3 times onto a strip of pink cardstock, spacing them so they connected to each other & the focal circle. The patterned paper panels come from Echo Park's "Home for the Holidays" 6x6" pad. I cut them to size, matted them with kraft cardstock, and adhered them to a white A2 card base. Finally, I adhered my greeting strip & focal piece, and my card was done!

Monday, December 7, 2015

Two Holiday Cards

Catch the Bug Challenge Blog is having their 3rd Annual "Christmas Chaos" challenge series this week. Initially, I had no intention of participating, mostly because I'd totally forgotten about this event. But I can never pass up a challenge, especially when it serves the dual purpose of getting Christmas cards done this time of year! :) (Yes, I'm still working on those.) These are my first two entries.


The first day's challenge theme is "Anything Goes with 'Here Comes Santa Claus'." I used the "Stocking Santa Ornament" image by Bugaboo Stamps. I printed him on a piece of 140 lb. watercolor paper, and die cut that with a Spellbinders "Classic Ovals SM" die. I colored Santa & the ornament with my Inktense pencils & a damp brush. After that dried, I coated the ornament ball with Glossy Accents, and the topper with Silver Stickles. I also added some Star Dust Stickles to the star on Santa's hat.

Following Sketch #61 from Operation Write Home, I cut a piece of patterned paper from The Paper Studio's "Christmas Candyland" pad, and matted it with cream cardstock. I also used Versamark ink to stamp a piece of lavender cardstock with Hero Arts "Irregular Arrow Bold Prints" background stamp, and heat embossed it with Recollections Clear Detail embossing powder. I matted that with another piece of cream, and adhered my patterned paper and focal panels in place.

I punched 2 stars from yellow cardstock with a 5/8" star punch by Recollections. I glued them in place, and coated them with Star Dust Stickles. I also went around the perimeter of the oval with Star Dust, and this card was done.


For my second card, I used the sketch provided for the second day of the challenge:


I used one of the images from Bugaboo's "Christmas Doodles." I printed it out on a piece of Strathmore Bristol paper, and colored it with my Zig Clean Color pens. I also traced over the bow and the sparkles in the background with a white gel pen, and colored the ornament topper with a silver gel pen. Since the image is not exactly a perfect circle, I had to fussy cut it. Then I went around the edge with a black brush-tip marker, to conceal the white core. I matted it with yellow, and cut around it with my scissors, leaving about a 1/16" mat. Even though the cutting is not exactly perfect, I figure it goes with the sketchy look of the ornament.

I cut a piece of patterned paper from My Mind's Eye's "Cozy Christmas" 6x6" pad to 2x4", and printed the greeting, from Doodle Pantry's "Holiday Greetings" set, on that. I cut 2 more panels, from one of the papers in BoBunny's "Dear Santa" 6x6" pad, and adhered everything to a light blue panel. Finally, I mounted my card front to a white A2 card base, and coated the ornament with Crystal Stickles.

I'm also entering both cards in Virginia's View Challenge #21: "All About Glitter."

I'm entering my second card as well in the following challenges:

Through the Craft Room Door "Anything Goes"
Pile It On #98: "Anything Christmas/Winter"

Sunday, December 6, 2015

Two Hanukkah Cards


With Hanukkah starting today, I decided to make 2 cards for some friends of ours. This first one is a spinner card.

For my card front, I temporarily adhered my blue panel to the front of a white card base, and die cut a window (just in the blue and front of my card base) with a Spellbinders "Standard Circles SM" die. I also cut a frame with that same die and a "Lacey Circles" die, also by Spellbinders, from white cardstock. I glued the frame around the window on the blue panel, then separated the blue from the card base.

I downloaded a clip art image of a dreidel off the Internet, and sized it for my card window in Photoshop. I copied it, so I had 2 images, and flipped the second image so it was in reverse. Then I printed those onto the back of some cherry wood paper from Simon Says Stamp (no longer available). I fussy cut them, and drew the lines for the edges on the front of each with a brown marker. I cut a length of thin fishing line, doubled it, then adhered it between my dreidel pieces, using Be Creative double-sided tape. I used more double-sided tape to adhere the fishing line to the back of the blue panel, centered within the window. Finally, I added more adhesive with my ATG, and mounted the blue panel back onto the card base, lining up the window in each piece.

After die cutting & embossing a piece of white cardstock with a Spellbinders "Grommet Tags" die, I inked the center portion with Tumbled Glass Distress ink. I scanned it into my computer, and used that image to size my greeting, which I then printed onto the tag. I adhered the tag in place on my card front, and filled in the holes with Silver Pearl Liquid Pearls.


I got the inspiration for my second card from this card that I found through Pinterest. I created a blank canvas in Photoshop, and typed "Happy Hanukkah" 8 times. (I did do all this horizontally, just to make it easier!) After spacing those lines of text out, I typed the larger greeting in the middle. I added a Star of David clip art image to the canvas, and reduced the opacity of that layer so it would print in a very light grey. Then I printed all that onto a piece of white cardstock.

I traced over the Star of David with a blue glitter gel pen, using my ruler to help keep the lines clean & straight. I then die cut 8 candle flames from gold paper using a die from a Tim Holtz "Birthday Blueprint" stamp/die set. After gluing them in place, I drew the rays from the Star of David with a gold gel pen. Finally, I matted that panel with a piece of patterned paper from my scrap stash, and mounted that onto a white card base.

Saturday, December 5, 2015

Christmas Blessings


Merry Monday Christmas Challenge Blog theme this week is "Birds." I decided to use one of the birds from Hero Arts' "Feathered Friends" digi set for my card.


I used Sketch #SC552 from Splitcoaststampers.com for my card design. I die cut a piece of scrap cardstock with a We R Memory Keepers "Nesting Scallops" circle die, to use as a pattern, and scanned that into my computer. I opened it in Photoshop, and sized my bird to fit. I printed the bird out 3 times: once on blue cardstock for the background, and once each onto pink & blue patterned papers from BoBunny's "Candy Cane Lane" 6x6" pad. I die cut the background piece with my circle die, and fussy cut the patterned paper pieces. After I'd "painted" the edges of the patterned paper pieces with a black brush-tip marker, I glued them in place on the die cut circle.

For the background, I embossed a piece of blue cardstock with the "A2 Tiny Polka Dot" embossing folder from The Paper Studio. I went over the raised portion with a foam ink blending pad and Ranger Adirondack Snow Cap pigment ink, just to provide a bit of highlighting. I cut my background papers, from The Paper Studio's "Christmas Candyland" & Echo Park's "Home for the Holidays" 6x6" pad. I then inked around the edges of each piece, and my focal panel, with Stormy Sky Distress ink, and glued everything to the background.

I stamped one of the greetings from Hero Arts' "Joy to the World" set onto a scrap of the pink patterned paper I'd used for the bird's wings, in Versafine Onyx Black ink. Then I heat embossed it with Recollections Clear Detail embossing powder, and cut it into a banner. I glued that down, and set my card front under an acrylic block until the glue dried, just so everything would stick well. Finally, I mounted it to a white A2 card base.

I'm also entering my card in the following challenges:

Through the Craft Room Door: "Anything Goes"
Simon Says Stamp's Work It Wednesday: "Holiday Cards"
Pile It On: "Cards Using Red & Green"

Friday, December 4, 2015

Fleas Navidad!


Every year for Christmas, my mom & I send a gift card for Petsmart to Northeast Animal Shelter in Massachusetts. This is a no-kill shelter that we've supported for several years now. To make it a little more special, I always make them a card to put the gift card in.

I started by using a "Triple Step" card template from Hot off the Press to create my card base from red shimmer cardstock by Die Cuts with a View. Once I'd finished that, I stamped my images, from Hampton Art's "Furry Christmas" set, onto white cardstock, & colored them in with colored pencils. I colored in the dots and the middle of the star on the dog's present with a gold gel pen, & used a white gel pen to go over the dots on the cat's present box. Then I used the HOTP template to trace the cut lines for each panel. After cutting them out, I adhered them to their respective panels.

I traced the pattern for the main front panel on a piece of patterned paper from The Paper Studio's "Woodland Wonderland" 6x6" pad. I then cut that out and adhered it to my card base.

One of the greeting stamps in "Furry Christmas" was too small, and the other one was too big, so I had to get creative. The small greeting in the set says "Fleas on Earth." I took that and mentally ran with it, and finally came up with "Fleas Navidad." (A play on words for the Spanish greeting, "Feliz Navidad.") I die cut white cardstock with one of the "Labels Four" dies by Spellbinders, and scanned that into my computer. I opened that image in Photoshop, and used it to size & place my greeting, which I typed using a font on the computer.

I played around with what to put above & below the greeting, to fill up the empty space and balance the greeting a little better. I started by drawing paw prints with the Custom Shape tool in Photoshop, but that just wasn't doing it for me. I tried a bone & a fish, but that didn't seem right, either. So finally, I drew a dog and a cat, also with the Custom Shape tool. I copied each image layer, and flipped them horizontally so I had 2 dogs & 2 cats facing each other. I lined them up on the label image, and reduced the opacity so they didn't compete with the greeting. Finally, I printed all that directly onto my die cut label, and adhered it to the card front.

As a final touch, I added a couple of coats of clear Wink of Stella to the bow on the cat's present and the star on the dog's present. I also coated the star with Glossy Accents. Hopefully, the staff at the shelter will get a kick out of this. I'm sure they'll appreciate the gift card!

Tuesday, December 1, 2015

Christmas Kitty & Elephant Cards


One of my new acquisitions from Bugaboo Stamps is this cute "Christmas Cat." I decided to use him on a card for Send a Smile 4 Kids. I took my design inspiration from Operation Write Home's Sketch #2.

I printed the kitty onto a piece of 140 lb. watercolor paper, then colored him in with my Inktense pencils to look like our youngest, Barney. For the sky, I used a wash of Broken China Distress ink, and Pumice Stone Distress ink for the ground. I added some shimmer to his bell with a gold gel pen, and applied Marvy Uchida Liquid Applique to the hat brim & pompom. Once that had dried, I used my heat tool to puff it.

I cut a piece of patterned paper from my scrap stash to 2x5.5", and tied a length of metallic embroidery floss around it in a bow. I adhered it to a red card front panel, and added a dot of Perfect Paper Adhesive Matte to the knot on my bow, both to hold it in place and keep it from untying. Finally, I adhered my focal panel, and mounted the finished card front to a white A2 card base.


For my second card, I used Operation Write Home's Sketch #B-29 for my design. I used the "Elephant Christmas Tree," also from Bugaboo, as my focal image. I reduced the opacity of the image to 7% in Photoshop, then printed it on a piece of 140 lb. watercolor paper. The reduced opacity virtually eliminated the outlines, allowing me to do some no-line coloring with my Inktense pencils.

After I'd colored the image, I added Liquid Applique to the cuffs on the stockings, and the brim & pompom on the elephant's hat. As with the kitty, when that had dried (I left it for several hours), I puffed it with my heat tool. I added details to some of the ornaments and the left-most stocking with a white gel pen. Then I applied clear Wink of Stella to the ornaments, and coated them in Glossy Accents. I colored the stars with a gold gel pen for a base coat of color, then added Gold Stickles on top. I also traced the "glow lines" from the star on top of the tree with my gold gel pen. I used a silver gel pen to draw the wires/ornaments on the mantle between the stockings.

I cut a strip of patterned paper from my scrap stash to .5x4.25", as indicated in the sketch. I adhered my focal panel to a piece of green cardstock, and then glued my patterned paper below it. Finally, I mounted the card front to a white A2 card base.

I'm entering both cards in Simon Says Stamp's Wednesday "Anything Goes" challenge.

Monday, November 30, 2015

JOY


I must admit, over the past couple of weeks, I really went to town making holiday cards for Send a Smile 4 Kids. I didn't finish as many as I would have liked, but I got several done any way.

For this card I used Operation Write Home's Sketch #163:


I didn't do the small squares, but just had my image take up the whole focal panel.

I used the "Penguin Joy" digi image from Bugaboo Stamps. I printed it on 140 lb. watercolor paper, and colored it with Inktense pencils & a damp paintbrush. I added Marvy Uchida Liquid Applique to the snow clumps on the letters, and heated that after it had dried to puff it up. I also added clear Wink of Stella to the letters, the little heart on the penguin, and the snow on the ground. For the sky, I applied a wash of Broken China Distress ink. Then I set that aside to dry.

I cut a piece of patterned paper from my scrap stash to the size in the sketch, and adhered it to a piece of green cardstock I'd cut to cover the front of my white A2 card base. When my focal panel had dried, I adhered that in place. Very simple. The longest parts of the process were choosing my design & coloring the image.

Merry Christmas from Mimi


I have another card that I sent to Send a Smile 4 Kids. This one uses one of the images from "Mimi's Winter Friends" by Penny Black. I used Operation Write Home's Sketch #110 for my design:


I stamped Mimi on a piece of 140 lb. watercolor paper that I'd die cut with the Lawn Fawn "Stitched Journaling Card" die. Because I wanted to watercolor her, I used Ranger Archival Jet Black ink. I colored her with my Inktense pencils and a damp paintbrush. Once I'd finished, I wet the area below her with clean water, and added a wash of Pumice Stone Distress ink. I did the same for the sky, using Broken China Distress ink.

I sat back & looked at it--and thought, this is supposed to be a winter card. In particular, a winter card that's going to a child up north, where it snows. It should have snow on the ground instead of dirt! (In my defense, here in Texas we don't get much snow. Dirt is very realistic for winter scenes!) I was not about to scrap it and start over completely, though. So I went over the Pumice Stone area with white gesso. The Pumice Stone reactivated enough to color the gesso, so it's not just stark white, but I think that looks better than just white. (That's my story, and I'm sticking to it! LOL) When the gesso dried, I stamped my greeting, from Hero Arts' "Merry Christmas Message," with Archival Jet Black ink.

I cut a piece of green patterned paper from my scrap stash to 4.25x5.5", and adhered it to the front of a white A2 card base. I also cut 3 strips from a piece of pink paper from BoBunny's "Candy Cane Lane" 6x6" pad. I punched 3 snowflakes from white glitter cardstock with an old EK Success punch, and glued them to the ends of my pink strips. I measured where to adhere my strips, and put them in place. Then I adhered my focal panel, and I was done!

Merry & Bright


I know I said I'm not a one-layer card kind of gal (layer withdrawal, anyone? LOL), but I guess I'm just a glutton for punishment sometimes. I decided to do one more for a2z Scrapbooking's challenge this month. Since I knew I wanted to do a bit of watercoloring, I created my card base from Strathmore Smooth Bristol paper.

I used 2 stamps from a new-to-me set by Hero Arts, "Joy to the World." I put my card base in my MISTI, and used my grid template overlay to help me line up my greeting & one of the "tree" stamps. Then I picked the stamps up with the door on my MISTI, and used Versamark ink to stamp them on the card. I sprinkled on Ranger Super Fine Detail White embossing powder, and melted it with my heat gun. Then I masked off the tree. I stamped the second tree, and sprinkled on embossing powder. That's when I realized my mistake.

I wanted my third (right hand) tree to go in front of the middle tree, so I should have stamped & embossed that first. No big problem, though, since I realized this before I melted my embossing powder on the second tree. I just positioned my stamp, and stamped it in Versamark, overlapping the middle tree slightly. I brushed away the embossing powder from the middle tree where they overlapped, and sprinkled powder onto my third tree. Then I heat set both trees. You can't even tell I goofed--whew!

Once my embossing had cooled, I brushed clean water over the greeting & trees. Then I smooshed Evergreen Bough Distress ink onto an acrylic block, and picked it up with a wet paintbrush. I daubed it onto the wet areas of my paper, letting it bleed and blend. Then I dried that with my heat tool, and went over those areas with Pine Needles Distress ink and a wet brush. When I had the depth of color I wanted, I dried it again.

At this point, I felt the greeting & images looked a bit disconnected. So I added some splatters of Heidi Swapp Color Shine mist in the Tinsel color. This gives it added interest, and I think just helps to pull the design together. Once that had dried, I put my card under a book, since the watercoloring & heating had warped it a bit. I left it there for a few hours, and it flattened out nicely!

I'm also entering this card in the following challenges:

Simon Says Stamp's Work It Wednesday: "Make a Holiday Card"
Simon Says Stamp's Wednesday Challenge: "Anything Goes"
Through the Craft Room Door: "Anything Goes"

You're Cool


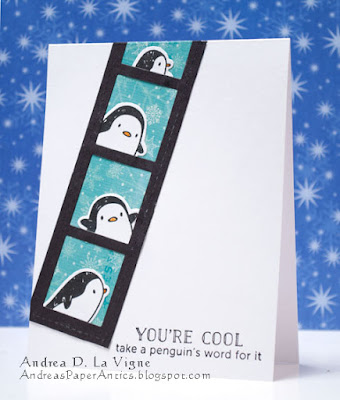
I just wrapped up making holiday cards for Send a Smile 4 Kids. I have had the "Arctic Penguins" and "Jolly and Merry" stamp sets from Mama Elephant for several months, and haven't used them much, since I couldn't really come up with any ideas. Finally, I thought to do a search for "Arctic Penguins" on Pinterest (head slap!). I found lots of ideas there, including the one that inspired this card.

I used the "Stitched Film Strip" die from Pretty Pink Posh. Because the die isn't long enough for what I wanted to do, I had to do a little creative die cutting. I first cut all but one end from some black paper. Then I lined up the die with where I'd already cut, extending it up the paper more, and finished cutting the filmstrip. I didn't really cut both ends "closed," since my paper wasn't long enough, but I had to cut it a little shorter anyway, so it worked out.

I stamped 4 of the penguins on white cardstock with Versafine Onyx Black ink, cut them with the coordinating dies, and colored their beaks with an orange marker. I placed them behind the filmstrip frames, and marked where to cut them so they wouldn't stick out beyond the edges. After trimming them, I glued them to the back of the frame. Then I took a strip of patterned paper from BoBunny's "Candy Cane Lane" 6x6" pad and adhered it to the back of the filmstrip & penguins.

After I adhered the filmstrip in place, I placed the card in my MISTI. I used my grid template to line up the greeting, from "Jolly and Merry," and stamped it on my card in Versafine. All I had left to do was trim off the filmstrip where it hung over the edges, and another holiday card was done!

Sunday, November 29, 2015

Peace Crystals


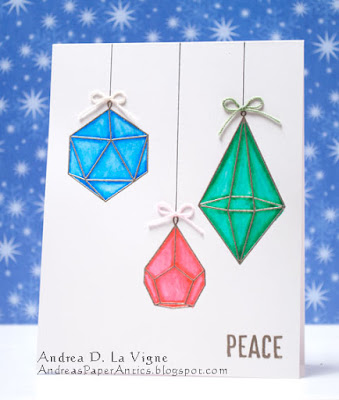
a2z Scrapbooking is having a "One Layer Holiday Card" challenge at their blog. I will be the first to admit, I am not a one-layer kind of girl. It's not that I find them overly difficult; I just love my layers! But I decided to give it a go for this challenge. I really should probably do more cards like this, since it came together super quick.

I used Hero Arts' "Christmas Crystals" stamp set for my card. After creating a card base from Strathmore Smooth Bristol paper, I placed it in my MISTI and positioned my stamps. Once I had them where I wanted them--and STRAIGHT!--I picked them up with the door of my MISTI, and inked them with Versamark. I stamped the images & greeting, and then heat embossed with Ranger Liquid Platinum embossing powder.

Once the embossing had cooled, I used 3 of my Zig Clean Color pens to color the crystals. I basically traced around the embossed lines, and then used a damp paintbrush to pull the color out into the center of each facet.

When the color had dried, I drew a line with a fine-tip black pen from each crystal up to the top of my card front. I tied 3 little bows with crochet thread, and glued them to the tops of the crystals. And that finished this card. Like I said, quick & easy. But oh, that layer withdrawal...! LOL

Friday, November 27, 2015

Thinking of You at Christmas


Ellen Hutson is currently having their November Pin-Sights challenge. They posted the following mood board, as inspiration for participants' projects:


I decided, due to my need for holiday cards, and despite the lack of "regular" Christmas colors in the photos, to make a Christmas card.

I used one of the lessons in May Flaum's "Tried & True Card Designs" class as the inspiration for my design. Basically, the idea is to create a wreath. When I saw the lesson in class, I knew almost immediately which set I wanted to try: Essentials by Ellen's "Bokeh Dots." I've seen holiday wreaths made entirely of ornament balls, and wanted to recreate that look on my card.

I used 3 of the solid dots in the set, with Distress inks in Tumbled Glass, Broken China, Peacock Feathers, Mermaid Lagoon, and Tea Dye, as well as Delicata Silvery Shimmer pigment ink. I cut a piece of 140 lb. watercolor paper to 3.75x5", and lightly drew a circle on it, using a Spellbinders circle die as a template. I had initially thought, since May did in her lesson, that I would use water during the coloring of my wreath, which is why I used watercolor paper. In the end, I didn't do any watercoloring, but there was no harm done from my paper choice anyway. I stamped the dots around my circle outline, trying to keep a balance of colors & sizes, and keep a fairly circular shape. It's really not quite as easy as you might think!

When I had finished stamping the wreath, I turned to the greeting. So that I wouldn't cover up my wreath too much, I decided to use a vellum strip. I stamped my greeting, from Hero Arts' "Merry Christmas Message," in Versamark ink, and heat embossed it with Ranger Silver embossing powder.

I positioned the strip in place, and folded the ends to the back of my panel, without applying any adhesive. Once I had the placement worked out, I applied tiny dots of glue to the back of the strip, hiding them behind the embossed words, and adhered it to my panel. I also added glue to the ends behind my panel, and stuck them down. I then created a "faux bow," as demonstrated in this tutorial.

For the mat, I was again inspired by the look of a mat on one of May's cards. I cut a piece of white cardstock to 4.25x5.5", and painted along all 4 sides with a paintbrush and clean water. Then I tore the cardstock where I'd wet it, giving me a controlled ragged edge. Finally, I dried the cardstock with my heat tool, inked around the perimeter with Tumbled Glass, and adhered my main panel to it. I inked around the edges of another piece of white cardstock, cut to A2 size, with the Silvery Shimmer Delicata ink, and when that had dried, mounted my matted panel to that. I adhered that to a white A2 card base, and another holiday card is finished!

Thursday, November 26, 2015

Send a Smile 4 Kids Holiday Cards

Catch the Bug Challenge Blog is having their "Stella Says Sketch #318" challenge. I actually ended up making 3 holiday cards based on the sketch, to send to Send a Smile 4 Kids:


My first card uses the "Teddy--Present" digi image from Bugaboo Stamps. I printed him on Strathmore smooth bristol paper, and die cut that with one of the tags in Mama Elephant's "Tags a Lot" set. I then colored him in with my Zig Clean Color pens, adding white dots to the box with a gel pen. I inked the edges with Aged Mahogany Distress ink, and added a reinforcer I'd cut from brown cardstock, using a die from "Tags a Lot." I punched a hole through the top, and added some baker's twine.

For the background, I cut a piece of red cardstock to 4.25x5.5", and printed my greeting, from Doodle Pantry, directly on it. I cut a strip of paper from The Paper Studio's "Christmas Candyland" patterned paper pad, and punched one long edge with Fiskars' "Threading Water" border punch. I adhered that under the greeting, and added my tag. Finally, I mounted the card front to a white A2 card base, and added 3 dots of Silver Stickles next to the greeting.


My second card uses the "Candycane Stocking" image. I printed this on bristol as well, and colored it with my Clean Color pens. I die cut it with one of Lawn Fawn's "Small Stitched Rectangle" dies, and inked the edges with Aged Mahogany. I printed the greeting on my red background panel, and added a punched strip of paper from Echo Park's "Home for the Holidays" 6x6" pad. After adhering my focal panel, I mounted it on a white A2 card base, and added my Stickle dots.


My final card uses the "Christmas Window--Santa" digi image (discontinued). I again printed this on Bristol, and die cut it with the same "Tags a Lot" die as in my first card. I colored it with my Clean Color pens, adding stars/snowflakes with my white gel pen, and inked the edges of the tag with Aged Mahogany. I cut the hole reinforcer from the same cardstock as the background, punched a hole, and threaded baker's twine through. I printed my greeting, added a strip of paper from The Paper Studio's "Woodland Wonderland" 6x6" pad, glued on my tag, and adhered the panel to a white A2 card base. I added Silver Stickles, and my trio of cards is done!

Wednesday, November 25, 2015

Two "Card Shower" Cards

Jennifer McGuire is having a "card shower" for two children suffering from cancer. She also included information on each child's sibling, in case anyone wanted to make them cards, too. I decided to make a card for each, not just because I wanted to, but also in the spirit of avoiding sibling rivalry! :)


Emily, one of the children, has a younger sister who likes pink & purple. I was struggling what to do for a 3-1/2 year old girl, whom I don't even know. Then I looked down on my desk and saw this stamp set that I just recently got, and thought of Catherine Pooler's love of pink & purple snowflakes. Bingo--stamp a flurry of pink & purple snowflakes!

I stamped 3 of the snowflakes from the set on a panel I'd die cut using one of the "Small Stitched Rectangle" dies from Lawn Fawn. I used Hero Arts inks in Bubble Gum, Grape Juice (first & second generation stamping), and Soft Lilac. After I'd covered the panel, I set that aside to work on my greeting.

I die cut my greeting from black cardstock, with Lawn Fawn's "Scripty Joy" die. I glued it to a piece of vellum that I'd cut smaller than the snowflake panel. I taped the vellum in place temporarily on my background with low-tack tape, and stitched around the perimeter to attach the vellum. Finally, I adhered my snowflake panel to a white A2 card base, and coated the "joy" with Star Dust Stickles.


I wrote about Xander in this post. He has an older brother who likes airplanes, among other things. I have the "Small Planes" die set from Simon Says Stamp (discontinued), and thought that would be perfect for this card.

I die cut a white panel with the largest of Lawn Fawn's "Large Stitched Rectangle" dies. Then I used one of the "Landscape Trio" dies from Mama Elephant to die cut 4 strips from that panel. I inked the top strip completely with Tumbled Glass Distress ink, then inked just the lower edge of each of the remaining strips. Finally, I glued them all to a 4.25x5.5" white cardstock panel.

After cutting a wavy banner from green cardstock, I stamped my greeting on that with Lawn Fawn's "Milo's ABC's." I heat embossed it with Ranger Super Fine Detail White embossing powder, and cut the left end in a V-shape. I die cut the larger of the 2 planes from red shimmer cardstock, & glued it directly on the background. I added foam tape under 2 points of the banner, and used liquid glue for the rest, to give it an even more "wavy" appearance. After I glued it down, I drew a line along the straight edge with a red gel pen. Then I poked 3 holes, and threaded crochet thread through, so it looks like the plane is pulling the banner. Finally, I adhered my card front panel to a white A2 card base. All I have left to do is add an inside sentiment to each card, and they will be ready to send!

Tuesday, November 24, 2015

Season's Greetings


Yana Smakula had a lesson on Day 7 of "Holiday Style," which focused on "Shimmer & Shine" cards. Her card used the negative of a greeting die cut in a foil patterned paper background.

My version was actually a pretty simple card to do. I began by stamping the "Wood Plank Background," from My Favorite Things, on a piece of white cardstock using Delicata Golden Glitz ink. Once that had dried, I die cut Simon Says Stamp's "Season's Greetings" from the panel. That was when the real fun began!

In Yana's card, she had had just the negative space from die cutting the greeting as the front of her card, giving it a very modern look. Because of the relatively large open spaces in the letters in my greeting, and my wanting a more "traditional" effect, I wanted to replace the inner pieces of the letters into the negative space. First, I cut a piece of gold foil cardstock to 4.25x5.5", to use as my backer panel. I applied foam tape to the back of my main panel, adding several really tiny pieces around and between the letters. That was actually one of the most time-consuming parts of making this card! When I felt I had covered enough area to support the panel pretty completely, I removed the liner papers from the tape and adhered it to my gold foil panel.

When I'd die cut the greeting, I used a dryer sheet on the back of the panel, so the die cut pieces would stick to it, and I wouldn't lose any of them. I carefully peeled each piece up, and used my 2-way glue pen and tweezers to glue them all in place on the foil panel. The only piece I lost was from the middle "s" in "season's." No problem, though. I just trimmed the apostrophe piece (which I didn't need for this) to the approximate shape, and glued it in place! I will admit, the smallest pieces were not easy to maneuver into place and adhere without getting glue all over. But I think it was worth it in the end. All that I had left at that point to do was mount the card front to a white A2 card base. This will be going into my collection of holiday cards for my mom & me to send out this year.

Merry Christmas Snowflakes


The theme of Day 1 of "Holiday Style" was "Clean & Simple" cards. Debby Hughes' card in that day's lessons inspired this one.

Debby used a snowflake border die from Simon Says Stamp, that I don't have. So I decided to improvise. I first cut my white panel with one of the "Landscape Trio" dies from Mama Elephant, to create a curved edge along the top. I also die cut 4 snowflakes, using one die each from Spellbinders' "2013 Snowflake Pendant" (discontinued) and "Banner and Trees" sets. I coated each snowflake in Versamark ink, and heat embossed them with Ranger Silver embossing powder. I did this one more time for all 4 snowflakes, to get a nice smooth coverage. I also inked the curved edge of my panel with Versamark, and heat embossed that with silver.

For the greeting, I used one from Lawn Fawn's "Peace Joy Love" set. I used my MISTI tool to help me position the stamp so it followed the curve on my panel, then stamped and heat embossed the greeting.

I used a few snowflake stamps from Hero Arts' "Joy Snowman" stamp/die set (discontinued) to stamp a panel I'd cut from 140 lb. watercolor paper, then heat embossed those with Ranger Super Fine Detail White embossing powder. When that had cooled, I wet the entire panel, then dropped in diluted Blueprint Sketch & Pine Needles Distress inks. After I'd blended the colors, while everything was still wet, I sprinkled on coarse sea salt, to create a mottled background. I dried the panel with my heat tool, and then brushed the salt off. I also flicked Heidi Swapp Tinsel and White Linen Dylusions mists onto the panel. Finally, it was time to assemble my card.

I glued my die cut snowflakes to the back of my white panel, so they peek out over the edge. Debby had mounted her panel with foam tape, but I didn't want to risk the snowflakes getting bent as the card goes through the mail. So I adhered my panel to the background with a combination of ATG adhesive for the lower part and liquid glue for the snowflakes. I then mounted my card front to a white A2 card base. All I have to do now is add an inside sentiment, and this card is ready to go!

I'm entering this card in Live Love Cards' November challenge: "Snowflakes."