Tuesday, November 24, 2015
Happy Christmas
Online Card Classes "Holiday Style" is wrapping up this week. :( It's been a fun class, as always, with LOTS of inspiration! This card was inspired by one Shari Carroll did on Day 11.
I die cut a piece of 140 lb. watercolor paper with one of the tag dies from My Favorite Things' "Blueprints 13" set. I then stamped one of Hero Arts' "Christmas Crystals" on that in Versamark ink, and heat embossed it with Ranger Super Fine Detail White embossing powder. I added the chain & little bow in the same way. Then I took clear water and painted over the ornament, and dropped in diluted Distress inks in Evergreen Bough & Pine Needles. I ended up not liking the way it looked, with the color just around the ornament, so I sprayed the whole tag with water and added color again, taking it out to the edges. Then I set that aside to air dry.
I die cut another tag from a shimmer vellum, and the larger tag from pink patterned paper from BoBunny. I actually cut the vellum tag only partially, by leaving the top of the die hanging outside my cutting plates. Then I took my scissors and finished cutting to the top of the piece, to give me a longer tag. I adhered my vellum tag to the pink, and layered my focal tag over the vellum.
For my greeting, I stamped "happy Christmas" using 2 of the stamps from Simon Says Stamp's "Christmas" mini set. I then heat embossed that in Ranger Liquid Platinum embossing powder, and cut it into a banner. I cut another banner strip from the same pink paper as I'd used for the tag, and layered that behind the white greeting strip.
To assemble my card, I cut a piece of pale blue cardstock for the background. I adhered my tag to that, and mounted the greeting over the top of the tag with foam tape. Finally, I adhered the card front to a white A2 card base.
I'm entering this card in Simon Says Stamp's Wednesday "Christmas" challenge.
Monday, November 23, 2015
Merry Christmas
The final day of "regular" lessons in "Holiday Style" was on using one stamp set, 5 ways. Five different designers used the same stamp set to create cards with different looks. Jennifer McGuire made two shimmery cards, using a foiled stamped image on vellum and a dry-embossed background. I took the inspiration for this card from her general design.
I began by embossing a 4x5.5" piece of silver foil cardstock with the "Snowflake Swirl" embossing folder by Darice. I also stamped my image (source unknown) on a piece of white cardstock, and heat embossed it with the Color Blend Verdigris embossing powder by Wow. I die cut that with a Spellbinders "Standard Circles SM" die, and trimmed off one side Then I glued that to my embossed panel.
I had used the "Merry Christmas" die from Simon Says Stamp to die cut the greeting from white cardstock a few days ago. I intended to use it on another card that never did work out. So I figured it would be perfect for this card. I colored the die cuts with Peacock Feathers Distress ink, so the words would stand out from the background. I ran them through my Xyron Sticker Maker, and adhered them to my panel. I inked the sides of a white A2 card base with Peacock Feathers, and finally adhered my main panel to that. I will be sending this card to the parents of a child with cancer, as part of Jennifer's "card shower."
I'm entering this card in Simon Says Stamp's Wednesday "Christmas" challenge.
Very Merry Christmas
Michelle Short had a lesson on Day 9 of Online Card Classes' "Holiday Style," on doing "Soft Tone-on-Tone" cards. While I didn't have the die she used for her card, I was able to do something similar on mine.
I began by die cutting my tree from silver foil paper, using one of Spellbinders' "Banner and Trees" dies. I also die cut a piece of 140 lb. watercolor paper with the largest of Lawn Fawn's "Large Stitched Rectangle" dies. After deciding where I wanted my tree on the panel, I stamped my greeting, from Hero Arts' "Very Merry Christmas" set, in Versamark ink. I then heat embossed it with Ranger Silver embossing powder, to coordinate with the silver tree.
I replaced my tree on the panel, without adhering it, and made little pencil tic marks around it, so I would know where to paint. Then I brushed clear water over the area inside those marks, and dropped in diluted Peacock Feathers Distress ink. Once I had that blended out, I dried it with my heat tool. (Yes, I'm impatient like that! LOL) I went over it with a little more Peacock Feathers, and also dropped some Cracked Pistachio Distress ink into the wet Peacock Feathers layer. I dried it with my heat tool again, and repeated the process one more time, focusing more of the color towards the center of my shape, and fading it out to white around the edges.
After drying the panel once more with my heat tool, I adhered the tree, which I'd run through my Xyron Creative Station, on to my panel. All I had to do then was adhere the panel to a white A2 card base. I am sending this card to the parents of the little girl I created this card for, as part of Jennifer McGuire's "card shower."
I'm entering my card in Simon Says Stamp's Wednesday challenge: "Christmas."
Sunday, November 22, 2015
Merry Christmas, Xander!
This is another card for Jennifer McGuire's "card shower." This one is for a little boy, Xander, who has also been battling cancer, and is now under hospice care. It's a bit unconventional, with no Christmas tree, no ornaments, no reindeer, no Santa. But 2 of Xander's loves are paintball and baseball, so that provided the inspiration for my card. The layout came from the sketches My Favorite Things provides for their "Blueprints 15" set, which I used for my die cutting.
I first die cut the larger white panel. I used paint daubers in Twisted Citron and Gold to create my splats. (My original idea was to use red & green, but I don't have a red dauber, and I figured it might end up making mud anyway, since they are complementary colors.) After I got the paint started in the dauber, I sprayed the end lightly with water, then pounced it on my cardstock. I repeated this a few times with each color. I figure that's about as close to paintball splats as I can get! Then I set my panel aside to air dry.
I cut another, smaller white panel for my greeting, and inked the edges with Mowed Lawn Distress ink, for a bit of contrast. I didn't have any holiday greeting stamps that had an appropriate font for this card, though. So I scanned the panel into my computer, and opened that image in Photoshop. I used an old Creating Keepsakes font (with a baseball "theme") for my greeting. After I got the type sized & formatted in Photoshop (using the image of my scanned panel as a guide), I printed it directly on my panel. Then I adhered that panel to my "paintball" splat panel.
I cut a piece of red cardstock to 4.25x5.5", and embossed it with the "Charles" embossing folder by Cricut. Then I stitched around the perimeter twice with black thread on my sewing machine. This provides more contrast, and helps tie in with the black font in the greeting. I actually channeled my inner May Flaum, making the stitched lines wavy. That's really not as easy as doing just a straight line, either! :)
For more gold accents on my card, I painted a scrap of white cardstock with the gold dauber, and die cut the star & banner end (also from "Blueprints 15") from that. I also die cut a stitched circle from a scrap of Strathmore smooth bristol, and inked it with Mowed Lawn. Then I glued the star on that.
Because of the texture on my background from the embossing, I decided to use liquid glue to adhere my main panel. I also glued the gold banner piece so that it peeked out from under the focal panel, and glued the star/circle piece on. I weighed all that down with my two pencil cups on top of acrylic blocks until the glue dried. Finally, I adhered my front panel to a white A2 card base.
I'm entering this card in the following challenges:
Simon Says Stamp's Wednesday "Christmas"
Through the Craft Room Door "Anything Goes"
Holiday Style--Shape Stamping
On Day 3 of Online Card Classes' "Holiday Style," May Park had a lesson on "Classic Shape Stamping." I created my card based on her lesson.
I first drew a triangle on a 4.25x5.5" panel of white cardstock. Then I used several small stamps from various sets (Hero Arts "Joy Snowman," Lawn Fawn "Peace Joy Love," Clearly Besotted "Holiday Sentiments," and one that I don't know the name of) to fill it in. The inks I used were Hero Arts Butter Bar, Red Royal, & Green Hills. Once I had all my images stamped, I used the smallest dot stamp from "Bokeh Dots" (Essentials by Ellen) to fill in any blank spots. Then I heat embossed those dots with Ranger Gold embossing powder.
For the greeting, I chose one from Hero Arts "Very Merry Christmas" set. I placed my card in my MISTI, and positioned my greeting stamp. I masked off the bottom portion, and inked the top with Green Hills, then removed my masking tape and stamped the first part. I cleaned my stamp (which I realized afterwards was really unnecessary in this case), and masked off the top. I used Red Royal on the "Holiday Season" part, and stamped that.
I punched a star from white cardstock that I'd covered in Stick It adhesive, using a punch from The Paper Studio. I then coated it in gold glitter, and glued it to the top of the tree. I applied 1/8" wide strips of Scor-Tape to either side of my panel, and covered them in the same gold glitter. Finally, I mounted my panel to a white A2 card base.
Saturday, November 21, 2015
Be Merry
Jennifer McGuire is having a "card shower" for two children who have cancer. I made this card for one of those children, Emily, who is 6 years old now. One of her "likes" that Jennifer listed is animals. So I hope this holiday card with a reindeer will make her smile!
I used a piece of patterned paper from The Paper Studio's "Woodland Wonderland" 6x6" pad for my focal image. I laid my Spellbinders "Grand Circles" Nestabilities die over the image, with part of the die hanging off the bottom & right edges. I ran that through my die cutting machine, then adhered the panel to a piece of red cardstock that I'd cut to 4.25x5.5".
For the greeting, I used a stamp from Lawn Fawn's "Peace Joy Love" set. I used my MISTI to help me position it so it went around the curve of my panel, and stamped it in Versamark ink. I then had to reposition the stamp, since it wasn't long enough to reach around the entire curve, and stamp part of it again. Then I sprinkled on Ranger Super Fine Detail White embossing powder, and melted that with my heat tool. I mounted my panel to a white A2 card base, and rounded the top left corner with the 1/2" side of my Corner Chomper.
The reindeer's nose is brown as is, and I decided I just had to make this Rudolph. Unfortunately, my only red gems were either too small or too large. But I found a clear gem that was just the right size, so I colored it with Cranberry alcohol ink. When that had dried, I glued it in place with Ranger Multi Medium Matte.
I'm entering this card in Merry Monday Challenge Blog's challenge #180: "Use a Reindeer."
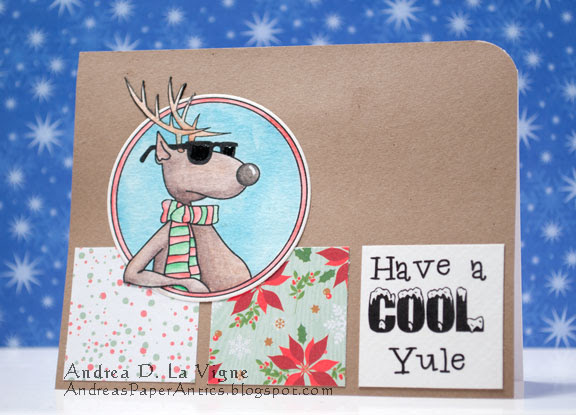
Cool Yule
I am very happy to be a Guest Designer over at Send a Smile 4 Kids for their "Anything Goes 4 Kids" challenge this week! We have three very generous sponsors: Crackerbox Palace is giving one winner 3 digis; All Dressed Up Stamps will award 2 digis; and Sassy Studios will give 4 digis.
For my card, I used a digital image ("Cool Deer") & greeting ("Cool Yule") from Crackerbox Palace. I opened both in Photoshop, and used them to create a mock up design of my card, using Sketch #98 from Operation Write Home:
Once I had them sized correctly, I printed both onto scraps of 140 lb. watercolor paper.
I colored the reindeer with Inktense pencils, using a damp paintbrush to blend and shade the colors. I also painted the background with some watered-down Broken China Distress ink. Once my piece had dried, I did a little "outside the box" die cutting. I laid my Spellbinders "Standard Circles SM" die over my image, then marked where the inside of the die crossed the antlers & arm of my reindeer. I used my scissors to fussy cut in along the antlers & arm to those marks. Then I positioned my die again, slipping it under the antlers & arm, so they would not get cut by the die. I ran it through my die cutting machine, and trimmed off a little excess paper around the antlers & arm, where I hadn't cut enough. Then I went along the edges of those elements with a black brush tip pen, to make the fussy cutting look neater. Finally, I added a little Glossy Accents to the lenses in his glasses, for a bit more coolness.
I cut 2 squares of patterned papers from my scrap stash, and adhered them and the greeting panel to a piece of kraft cardstock that I'd cut to 4.25x5.5". I glued down the reindeer image, and rounded the top right corner with the 1/2" side of my Corner Chomper, just to soften that corner & add a bit of balance. All that was left was to adhere it to my white A2 card base, and add a little shine mark to his nose with my white gel pen. I will be sending this card to Send a Smile 4 Kids.
Subscribe to:
Posts (Atom)