Wednesday, December 31, 2014
Happy Happy Birthday
The theme for December's Our Daily Bread Designs challenge at Operation Write Home is to use primary colors. I couldn't help but think of doing a child's birthday card. When I was looking through my stamps, I came across Spellbinders' "Your Day" set. I just love the elephant in this set, and had to use him. Thankfully, I was able to find an OWH sketch to accommodate the image!
I did have to "doctor" the sketch a bit. I made the focal panel slightly wider, to give the image a little more "breathing room." I also flipped it horizontally, and replaced the banner in the upper corner with the balloons.
I began by stamping my image onto a piece of 140 lb. watercolor paper with Ranger Archival Jet Black ink. I taped the panel to my cutting board that I use for watercoloring, and painted it with watercolors. For the ground, I smooshed some Pumice Stone Distress ink onto an acrylic block, then watered it down and applied a light wash to the bottom of the panel. I did the same with Tumbled Glass Distress ink for the sky portion. After drying it with my heat tool, I removed the tape and set it aside while I worked on the rest of the card.
I decided to use a greeting from this stamp set by Sweet 'n Sassy Stamps. The set comes with a solid balloon stamp that coordinates well with that particular greeting. I first stamped the balloon in Stampabilities "Light Pink" pigment ink onto white cardstock. When that dried, I stamped the greeting over it with Ranger's Adirondack Brights "Clover" ink. After giving that time to dry thoroughly, I fussy cut the balloon. I also used the smallest die from this Simon Says Stamp set to die cut 2 more balloons from patterned paper scraps.
For the background, I decided to go with a bright red. I found a piece of yellow gingham patterned paper in my scrap stash, and cut a strip of that to go along the side of the red. After gluing the gingham paper to the red cardstock, I die cut the panel with the largest die from My Favorite Things' "Blueprints 13" set. I also matted the focal panel with blue cardstock, leaving a 1/16" border all around.
Finally, it was time to assemble the card. I determined where I wanted the focal panel in relation to the 3 balloons, and adhered it to the background. I tied white embroidery floss around the bottoms of the pink & yellow balloons. (The bottom of the blue balloon would not be showing, so I didn't add floss around that.) Since I wanted the elephant to be "holding" the balloons, I poked a hole on each side of his trunk. After gluing the balloons in place, I threaded the other end of the embroidery floss through the holes, and wrapped it around the trunk. Finally, I tied a small bow with more floss, and adhered it over the floss around the trunk with a small dab of Ranger Multi Medium Matte. I decided I had to use a googly eye to up the cute factor, so I used more Multi Medium to glue one on the elephant.
The only thing left was to adhere the finished card front to a cream A2 card base, and this card for Operation Write Home is DONE!
I'm also entering this card in Simon Says Stamp's Wednesday "Anything Goes" challenge.
Sunday, December 28, 2014
One Sketch Two Ways
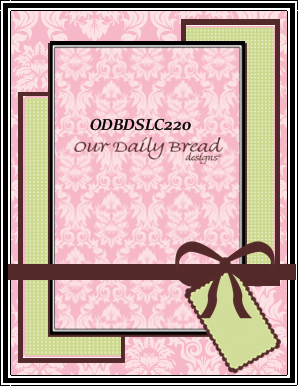
Our Daily Bread Designs' biweekly challenge this time is a sketch challenge. I also decided to create a few love/Valentine's Day cards for Operation Write Home. So I figured, why not combine the two and create a couple of cards based on that sketch for OWH?
I decided to create a masculine and feminine card for this challenge. For the masculine version, I used the "Anchor Single" stamp from Our Daily Bread Designs. I stamped it onto a piece of 140 lb. watercolor paper, and colored it with Inktense pencils and a damp brush.
After matting the focal panel on black, I cut 2 pieces of patterned paper from my scrap stash and matted them with black as well. I also used a piece of burlap paper from The Paper Studio as my background. After wrapping some jute twine around the card front panel, I matted it with more black paper.
For the greeting, I die cut a banner from grey cardstock with a Spellbinders die, and stamped the "I Love You" from this Simon Says Stamp set in Versafine Onyx Black ink. I shortened the banner a bit, and punched a hole in the end. I threaded jute twine through the hole. I tied it to the twine wrapped around the card front, and that finished card #1.
I used ODBD's "Violet Single" stamp for my second card. I stamped it onto 140 lb. watercolor paper as well, and also used my Inktense pencils to color it. I fussy cut it out, and mounted it onto a piece of lavender cardstock I'd die cut & embossed with a Spellbinders "Classic Ovals LG" die.
I used a Stampabilities background stamp and Hero Arts' Soft Leaf shadow ink to stamp the background onto white cardstock. I cut 2 pieces of patterned paper from Fancy Pants Designs' "Park Bench" 6x6" paper pad, and matted them with more of the lavender cardstock. I adhered those in place, and wrapped yellow bakers twine around the card front.
For the greeting, I used one from Avery Elle's "Love Notes" set. I stamped it on white cardstock using Adirondack Eggplant pigment ink, & clear heat embossed it. I cut it into a tag shape, punched a hole, and used yellow bakers twine to tie it to the twine wrapped around the card front. Finally, I matted the front panel onto more lavender, and adhered that to my card base.
I'm also entering these cards in Simon Says Stamp's Wednesday "Anything Goes" challenge.
Friday, December 26, 2014
Merry Mail
Catch the Bug challenge blog has their "Stella Says Sketch #221" challenge going on right now. I created this card for that. It's actually one of a set of 4 cards that I made using the same design and stamps, but different papers.
I decided to go with a kraft card base this time. I felt it kind of went with the homey, "country" style of my focal image. I stamped the "Holiday Mail" image, from Deep Red Stamps, onto a piece of Strathmore Mixed Media Paper, with Ranger's Archival Jet Black ink. I die cut & embossed it with a Spellbinders "Labels Four" die, and colored it with Inktense pencils and a damp paintbrush to blend the colors. Once I'd finished coloring, I replaced the panel inside the die, and lightly blended Tumbled Glass Distress ink around the mailbox. It's subtle (so subtle, in fact, that it doesn't show up in the photo!), but I think it adds just a touch of dimension to the image panel.
I chose my patterned paper from the "Woodland Wonderland" 6x6" paper pad by The Paper Studio. I used a pale blue cardstock to mat it, die cutting the long sides of that with one of Pretty Pink Posh's "Stitched Borders 1" dies. I adhered the patterned paper piece to the mat, and adhered that to the card base.
After gluing the focal panel in place, I stamped the greeting, using one from Hero Arts' "Merry Christmas Message" set, in Versafine Onyx Black below the patterned paper. And that finished this card. Hopefully the recipient will enjoy getting it as much as I enjoyed making it! (If not, they just don't get to keep it! LOL)
Tuesday, December 23, 2014
Happy Christmas
I recently got this stamp set from Simon Says Stamp. It's kind of a "build your own" Christmas greeting set. It's nice for simple greetings on the front of your cards. I also came across this image on Pinterest. I have a similar embossing folder, and decided to pair that with two of the dies from Spellbinders' "2013 Snowflake Pendant" set. I felt, with the elegance of the embossing folder and dies, a simple greeting was in order, so I used the SSS set.
I cut my white background panel to 4x5.25", and ran it through my die cutting machine with the Darice "Snowflake Swirl" embossing folder. I also taped 2 of the snowflake dies together (one inside the other), and die cut a snowflake from sliver glitter cardstock and another one from white cardstock. I glued the silver to the white, just in the middle, and slightly offset to provide some layering and dimension. Finally, I glued that to the embossed panel, again leaving the "arms" of the snowflakes loose; and glued a jewel to the center with a bit of Glossy Accents.
I stamped the greeting on vellum. I had quite a bit of difficulty getting the right effect, especially since the inks I used all seemed to have a tendency to bleed on the vellum as they dried. Finally, I figured out to stamp in Memento "Gray Flannel" ink, which gave me a light grey to complement the silver snowflake, and immediately blot off the excess ink with a piece of scrap copy paper. That gave me the result I wanted--subtle and NOT blurry! :)
I ran the vellum strip through my Xyron machine, to apply an even layer of adhesive to the back. Finally, I stuck it down towards the bottom of the embossed panel, matted that panel with more silver glitter cardstock that I'd die cut with Avery Elle's "Custom Panels" A2 die, and adhered that to a 4.25x5.5" card base.
I'm entering this card in Simon Says Stamp's Wednesday "Winter Inspiration" challenge. (I thought of this design when I saw the photo of the snowflakes on their mood board.)
Joy of the Season
Simon Says Stamp's Wednesday challenge this week is to create a project inspired by a mood board one of their design team members put together. One of the photos on the board is of a cardinal. I have this stamp (source unknown), and when I saw that photo, immediately thought of it. And yes, I'm still making Christmas cards, so it seemed a perfect fit.
Because of the size of the image, I felt the design was pretty straightforward, so I did not pick a sketch from anywhere. I first stamped it in Ranger Archival Jet Black ink onto Strathmore Mixed Media Paper. I did a technique called "outside the box" die cutting. The basic procedure is to lay your die (that is smaller than the image) over the image. Mark where the inside of the die meets the image, and use scissors to cut into the image at those points. Then just slip the die under those image portions, and die cut the rest around the image.
After die cutting & embossing with a Spellbinders "Labels Eight" die, I colored the image with Inktense pencils and a damp paintbrush. I had done an online search for cardinal photos, to guide me in my coloring. Once I finished that step, I set that aside to dry.
I cut a piece of patterned paper from my scrap stash to 4.5x7", the size of my folded card base. I felt that, even with the subtle pattern, it would compete with the greeting too much if I stamped directly on it. So I stamped the greeting (from this Hero Arts set) onto a strip of vellum instead, using Versafine Onyx Black ink, and heat embossed it with Recollections Detail Clear embossing powder. I used the heart stamp from this Simon Says Stamp set for the hearts on the greeting strip, stamping them in Stampabilities "Cherry Red" pigment ink and clear heat embossing them.
To finish the card, I glued the focal panel to the card front. I ran the vellum strip through my Xyron Sticker Maker to apply adhesive to the back, and adhered that towards the bottom of the front, wrapping the ends around to the back. Finally, I adhered the completed card front to my base.
Sunday, December 21, 2014
Christmas Candle
I got this image from Sweet 'n Sassy Stamps', thinking it would make a really great Christmas card. I felt the image was enough to stand on its own, so I chose a simple sketch from Operation Write Home to feature it:
I thought an oval would lend itself better to the image, so I substituted that for the rectangle in the sketch.
I printed the image onto a piece of Strathmore Mixed Media Paper, and die cut & embossed it with a Spellbinders "Classic Ovals SM" die. I colored the candle with Inktense pencils and a damp paintbrush. The holly leaves were the hardest element to get the coloring right. I wanted them to be vibrant, but not garish. Thankfully, I finally found the right combination of colors--without going overboard!
For the greeting, I used one from this Hero Arts set. I stamped it in Versafine Onyx Black ink onto another scrap of Mixed Media Paper. I then die cut & embossed it with one of the dies from Spellbinders' "Labels Eight" set. While the paper was still in the die, I sponged Spun Sugar Distress ink over the inner portion. This gives the effect of a matted piece, without adding an extra layer.
I chose a striped patterned paper from my scrap stash for the background. After adhering a piece of mauve cardstock to that, I die cut the panel with one of the dies from My Favorite Things' "Blueprints 13" set. I then glued the focal panel & greeting to that.
Because I couldn't find cardstock in my stash that was the "right" shade of pink for the background mat, I die cut a piece of white cardstock with the A2 die from Avery Elle's "Custom Panels" die set. Then I inked around the edges with Spun Sugar. Finally, I adhered that & the main panel to an A2 card base.
I'm entering this card in the following challenges:
Simon Says Stamp's Monday "Anything Goes"
a2z Scrapbooking's December Challenge: "Watercolor"
Shepherd Cards
One specific request my mom made for Christmas cards this year was religious-themed cards. So I made these two for her to send (among others.)
For the first card, I chose the following sketch from Operation Write Home:
The image is this one from Sweet 'n Sassy Stamps. I printed it, leaving a slight border, onto a piece of Strathmore Mixed Media paper; and colored it with Inktense pencils & a damp paintbrush.
I die cut a piece of kraft cardstock for the background with a die from My Favorite Things "Blueprints 13" set. For the outermost mat, I used the A2 die from Avery Elle's "Custom Panels" to cut a piece of textured green cardstock. I then adhered the kraft to the green. I chose 2 patterned papers from my ample scrap stash to go behind the focal image, and after determining placement, glued those and the focal panel to the card front.
For the greeting, I stamped one from this set, also by Sweet 'n Sassy Stamps, onto a piece of white cardstock, with Versafine Onyx Black ink. I die cut and embossed that with a Spellbinders "Classic Ovals SM" die, and inked around the edges with Gathered Twigs Distress ink. I glued it in place, and finally adhered the completed card front to an A2 card base.
I used Operation Write Home's Sketch #223 for the design of my second card:
I really like this sketch for images like this one, because of the large panel on top, with another amply-sized piece for a greeting.
The image also comes from Sweet 'n Sassy Stamps. I printed it on 140 lb. watercolor paper, and colored it with Inktense pencils, adding more stars with a white gel pen.
For the greeting panel, I stamped one from this Hero Arts set in Versafine Onyx Black onto white cardstock, and cut it down to the measurements indicated in the sketch. I matted it on a piece of brown cardstock, and wrapped a piece of sheer blue ribbon around the one end.
After the focal panel dried, I matted it on brown cardstock as well. I die cut the background with Avery Elle's "Custom Panels" A2 die, and adhered the 2 panels to that. I felt the space between the focal & greeting panels needed a little something, so I die cut the holes with one of the dies from My Favorite Things "Blueprints 18" set. (I was quite pleased to discover that particular die goes all the way across the short side of an A2 card!) I inked a strip of white cardstock with Chipped Sapphire Distress ink, and glued it behind the holes. Finally, I adhered the completed front to an A2 card base, and that finished these two cards.
I'm entering these cards in the following challenges:
Simon Says Stamp's Monday "Anything Goes" (both cards)
a2z Scrapbooking's December Challenge: "Watercolor" (only the second card)
For the first card, I chose the following sketch from Operation Write Home:
The image is this one from Sweet 'n Sassy Stamps. I printed it, leaving a slight border, onto a piece of Strathmore Mixed Media paper; and colored it with Inktense pencils & a damp paintbrush.
I die cut a piece of kraft cardstock for the background with a die from My Favorite Things "Blueprints 13" set. For the outermost mat, I used the A2 die from Avery Elle's "Custom Panels" to cut a piece of textured green cardstock. I then adhered the kraft to the green. I chose 2 patterned papers from my ample scrap stash to go behind the focal image, and after determining placement, glued those and the focal panel to the card front.
For the greeting, I stamped one from this set, also by Sweet 'n Sassy Stamps, onto a piece of white cardstock, with Versafine Onyx Black ink. I die cut and embossed that with a Spellbinders "Classic Ovals SM" die, and inked around the edges with Gathered Twigs Distress ink. I glued it in place, and finally adhered the completed card front to an A2 card base.
I used Operation Write Home's Sketch #223 for the design of my second card:
I really like this sketch for images like this one, because of the large panel on top, with another amply-sized piece for a greeting.
The image also comes from Sweet 'n Sassy Stamps. I printed it on 140 lb. watercolor paper, and colored it with Inktense pencils, adding more stars with a white gel pen.
For the greeting panel, I stamped one from this Hero Arts set in Versafine Onyx Black onto white cardstock, and cut it down to the measurements indicated in the sketch. I matted it on a piece of brown cardstock, and wrapped a piece of sheer blue ribbon around the one end.
After the focal panel dried, I matted it on brown cardstock as well. I die cut the background with Avery Elle's "Custom Panels" A2 die, and adhered the 2 panels to that. I felt the space between the focal & greeting panels needed a little something, so I die cut the holes with one of the dies from My Favorite Things "Blueprints 18" set. (I was quite pleased to discover that particular die goes all the way across the short side of an A2 card!) I inked a strip of white cardstock with Chipped Sapphire Distress ink, and glued it behind the holes. Finally, I adhered the completed front to an A2 card base, and that finished these two cards.
I'm entering these cards in the following challenges:
Simon Says Stamp's Monday "Anything Goes" (both cards)
a2z Scrapbooking's December Challenge: "Watercolor" (only the second card)
Subscribe to:
Posts (Atom)


