Friday, July 4, 2025

Peace, Love, & Joy

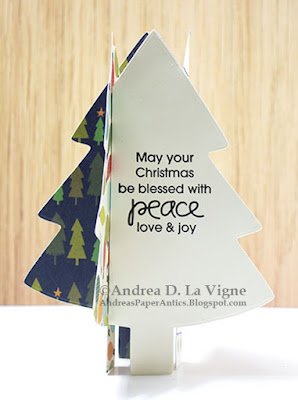
This week at Christmas Card Throwdown is their "Pillar Tower Card" theme challenge. I had to look up how to make one, and found a good tutorial on Splitcoaststampers (which, unfortunately, I can't find now!). I decided to be a little extra on this one & use die cut trees for my panels rather than rectangles. Even with having to figure out how to make that work, this card didn't really take all that long.


I made a mock-up first with just scrap paper to see if my idea would work. Thankfully it worked without any difficulties. I began the actual card by choosing 7 patterned papers from an old pad from The Paper Studio. (My paper was single-sided, so I needed to glue my papers back-to-back to have patterns on both sides.) Two of the papers I actually found in my (ahem - vast) scraps collection, but for the rest I sadly had to cut into "virgin" sheets. I'm sure I'll use the large leftovers for something, though!

Once I cut my papers to size, I die cut each one, plus a piece of cream cardstock, with one of the "Nested Fir Trees" from Scrapbook.com. I used one of the cut trees from my mock-up as a pattern, & cut a small section off 3 of the trees. I glued those back-to-back with 3 uncut trees, & then used scissors to cut the uncut trees down. I just figured this would be easier than trying to cut everything first & then possibly have the straight edges not line up perfectly due to miscuts.

I made my pillar from a scrap of Bazzill Butter Mints cardstock. I cut it a little shorter than the full height of my card, since the trees obviously weren't rectangular & I didn't want my pillar to stick out at the top & bottom. I scored the 4-1/2 x 3-1/2" panel every 1" along the long side, folded & burnished along the score lines, then added glue to the 1/2" tab at the one end to glue the panel into a hollow rectangular prism shape. I was able to glue my trees to that, lining up the straight edge of each with one edge of the pillar.


After I cut the left section off my cream tree, I stamped a greeting from the "A Holy Holiday" by Paper Smooches (discontinued). (Having the side piece cut off made it much easier to line everything up in my MISTI stamp positioning tool.) I glued that to the last (uncut) patterned paper tree, cut off the excess as for the others, & glued that to my pillar. While I would have liked to have a star at the top, I couldn't make that work. (Believe me, I tried!) So this first Christmas card for our personal stash is done!

I'm also entering this card in the following challenges:

Paper Funday Challenge #78: "Anything Goes" (not playing the optional twist)


Friday, June 27, 2025

No One Elf

The theme this week for Christmas Card Throwdown's challenge is "Santa's Helper." For my card, I used this cute upside-down elf selfie image & greeting from the "Christmas sELFies" stamp set from My Favorite Things (discontinued).

I stamped the image onto a scrap of 140 lb. watercolor paper with Versafine Onyx Black ink. After heat setting the ink, I used my Inktense pencils & damp paintbrush to color the elf & ornament. I added a pale blue wash around the image, & dried it with my heat gun.

I die cut one of the frames from the "Polaroid Tag Set" from Mama Elephant from plain white cardstock. I adhered that over the image. Thankfully, the window in the frame was *just* the right size to cover the black border on the image, as I didn't want that line showing. Whew! The first time I adhered the frame, I actually had the image upside-down. I didn't even notice this until I used the frame-with-image to "audition" patterned papers! Fortunately, I had used double-sided tape to adhere the 2 together, so with a little Undu adhesive remover, I was able to flip the image panel around.

For the background, I found a scrap of an old patterned paper from The Paper Studio in my stash. I cut it to size, & matted it with green cardstock that I'd adhered to my A2-size white card base.

I stamped the greeting in 2 parts onto a scrap of Bazzill Icy Mint cardstock. I masked off the second part of the greeting with a small piece of painter's tape, inked up the rest of the stamp, removed the mask (always the most important step for this technique!), & stamped the text. I flipped the cardstock 180° & repeated the process to stamp the second part of the greeting. I cut them into small strips, & adhered them to the bottom of my frame, a little askew for a more playful look.

After I adhered my frame to my card (again - almost upside-down 😕), I die cut the clip from the "Polaroid Tag Set" from silver shimmer cardstock. The die actually cuts so you can fold the clip in half along the top. I suppose that's if you need the back to be as nice as the front. I didn't need that, though, so I just cut it in half at the top fold line, & glued it in place. Finally, I coated the ornament ball & jingle bell with Glossy Accents. I will send this card to Send a Smile 4 Kids later this year. Hopefully it will bring a smile to a hospitalized child's face.

I'm also entering this card in the following challenges:

Simon Says Stamp's Wednesday challenge: "Anything Goes"
Paper Funday Challenge #77: "Anything Goes" (not playing the optional twist)
Ellibelle's Crafty Wednesday June/July challenge: "Anything Goes"
613 Avenue Create's June Challenge: "Anything Goes" (not playing the optional twist)

Sunday, April 27, 2025

Yappy Mother's Day


Every year for Mother's Day, I create a card for my sister-in-law from their dog. This year the current challenges at Double Trouble Paper Crafting & Try a Sketch on Tuesday inspired my color choices & design. (Melissa Grant's card featured at TSOT inspired the stenciling on my card.)


Double Trouble's challenge, as usual, is a 3-2-1 Recipe challenge. The elements this month are 3 pastel colors (excluding neutrals), 2 words in one greeting, & 1 slimline card (either mini or full-size). You can exceed the numbers of elements, but need to include at least that many of each. I went with Tattered Rose, Squeezed Lemonade, & Cracked Pistachio Distress inks for my pastels; a 3-word greeting; & a mini slimline card.

I stamped the puppy from Hero Arts' "Fawn and Friends" stamp set (discontinued) onto a scrap of Strathmore vellum bristol paper, & colored it to look like their dog, Glennis. Then I die cut it with the coordinating die.

For the background, I used my chosen Distress inks to color over the "Gingham" stencil by Tim Holtz. Inspired by the sketch, I masked off each section as I ink blended, moving the masks as necessary.

I stamped my greeting with Lawn Fawn's "Harold's ABCs," using their Doe ink for a softer look. I cut each word into a strip, & inked the edges with the same Distress ink colors I'd used for the background, going in the same color order as I'd done the stenciling.

To ground the puppy, I die cut a heart from white cardstock with a die from the Nellie's Choice "Straight Heart" set (discontinued). I laid it on my background where I wanted it & made tick marks where it overlapped each stenciled section. I masked off each section as I'd done with the background & inked in the corresponding colors. Then I glued that to my background, & glued the puppy on top.

I adhered my greeting strips, angling them for a more playful look. Finally, I adhered my panel to a white mini slimline card base. All I have left to do now is add an inside sentiment, & this card will be ready to present.

I'm also entering this card in the following challenges: