I have a little different post today. Neat & Tangled is having a
tutorial challenge. I don't do video tutorials, so I'm doing a photo tutorial instead. So, grab a cup of your favorite beverage, and let's get going!
 |
| Masculine version |
I actually made 2 cards, one feminine and one more masculine. I figured, I had everything out, so I might as well take just a few extra minutes to make a second card. I used Neat & Tangled's
"Awesome" die set, which cuts out both the word and the shadow. I also used the coordinating
"Awesome" stamp set to complete my greeting.
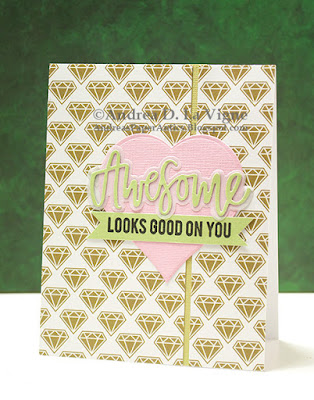 |
| Feminine version |
I began by choosing
a sketch from Splitcoaststampers as the basis for my design. Next, I picked out my patterned papers. For the masculine version, I chose one from Echo Park's "That's My Boy" 6x6" pad. I used a pattern from Echo Park's "Anything Goes" 6x6" pad for the feminine version.
I cut each paper first to A2 size, then cut the left strip to 2-3/4 wide. I took the remaining piece, flipped it 180 degrees, and trimmed it to 1-3/8" wide, basically taking 1/8" off the left side. This gave me the gap I wanted, while still keeping the pattern continuous. To keep me straight on which panel went which way, I drew a small arrow on the back of each, so I would be sure the patterns matched up.
For the strip on the masculine version, I simply cut a 3/8" strip from the leftover patterned paper, and flipped it over to the orange on the reverse side. No better way to coordinate papers than to use from the same collection! I couldn't do that with the diamond pattern, though, so I just used a green cardstock scrap from my stash.
To help me place my strip in the right place on my card base, I first placed the left patterned panel on the front of the base, and traced along the right edge with a pencil. I used my grid ruler and drew another line 1/8" to the left of that. I then adhered my strip along that line. After that, I just adhered my patterned paper panels in place.
I die cut a heart, with a Nellie's Choice "Straight Heart" die, from a scrap of pink cardstock, for my feminine version. For the masculine, I die cut a star, using a Lifestyle Crafts "Nesting Stars" die. I also die cut the "Awesome" from green cardstock for the feminine and from brown for the masculine. I used Essentials by Ellen 40 lb. vellum for the shadow.
For the stamped greeting, I cut a 1/2" wide strip from the same cardstocks I'd used for the die cut word. I stamped the greeting with Versafine Onyx Black ink, and trimmed the ends of each strip to make a funky banner.
After I ran the word die cuts through my Xyron Sticker Maker, I adhered them to the vellum shadow.
To keep the die cut heart & star straight, I made a small pencil mark where I wanted the middle of each shape to go. I lined up my T-square ruler with that mark, lightly adhered the shape partly on the card & partly on the ruler with my ATG, then just pulled the ruler out from under it. I then adhered my greeting banner to each card. Finally, I used a little Perfect Paper Adhesive liquid glue to glue down the die cut word. These cards came together fairly easily, in under an hour for both!


No comments:
Post a Comment
I love to hear your ideas on my work, so let me know what you think!