
Send a Smile 4 Kids is celebrating their 175th challenge at their blog! Their theme is "Christmas in July 4 Kids." I made this cute card using mostly Lawn Fawn products to send to them for this year's holiday season.
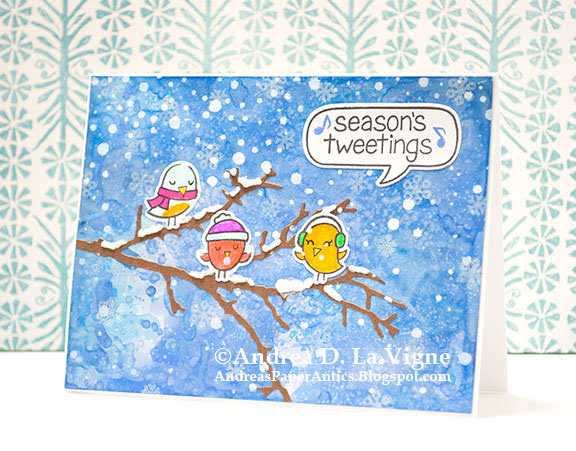
I stamped the 3 birds from "Winter Sparrows" onto a scrap of Strathmore Smooth Bristol paper with Versafine Onyx Black ink. I used the same ink to stamp one of the speech bubbles from "A Birdie Told Me" onto a scrap of white cardstock. I stamped the greeting from "Winter Sparrows" inside the speech bubble, using my MISTI stamp positioner to help me get it straight. I die cut the speech bubble with its coordinating die. Finally, I stamped the music note from "Winter Sparrows" with Blueprint Sketch Distress Oxide ink.
Once the ink on my birdies had dried, I colored them with Tombow markers, pulling in a Zig Clean Color Real Brush marker for the yellow on the blue bird's belly. I let the ink dry for a few minutes, then die cut them with the coordinating dies.
The biggest part of this card was the background. I wanted to try a technique Tim Holtz had developed for use with Distress Oxide inks. (I had actually learned about this from Jennifer McGuire.) I cut a piece of glossy cardstock to 4-1/8x5-3/8" for my panel. I smooshed Blueprint Sketch, Faded Jeans, & Salty Ocean Oxide inks onto my Tonic Easy Clean non-stick mat, and spritzed them with water. I dipped my cardstock (glossy side down) into the ink, & swooshed and pounced it until I had covered the surface. I dried it with my heat tool, and repeated this process a couple more times until I had the look I wanted. I let the ink dry for several minutes, then came time for the magic. I applied a thin coat of Distress Micro Glaze over the inked surface. The Distress Oxide inks on their own leave a dull, kind of chalky finish. But, on glossy cardstock, when you apply the Micro Glaze, the colors just come to life--bright & bold! After I had applied an even coat, I buffed any excess off with a paper towel.
I used the 2 snowflake stamps from Lawn Fawn's "Winter Penguin" set to stamp several flakes on the background with StazOn Cotton White ink. This ink is specially formulated for non-porous surfaces, like glossy cardstock. I was kind of disappointed, though, that the snowflakes didn't show up much in the end.
To start building my scene, I die cut a branch from brown cardstock using the "Bare Branch" die from Impression Obsession. I glued it to the background with liquid glue, and trimmed off a couple of bits that were hanging over the edge of the panel. I glued my birds in place, and glued the speech bubble down. I also added some "snow" on the branches, with a Marvy Snow marker. The too-subtle look of the stamped snowflakes still bothered me, though. So I got my "Falling Snow" stencil (from Simon Says Stamp) and taped it over my panel. I used a foam make-up applicator to pounce white acrylic paint through the stencil. I made sure it also went over the birds & branch, so it looks like they are in the snowfall, not just surrounded by it. After I removed & cleaned my stencil, I took a black fine-tip marker and went over the eyes on two of the birds that had gotten covered up by paint, just so they didn't look like they only had one eye. Finally, I adhered my panel to a white A2 card base, leaving a 1/16" mat on all sides.
I'm also entering my card in 613 Avenue Create's Challenge #211: "Anything Goes." (Not sure if the background counts for the optional challenge of creating your own designer paper, though.)
No comments:
Post a Comment
I love to hear your ideas on my work, so let me know what you think!