Saturday, November 29, 2014

Two Holiday Cards

This is the fifth year for the Caring Hearts Card Drive, to collect cards to distribute to nursing home residents who might not otherwise get holiday cards. I made these cards to send in.


I began my first card by die cutting a piece of 140 lb. watercolor paper with the smaller of Mama Elephant's "Femme Frames" dies. I stamped the cardinal and one of the greetings from this set by Sweet 'n Sassy Stamps on that. I taped the panel to a cutting board that I use for watercoloring, masking off the area around the faux stitching lines to create a mat. After coloring the image with Inktense pencils and a damp paintbrush, I blended Tumbled Glass Distress ink over the background, being careful not to go over the cardinal.

I die cut a piece of dark green cardstock using the scalloped frame die from the "Femme Frames" set. I blended Antique Linen Distress ink on the front of a white A2 card base, and finished by matting the focal panel and adhering that to the card base.


For my second card, I chose this sketch by Operation Write Home:


I created the focal image by combining the "Snowman Birdie Feeder" image from Dearie Dolls Digi Stamps with the "Snow Globe Gala" digital stamp set by Doodle Pantry. I colored the image with colored pencils, blending the colors in the base & topper of the snow globe with Gamsol on a paper stump. Finally, I inked around the edges of the panel with Chipped Sapphire Distress ink.

I cut a piece of patterned paper from my scrap stash to 4.25x5.5", and adhered it to an A2 card base. I had to cut the 3 strips of navy cardstock slightly wider than indicated in the sketch, to accommodate the snowflake buttons. I adhered the strips and the focal panel to the card front, and glued the buttons down with Ranger Multi Medium Matte.

I'm entering both of these cards in Simon Says Stamp's Wednesday "Anything Goes" challenge.

Monday, November 24, 2014

Ho^3


Catch the Bug Challenge Blog is having another "Stella's Sketch" challenge. The only real requirement is that the sketch is obvious in the finished card. The sketch for this challenge is Sketch #219:


I decided to flip it horizontally. Since I used a patterned paper for my background, I also left off the 3 round embellishments under the focal panel. The tricky part for me about using sketches that don't have measurements is trying to work out proportions of the elements. So I turned to Photoshop to work out my measurements. I created a blank canvas at 4.25x5.5" (the size of a standard A2 card), and digitally drew my elements on that. I also added the image I used, to get it sized perfectly. After noting the size of each, I just had to print it out.

For my focal image, I used this one from Bugaboo Stamps. I printed it on a piece of 140 lb. watercolor paper, and colored it with Inktense pencils and a damp paintbrush. After this dried, I matted it on a piece of dark green cardstock, leaving a 1/16" border all around.

I die cut an oval from a piece of gingerbread man patterned paper (from my scrap stash), using one of Spellbinders' "Classic Ovals" dies. I glued it onto the same dark green cardstock, and trimmed around it to create an approximately 1/16" mat.

Unfortunately, I don't know who made the stamp set I got the greeting from. I've been wanting to used that Ho-cubed stamp for quite some time. Since this card is intended for a child, I figured this would be the perfect opportunity. In case you're wondering, Ho^3 equals "ho ho ho" in mathematical terms. :) I stamped it in Versafine Onyx Black ink onto a scrap of brown cardstock, and cut it into a banner shape.

After cutting another piece of patterned paper from my scrap stash to 4.25x5.5", I started assembling my card front. I glued the oval piece partially behind the focal panel, and glued that to the patterned paper panel. I glued the banner over top of everything, and finally adhered the completed card front to an A2 card base. I have already sent this card on to Send a Smile 4 Kids, hopefully to brighten the holiday for a hospitalized child.

Thursday, November 20, 2014

Snowman Birthday


Sweet 'n Sassy Stamps is celebrating their November release with a blog hop & challenge to create a wintry birthday card. This is my creation for that challenge.

I used the following sketch from Operation Write Home for my design:


For once, I stayed exactly true to the sketch, with no alterations. :)

I combined 2 digital images for the focal panel on my card. I used Sweet 'n Sassy Stamps' "Winter Friends" for the scene inside one of Doodle Pantry's "Snow Globe Gala" images. After printing it on a piece of 140 lb. watercolor paper, I colored it with watercolor pencils and a damp paintbrush to blend the colors. I wanted a softer look, since it is such a relatively small image, so I didn't use my Inktense pencils this time. After coloring in the globe part, I added snowflakes with a white gel pen. I also added some shimmer with a gold gel pen to the decorative detailing on the snow globe topper & base.

I created the greeting in Photoshop. I admit, the wording is probably a bit of a stretch, but I wanted to make this card as wintry--and cute--as possible! :) After getting everything formatted and sized, I printed it on a piece of white cardstock.

I chose two patterned papers from my scrap stash for the remaining 2 blocks on the card. I wanted to warm the card up just a bit, so I decided to use a pink cardstock for the background. I felt it tied in well with the pink retro snowflakes in the larger piece of patterned paper, as well as the pink birdhouse. This is definitely a feminine birthday card! After arranging and gluing down all the panels, I adhered the completed card front to a white A2-size card base. I will be sending this card to Operation Write Home.

Tuesday, November 18, 2014

Happy Day!


A friend of ours recently had a birthday, so I created this card for her. My inspiration came from a project that Yana Smakula did for Online Card Classes' "Watercolor for Card Makers" class earlier this year.

I first embossed the bicycle into a piece of 140 lb. watercolor paper, using Spellbinders' InSpire "Bicycle" die and the embossing sandwich for my Grand Calibur machine. I next wet the bottom of the paper with clear water, and painted it with green watercolor. After that dried, I wet the sky area, and used blue to paint that. For the bicycle, I wet each area separately, and dropped pigment onto the wet paper, letting the water help blend the color.

I die cut 3 balloons from patterned papers in my scrap stash using the smallest die from Simon Says Stamp's "Balloons" die set. I adhered them in place, popping the yellow balloon up on foam tape, and the blue one with a double layer of foam tape. I tied a piece of black thread in a bow around the bottom of each (not an easy task!). I added a small drop of Ranger Multi Medium in the matte finish to each knot, just to make sure it stayed in place. Finally, I pierced a hole through the paper under the bicycle saddle, and threaded the long end of each thread through that, and secured them on the back with a piece of tape.

I stamped the cloud image from this set by Sweet 'n Sassy Stamps onto a scrap of white cardstock using Memento Tuxedo Black ink, and die cut it with the coordinating die. I stamped the greeting from the same set on that piece. I also stamped & die cut the sun from yellow patterned paper, adding the smiley face to the center. I adhered the sun directly to the background, and popped the cloud up with foam tape.

I double-matted the watercolor panel with yellow & green cardstocks, before adhering it to a 5.5x8.5" card base. I felt the sun and balloons needed something extra, so I added some shimmer to the sun with my clear Wink of Stella brush pen, and a coat of Glossy Accents to each balloon. And, I might add, our friend really liked the card!

Sunday, November 16, 2014

Peace & Joy


This card is my final entry in Hero Arts' Holiday Challenge ("Mad About Metallics" & "Anything Goes" categories). This time, I decided to create a card for us to send out to a friend or family member. I'm sadly behind on these cards!

I chose this Operation Write Home sketch as the basis for my design:


It so happened that I have a Spellbinders "Standard Circles SM" die that is exactly 3" diameter, so that worked out perfectly for this sketch!

I opened the dove from Hero Arts' "Swirl Christmas" digital set in Photoshop. After changing the color to a light blue, I added a digital patterned paper from Dreamees to it using a clipping mask, lowering the opacity of the pattern to let the blue show through a bit. I printed the image onto a sheet of copy paper, and temporarily adhered my die cut circle over it, getting it as centered as possible. Then I ran that through the printer again, printing the dove onto the white cardstock circle. Finally, I inked around the perimeter with Chipped Sapphire Distress ink.

For the background, I cut a piece of dark blue cardstock to 4.25x5.5". I also cut a piece of patterned paper to 2.5x5.5", and a strip of silver glitter paper to go behind the focal panel (sources of both papers unknown). I adhered the patterned paper to the top of the blue cardstock, and adhered the glitter paper strip in place.

I stamped a greeting from Hero Arts' "Merry Christmas Message" set onto the lower right corner of the background, and heat embossed it with Ranger Super Fine Detail White embossing powder. Finally, I glued my focal piece in place, and adhered the entire front to an A2 card base. And that finished off this card. Once I got the dove worked out, it really went pretty quickly. I think this card would be easy to make multiples of.

I'm also entering this in a2z Scrapbooking's November challenge: "Anything Goes."

Merry Christmas


Hero Arts is having a holiday challenge at their blog. I created this card with that challenge in mind. I'm entering it in 2 categories: "Mad About Metallics" & "Anything Goes."

I began by choosing this sketch by Operation Write Home:


I chose a patterned paper from my scrap stash, and die cut it with the scalloped frame from Mama Elephant's "Femme Frames" set. To create the mats, I cut pieces of white cardstock, inked around the edges with Versamark, and sprinkled on Ranger Gold embossing powder. After melting the powder with my heat tool, I had to apply more Versamark and embossing powder, since I'd missed some spots. I glued the patterned paper piece to the larger mat, and set that under a book to dry and flatten, since the heat from the heat tool had warped the cardstock significantly.

After printing the tree from this Hero Arts digital set onto white cardstock, I die cut it with one of Spellbinders' "Classic Ovals" dies. I inked the edges with Delicata Golden Glitz pigment ink, to tie in with the gold from the patterned paper and embossed mats.

I laid the die cut oval over the now-dry background, and positioned the green cardstock strip, without adhering anything down. I just wanted to see exactly where to stamp my greeting. I chose a greeting from Hero Arts "Merry Christmas Message" set, & stamped it in Versamark onto the green cardstock. I heat embossed it with Ranger Super Fine Detail White embossing powder.

Finally, I matted the green cardstock with the other gold embossed piece, and glued that to the card front. I glued the focal panel on top, & added dots of Christmas Red Stickles to the tree for ornaments. After inking a scrap of white cardstock with more Delicata ink and zapping it with my heat tool to set it, I die cut the star using one of My Favorite Things' "Blueprints 13" dies, and glued it to the top of the tree. I will be sending this to this year's Caring Hearts Card Drive.

I'm also entering this card in a2z Scrapbooking's November challenge: "Anything Goes."

Saturday, November 15, 2014

Sweets for the Snowman

(This is my second post today. You can find my Guest DT post for Send a Smile 4 Kids here.)


The theme for the current challenge at Bugaboo Digi Stamp's challenge blog is "Show Us Your Food." I decided to use this cute marshmallow snowman with the giant candy cane.

I knew I wanted a large panel to showcase the image, and the following sketch from Operation Write Home fit the bill:


This sketch is not new to me, but I had never been able to figure out what to do with that 1" square on the right. It just seemed like an odd design element. But I finally decided to go for it and use this sketch for my card. I ended up using a snowflake button in place of the square.

I cut a piece of 140 lb. watercolor paper to size, and printed the image on that. I colored it in with Inktense pencils, using a damp paintbrush to blend the colors and add shading.

After I'd finished the coloring, I smooshed some Tumbled Glass Distress ink onto an acrylic block. I wet the are of the sky with clean water, and then applied a wash of Tumbled Glass to it, blending it out until I got the look I wanted. Then I set that panel aside to dry.

I used 2 patterned papers from my scrap stash for the background. I cut the blue stripe piece to 4.25x5.5", and added the 1.5x4.25" polka dot strip about 1" up from the bottom of the blue piece. When the focal panel had dried, I adhered that, centered on the background. I threaded blue embroidery floss through the button, tying it in a knot, and glued the button in place with a little Ranger Multi Medium (matte finish). And that finished off this card. Very simple design and coloring, but I think the relatively large image has impact. I will be donating this card to this year's Caring Hearts Card Drive, so it will hopefully cheer up a nursing home resident this holiday season!

Happy Birthday


I am very happy to be a guest DT at Send a Smile 4 Kids' Challenge Blog today! The theme for the current challenge is "Anything Goes 4 Kids." All you have to do is create a card for a child, and link it up. You can enter up to 3 cards. The sponsors this week are: Kenny K (3 digis prize), Doodle Pantry ($10 gift certificate), and Fred, She Said ($10 gift certificate). So prizes are to be had, and you also have the chance to be chosen for their Top 3! Does it get any better than that? Though not a requirement for participating, it would also be great if you could donate your card(s) to SAS4Kids!

I began my card by choosing this sketch from Operation Write Home:


I've actually been wanting to use this sketch, but never had the right image. I did have to make the banner narrower than the 7/8" indicated in the sketch, to keep from covering up the image. Otherwise, I stayed pretty true to the sketch.

I printed this image by Kenny K onto a piece of Strathmore Mixed Media paper. I colored it with Inktense pencils, using a damp paintbrush to blend the colors. This is only my second time painting skin tones, and I must admit, I was kind of nervous, especially since that was the last thing I did. I was afraid I'd mess up, and wished I'd done that first, so if I did do something wrong, I wouldn't have wasted much time on the rest of the coloring! But I think I did OK. I also added some diluted Pumice Stone Distress ink under the figures to add a bit of shadow & help ground them.

For the greeting, I stamped one from this Simon Says Stamp set, using Versafine Onyx Black ink. I heat embossed it with Recollections Clear Detail embossing powder, and colored the letters in with colored pencils. Then I cut it into a banner shape.

I used 2 patterned papers by Me and My Big Ideas for the background & the strip behind the focal image & banner. I thought the number pattern went well with a birthday card, and the blue and green star paper added a nice bit of contrast.

I decided to mat everything with yellow cardstock. To help the white pieces pop against the yellow, I inked the edges of all the pieces with Salty Ocean Distress ink before adhering them to the mats. I also blended Salty Ocean around the front of a white A2 card base, to act as a mat for the card front panel. After adhering the star panel to the background, I popped the focal panel up over that with foam tape. I added more foam tape to the bottom edge of the greeting banner, to keep it level with the focal piece, and glued the top portion directly to the focal panel. Finally, I adhered the completed front to my card base. I will be sending this card on to Send a Smile 4 Kids, hopefully to brighten a hospitalized child's day!

Thursday, November 13, 2014

Two More Holiday Cards

Online Card Classes has been having their 2014 Holiday Card Workshop the past couple of weeks. These are 2 of the cards I created as part of that.


Day 2 of class was dedicated to interactive cards. I took my inspiration for my first card from Stephanie Klauck's lesson. She used a stamp of a house, and cut the door so it would open and reveal a tree behind. I didn't have that stamp set, so I used Spellbinders' "Edwardian Door" die instead.

I die cut my door once from white cardstock, and again from burgundy, just for the door part. I cut out the burgundy piece, and glued it to the white door, sandwiching a piece of yellow cardstock in between to look like the lights were on in the house.

For the background, I wanted it basically plain, but not just flat. So I cut a piece of green cardstock to 4.25x5.5" and scored lines every 1/4", to give something of a "siding" effect. Then I glued the door onto that.

Card with "door" opened
For the tree on the inside, since I didn't have a stamp that would work for that, either, I penciled a rough triangle, and used watercolors to paint a tree. I decorated it by dotting on "ornaments" made from Christmas Red, Star Dust, & Mercury Glass Stickles. Finally, I created a snowflake shape with Star Dust on top of the tree. I also added a red tree stand, and painted grey watercolor underneath as a shadow.

To keep the door from contacting the Stickles when it was closed, I applied foam tape to the back of the panel. I centered the watercolored tree in the door opening, and adhered that panel behind the door. Finally, I adhered the entire front panel to an A2 card base.


My second card was inspired by Jennifer Rzasa's lesson for Day 3 of class, which focused on watercolor cards.

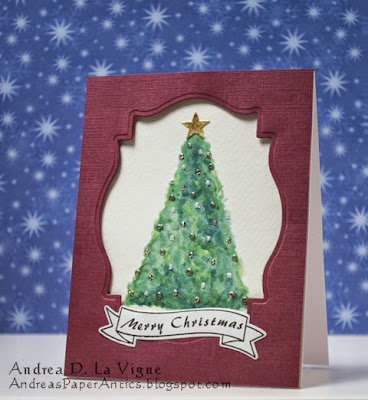
I began by die cutting & embossing a window in a piece of burgundy cardstock, using a Spellbinders' "Labels Eighteen" die. I cut a piece of watercolor paper the same size, and laid the burgundy panel on top. I made light pencil marks where the edges of the window were, and then marked out the outline of my tree. I used Masters Touch watercolors to paint the tree, and applied Mercury Glass & Star Dust Stickles, and silver dots with a Viva Paper Pen. I also die cut a star using one of the dies from My Favorite Things' "Blueprints 13" set, and glued it to the top of the tree.

I used one of the stamps from Avery Elle's "Build a Banner" set for the greeting banner. I stamped it with Versafine Onyx Black ink, and cut it with the coordinating die. I scanned it into my computer, and created the greeting in Photoshop, printing it directly on the banner.

After the "ornaments" had sufficient time to dry, I adhered the window panel over the watercolor piece with foam tape, to give a bit of dimension and shadow. I glued the banner towards the bottom, and adhered the entire panel to an A2 card base. I will be sending both cards to the Caring Hearts Card Drive, to be sent to a resident in a nursing home who might otherwise not get any Christmas cards.

Two Holiday Cards


Day 6 of Online Card Classes' "Holiday Card Workshop 2014" focused on coloring. Debby Hughes created a beautiful card that incorporated using colored pencils on kraft cardstock. This is my take on her card.

I die cut the tag from kraft cardstock using one of the dies from My Favorite Things' "Blueprints 13" set. I stamped the Christmas tree (source unknown) in Versamark, white heat embossed it, & used colored pencils to color it in. When that was done, I used Simon Says Stamp's "Falling Snow" stencil, and applied Golden Light Molding Paste over that. I sprinkled Ranger Holographic embossing powder over the wet molding paste, and let the paste dry. Finally, I heated the embossing powder until it melted, giving the snow a little glittery touch. I punched a hole in the top of the tag, and tied red and green bakers twine through it. I adhered the tag to a piece of white cardstock using foam tape.

I stamped the "Joy" (source unknown) in Versamark on a piece of vellum and heat embossed that with Ranger Gold embossing powder. I added a couple little pieces of Kool-Tak clear foam adhesive behind the "j" & "o," (so it would be level with the tag) and some glue behind the "y." Then I wrapped that around the card front panel, and glued the ends to the back.

I felt the front was a bit empty, so I dabbed spots of Heidi Swapp's "Gold" Color Shine spray ink onto the white cardstock. I also rounded the top left corner with my 1/2" Corner Chomper. I matted that onto a piece of green cardstock, and mounted it onto an A2 card base, again rounding the top left corner. I will be sending this card to Send a Smile 4 Kids, to go to a hospitalized child.

I'm entering this card in Send a Smile 4 Kids' "Happy Holidays 4 Kids" challenge.


My second card was inspired by Jennifer McGuire's lesson on Day 4--one-layer cards. I began by die cutting a window with a Spellbinders "Grand Scalloped Ovals" die in the front of a 4.5x7.25" card. I used the placement of the window to guide where I stamped my "Tree with Ornaments" image (by Hero Arts) on the inside. I colored the tree & ornaments with colored pencils, using Gamsol on a paper stump to blend the colors.

To finish the front, I white heat embossed the greeting (source unknown), centered below the window. I used a piece of paper inside the card to mask that off, and blended Tumbled Glass, Salty Ocean, and Chipped Sapphire Distress inks to create an ombre effect on the front. I went around the front with a white gel pen, to create faux stitching lines.

Inside of card
For the inside sentiment, I used one from Simon Says Stamp's "Inside Holiday Greetings" set. I stamped it below the tree (where it would be behind the bottom of the front) in Versafine Onyx Black ink. And that finished off this card.

I'm entering this card in the following challenges:

a2z Scrapbooking's November "Anything Goes"

Monday, November 10, 2014

Merry Christmas Star


I first saw this card on Pinterest, and felt it would be a great card for making multiples. Christmas is fast approaching, & I'm trying to get lots of cards done in a short amount of time, so for at least some of them, simple is better!

When I find a card that I want to CASE, I often try not to have the photo in front of me while I'm crafting, to help keep me from copying it outright. Instead, I just keep the general idea in mind, and this makes it easier for me to put my own spin on it. This card is a good example.

I began by choosing my patterned papers. I chose 2 green patterns from Lawn Fawn's "Fa La La" Petite Paper Pack & Authentique's "Believe" 6x6" paper pad. The blue patterns are from my stash (source unknown). I cut a strip from each to go on the front.

I cut the star from white cardstock using a die from this set. After cutting it, I embossed it with Cuttlebug's "D'vine Swirl" embossing folder, and lightly rubbed my Shabby Shutters Distress ink pad over the top to emphasize the embossing. I also inked the edges with Shabby Shutters.

I die cut a piece of vellum using one of My Favorite Things' "Blueprints 15" dies, & ran it through my Xyron Creative Station, to apply adhesive to the back. After gluing the patterned paper strips to an A2 card base, I adhered the vellum over them. I stamped the flourish using one of Inkadinkado's "Dot Flourishes" stamps, and heat embossed it with Ranger Silver Tinsel embossing powder. Then I glued the star over that.

For the greeting, I stamped one from Hero Arts' "Merry Christmas Message" set onto white cardstock with Versafine Onyx Black ink. I die cut & embossed it with one of Spellbinders' "Labels Eighteen" dies. With the cardstock still in the die, inked the front with Shabby Shutters, leaving a white mat around the inking. Finally I glued it to the card front, using my T-ruler to make sure it was straight.

I'm entering this card in the following challenges:

a2z Scrapbooking's November Challenge: "Anything Goes"
Hero Arts Holiday Challenge: "Anything Goes" & "Mad About Metallics"

Saturday, November 8, 2014

Dip-Dyed Christmas Tag Card


This is another card inspired by a lesson from Day 1 at Online Card Classes' "Holiday Card Workshop 2014." The theme for that day was cards that are easy to reproduce. Debby Hughes did a demonstration with dip-dyed looking tags. Apparently this is a popular look right now, at least on Pinterest. This is my take on that card.

I die cut my tag from watercolor paper using one of the dies from My Favorite Things' "Blueprints 13" set. I also die cut the snowflake 3 times, using a Spellbinders "2013 Snowflake Pendants" die. I glued the snowflakes together to create a thicker die cut. I also heat embossed a snowflake (source unknown) on white cardstock, using Ranger Silver embossing powder, and die cut it with a Spellbinders "Standard Circles LG" die.

I created the dip-dyed tag following the instructions in Debby's tutorial. I used Salty Ocean Distress ink, & sprayed it with a homemade Perfect Pearls spray. Then I spritzed my tag with plain water, and soaked up some of the ink, allowing it to move and blend. I set that aside to dry naturally, while I worked on the rest of the card.

I cut a panel of white cardstock slightly smaller than an A2 size card, and flicked Heidi Swapp "Gold" Color Shine mist onto it. I also blended Worn Lipstick Distress ink over the heat embossed snowflake piece, just to add a bit of warmth to the card.

For the greeting, I stamped and silver heat embossed one from Hero Arts "Very Merry Christmas" set onto another piece of white cardstock. I cut it into a banner shape, and inked the edges with Worn Lipstick.

Finally it was time to assemble the card. I threaded red bakers twine through the hole I'd punched in the tag, and glued the tag to the front panel. I determined where I wanted the greeting, and glued that down. Actually, if I do this type of technique again, I won't cover up as much of the tag, since you can't really see the dip-dyed effect on it. I had adhered the stamped snowflake circle to the middle of the die cut snowflake with foam tape, and just glued that assemblage to the card front. Finally, I adhered the front panel to an A2 card base, sandwiching the ends of the bakers twine in between.

I'm entering this card in the following challenges:

Hero Arts' Holiday Challenge: "White Out" & "Anything Goes"
a2z Scrapbooking's November challenge: "Anything Goes"

Thursday, November 6, 2014

Two Christmas Cards


I'm currently participating in Online Card Classes' "Holiday Card Workshop 2014." Day 1 focused on cards that are easy to reproduce. I used Kristina Werner's example for my card.

I first cut a piece of navy cardstock to size, and blended Black Soot Distress ink over the top third or so. I stamped & heat embossed my focal image (source unknown) with Ranger Super Fine Detail White embossing powder. Then I taped the "Falling Snow" stencil by Simon Says Stamp over it, and applied Golden Light Molding Paste through the stencil.

After the molding paste had dried, I adhered the navy panel to a piece of kraft cardstock cut to 4.25x5.5". I tied red bakers twine around the kraft, and added faux stitching with a white gel pen above the main panel. I adhered the finished card front to an A2 size card base, and rounded the upper right corner with my 1/2" Corner Chomper.


Day 3's focus was on watercolor. I first printed the "Two Snowmen" image from Bugaboo Digi Stamps onto a piece of 140 lb. watercolor paper. After letting the ink dry for a bit, I colored in the snowmen's accessories, arms, and the potted tree with Inktense pencils, blending with a damp paintbrush. I added subtle shading to the snowmen's bodies & the ground with a light blue watercolor pencil and my brush. It doesn't show up well in the photo, but it adds just a bit of depth. Finally, I used a larger brush to wet the background with clear water, then added blue watercolor pigment to create a sky. I just kept adding pigment and moving it around until I got the look that I wanted. Finally, I set that aside to dry.

I stamped the greeting (source unknown) onto a piece of light blue cardstock using Versafine Onyx Black ink, and cut it into a narrow strip. I also cut a piece of green patterned paper from my scrap stash to a standard A2 card size. I adhered the dry watercolor panel to the background, and glued the greeting strip underneath. I will be sending this card to Send a Smile 4 Kids, hopefully to brighten the spirits of a hospitalized child this holiday season.

I'm entering this card in the following challenges:

Send a Smile 4 Kids "Happy Holidays 4 Kids"
Catch the Bug's "Anything Goes"

Tuesday, November 4, 2014

Rustic Merry Christmas


Even though it's barely November, my holiday card creating is getting in full-swing. Christmas will be here before we know it, and I'm not one who likes to send my Christmas cards in February!

I got the inspiration for this card from this blog post I found through Pinterest. I liked the simple design, and that this is one that could be made in multiples easily.

I began by cutting kraft cardstock to 4.25x5.5". I stamped the greeting from this Hero Arts set towards the bottom, using Hero Arts Cup o' Joe mid-tone shadow ink. Next I ran the panel through my die cutting machine, with The Paper Studio's "A2 Snowflake" embossing folder, to emboss the top portion of the card. I lightly rubbed my Ranger Adirondack Snow Cap pigment ink pad over the embossing, to highlight the snowflakes.

I cut a piece of ribbon to go between the embossed area & greeting, and adhered it with my ATG tape runner. I felt the bottom was still a bit too bland, though, so I used my Sakura white gel pen to add faux stitching along the side & bottom edges. Finally, I adhered it to an A2 card base. And that finished this card. Like I said, fairly quick and easy to mass-produce.

I'm entering this card in the following challenges:

Simon Says Stamp's Wednesday "Anything Goes"
a2z Scrapbooking's November challenge: "Anything Goes"
Hero Arts Holiday Challenge: "Anything Goes"

Sunday, November 2, 2014

Christmas Decorating Mice


I found this adorable "Gingerbread House" stamp by Stampendous at Michael's last week, and had to have it! Not only is it cute, but I felt it would make a few nice, unique Christmas cards. Because of the detail & coloring involved, though, this is definitely not an image for mass-produced cards!

I stamped the image with Ranger Archival Jet Black ink onto a piece of Strathmore Mixed Media paper. Because of the detail in the image, I wanted a smooth surface, which I can't get with the watercolor paper I have. Since I knew I would be coloring this with my Inktense pencils and water, I also needed a heavyweight paper that wouldn't pill. Mixed Media paper to the rescue! I colored the image, layering colors in places to get the look I wanted. After the colors had dried, I went over the candies with my clear Wink of Stella glitter brush marker. It doesn't show up in the photo, but it adds a nice shimmer in real life.

To add a bit of shadow around the bottom mouse & the gingerbread house, I smooshed a bit of Pumice Stone Distress ink onto an acrylic block, and picked up some color with my water brush. I spread it along the bottom of the image, which also helped ground the mice & house. I also went over some of the icing with diluted Iced Spruce Distress ink where I thought it would be in shadow. It's subtle, but I think it adds a bit of depth & dimension.

After I finished my watercoloring, I trimmed the panel down slightly, and rounded the corners with the 1/2" side of my We R Memory Keepers Corner Chomper. I matted it on a piece of pink cardstock, again rounding the corners, and then matted that with burgundy. I adhered it to the front of an A2 card base, and rounded all 4 corners of my card.


For the inside sentiment, I chose one from Hero Arts' "Very Merry Christmas" set. I stamped it on another piece of the same pink cardstock, rounded the corners, matted it with burgundy, rounded those corners, and adhered it to the inside of my card base. And that finished this card. Quite time consuming--mostly with the coloring--but well worth it for a special card. I will be sending this in for this year's Caring Hearts Card Drive. You can read more about this special project, which sends cards to nursing home residents, here.

I'm entering this card in the following challenges:

Simon Says Stamp's Monday "Treats"
Simon Says Stamp's Wednesday "Anything Goes"
Hero Arts Holiday Challenge "Anything Goes"